GettingStarted
The retro-g15 emulator is an implementation of the Bendix G-15D computer system. The G-15 was a mid-1950s, vacuum tube, binary, drum-memory system. This page describes how to set up and start the emulator.
The emulator runs in a standard graphical web browser. It is written entirely in JavaScript, with HTML and CSS used to define the user interface. The emulator displays a replica of the G-15 control panel in your browser window. You operate and interact with the emulated G-15 through this control panel and your workstation keyboard. The intent is that you work with the emulator in much the same way you would have with a real G-15.
To set up and use the web-based emulator, you will need to do the following things, which are discussed in more detail in the sections below:
- Use a suitable web browser -- at present that means Mozilla Firefox, Google Chrome, Apple Safari, or the newer version of Microsoft Edge that is based on WebKit. See the following section on The Web Browser.
- Optionally, download and set up the emulator files on a web server. Instead of using your own web server, however, you can run the emulator from our hosting site. See the following sections on The Web Server and The Emulator Files.
- In your web browser, access the
webUI/G15.htmlhome page on the web server to run the emulator. See the following section on Starting the Emulator.
The retro-g15 emulator must be run in a modern web browser, as we are taking advantage of many features in HTLM5, its related DOM APIs, and CSS 3. It should run fine on any of the popular modern browsers. It has been tested in Mozilla Firefox, Google Chrome, and Microsoft Edge under Windows, and in Apple Safari under OS X. The emulator does not work in Microsoft Internet Explorer or the original versions of Microsoft Edge that are not based on WebKit.
You will need a reasonably powerful workstation for the browser. Emulation of the G-15 instructions requires almost nothing, but update of the panels and I/O devices can be graphics-intensive, and requires a fair amount of horsepower. Any standard PC manufactured since 2010 should be adequate. It also helps to have a good-sized display. The minimal system configuration should run on tablets and smart phones, but you will need to use an external keyboard.
The easiest way to use the emulator is to load it from the web site we have set up on a hosting service. Just point your browser to the following URL:
The web server is needed only to load the emulator into your local workstation. Once the emulator is loaded and running, it requires no further access to the server.
If you choose not to use our hosting site, or some other site that is already set up to serve the emulator files, you will need to configure a web server and load the emulator files to it. See the appendix Setting Up a Web Server for the necessary information. The emulator will likely not run directly from your local file system, although it can be turned into a standalone application using Electron.
This section describes how to run the emulator and prepare it to run G-15 programs.
To run the emulator from our hosting site:
- In your browser, access the page at http://www.phkimpel.us/Bendix-G15/.
- Click the "G-15 Emulator Home Page" link on that page.
- On the resulting page, click the blue Start the Emulator button.
To run the emulator from another web server:
- Open the
webUI/G15.htmlpage under the URL for the virtual directory you have set up. - On the resulting page, click the blue Start the Emulator button.
The emulator home page should look similar to this:

When you start the emulator, it will overlay the home page with the emulator's Control Panel. The browser window may be resized and moved around your screen in any way you wish.
You may minimize the window, but do not close it -- this will terminate the emulator and discard any output you may have generated. The emulator may display an alert if you attempt to close its window, but this is browser-dependent. Most modern browsers will display a close alert only if you have previously interacted with the window in some way, e.g., clicked on one of its elements.
In addition, while the emulator is running, it is not a good idea to minimize the control panel window or make another tab active in that window. Current versions of at least Firefox and Chrome slow down the execution of scripts running from minimized windows or inactive tabs, which in turn will cause the emulator to run very slowly. It is best to open the home page in its own window.
When it initializes, the emulator preloads the Paper Tape Reader with an image of a bootable paper tape containing the PPR (Program Preparation Routine) utility program. To run this utility immediately after starting the emulator, do the following:
- Click the green RESET button on the Control Panel. The system will read two blocks from the tape image, the Number Track required by the hardware and the PPR loader.
- Click the GO button of the COMPUTE switch, which will run the loader and read four more blocks from the tape image.
- Set the COMPUTE switch back to its middle (off) position.
- Press and hold the ESC key (in the emulator, this works like a shift key) to turn on the ENABLE switch, press the "
p" key, and then release the ESC key. This will load the next block of the tape containing decimal conversion and input control routines. - Set the COMPUTE switch back to the GO position.
- See the G-15 Operating Manual, Part II, "DIRECT CONTROL OF COMPUTER OPERATION," for details.
This preloaded tape image is provided as a convenience. If you wish to load different software, before clicking RESET, click the UNLOAD button on the right-hand side of the reader's progress bar, use the file picker control to load the tape image you wish, and then click RESET. Note that when you click the RESET button, the system expects you to have a tape image loaded that has as its first block the data for the system's Number Track. The system reset process reads that block and loads it to the appropriate line on the drum, then reads one more block into memory. This second block is typically a loader for another program.
To shut down the emulator, double-click the OFF button next to the red DC lamp. This will stop the processor if it is running and discard any unsaved output.
The Bendix PDF document archive at bitsavers.org has scans of several manuals for the G-15. You may wish to refer to the following in particular:
- G-15 Operating Manual.
- G-15 Programmers Reference Manual.
- G-15 Coding Manual.
- G-15 Theory of Operation.
Since the retro-g15 emulator user interface is designed to mimic the Control Panel and typewriter of a real G-15, you must be somewhat familiar with the way those devices worked. The best guide is the Operating Manual cited above.
This section describes setting up and configuring a web server to host the retro-g15 emulator.
If you use your own web server, it can run on your local workstation and serve files from there, or you can access some other server remotely over the Internet.
If you need a small, simple web server to host the emulator locally, we have had good success with mongoose (https://github.com/cesanta/mongoose). It can run on the same workstation as your browser to serve the emulator files using the loop-back port (localhost or 127.0.0.1). Versions are available that run under Windows, Linux, UNIX, and Mac OS. It is easy to set up. Under Windows, it can run either on demand as a user program or as a Windows Service.
Unless you are running your web server on the same workstation as your web browser, you do not need to download or store the emulator scripts on your workstation. You load it as you would any other web page.
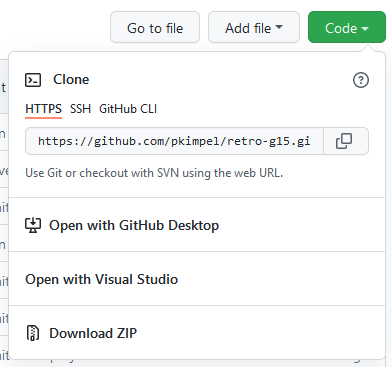
If you want to set up your own web server, the easiest way to obtain the emulator files is to download them from our GitHub project repository. You can clone the project with Git or Subversion, or download a ZIP archive of the files. To do this, click the green Code button on the right-hand side of the page and select Download ZIP:
The emulator is hosted in two directories of files:
-
emulator/contains the Processor and Drum modules, plus others. -
webUI/contains everything else you need to run the system. In particular, it contains the Control Panel user interface and the peripheral device drivers.
A third directory, software/, contains source and object code for the software projects and miscellaneous utilities that have been developed with the emulator. These are described in other wiki articles and the README files embedded within their directories.
A fourth directory, webSite/, contains the web pages for the hosting site. You are welcome to use these if you wish. The home page for the hosting site is index.html and must be located at the root of the project files. Use the "G-15 Emulator Home Page" link on that page to run the emulator.
The general steps to set up the emulator files are:
- Create a new virtual directory for the web server, e.g.,
/retro-g15/, to hold the emulator files. - Download the emulator release as described above.
- Place the files in the directory on your server's file system to which the virtual directory is mapped. You will need the files from at least the
emulator/andwebUI/directories. Those directories must reside at the root of the virtual directory. - If you choose to use the
webSite/files, that directory and theindex.htmlfile must also be at the root of the virtual directory. - To support the web fonts used by the emulator and hosting site, you may need to create a MIME-type mapping in the web server configuration for at least one of the following file extensions:
-
.wofftoapplication/font-woff -
.ttftoapplication/font-sfnt
-