![]()
Logo Usage (CC0 1.0)
The Tart logo (doc/logo.png) is licensed under CC0 1.0 Universal. You may use it freely for any purpose without attribution. See doc/LOGO_LICENSE for details.


![]()
Important
We are considering moving this repository to a different organization. As part of that move, the library group name may change.
Tart is a state management framework for Kotlin Multiplatform.
- The data flow is one-way, making it easy to reason about.
- Because state is immutable during processing, you don’t have to worry about side effects.
- Code becomes more declarative.
- Writing tests is straightforward.
- Works across multiple platforms.
- Enables code sharing and consistent logic across platforms.
The architecture is inspired by Flux and is as follows:

implementation("io.yumemi.tart:tart-core:<latest-release>")Let’s take a simple counter app as an example. First, define the State and Action classes.
data class CounterState(val count: Int) : State

sealed interface CounterAction : Action {
    data object Increment : CounterAction
    data object Decrement : CounterAction
}
Create a Store using the Store{} DSL and an initial State.
val store: Store<CounterState, CounterAction, Nothing> = Store(CounterState(count = 0)) {}

// or, use the initialState() specification
val store: Store<CounterState, CounterAction, Nothing> = Store {

    initialState(CounterState(count = 0))
}
Define how Actions change State using the state{} and action{} blocks.
Specify the resulting State with nextState().
If no nextState() is specified, the current state remains unchanged.
val store: Store<CounterState, CounterAction, Nothing> = Store(CounterState(count = 0)) {

    state<CounterState> {

        action<CounterAction.Increment> {
            nextState(state.copy(count = state.count + 1))
        }

        action<CounterAction.Decrement> {
            if (0 < state.count) {
                nextState(state.copy(count = state.count - 1))
            } else {
                // do not change State
            }
        }
    }
}
For conditional or complex updates, use nextStateBy{} to compute and return the new state.
nextStateBy {
    // ...

    val newCount = ...

    state.copy(count = newCount)
}
The Store setup is complete. Keep the store instance in a ViewModel (or similar).
Dispatch an Action from the UI using the Store's dispatch() method.
// example in Compose
Button(
    onClick = { store.dispatch(CounterAction.Increment) },
) {
    Text(text = "increment")
}
The new State is exposed via the Store's .state (StateFlow), so render it in the UI.
Define your Event class and set it as the third type parameter of Store.
sealed interface CounterEvent : Event {
    data class ShowToast(val message: String) : CounterEvent
    data object NavigateToNextScreen : CounterEvent
}
val store: Store<CounterState, CounterAction, CounterEvent> = Store(CounterState(count = 0)) {
// ...
}In an action{} block, specify an Event with event().
action<CounterAction.Decrement> {
    if (0 < state.count) {
        nextState(state.copy(count = state.count - 1))
    } else {
        event(CounterEvent.ShowToast("Can not Decrement.")) // raise event
    }
}
Collect the Store's .event (Flow) in the UI and handle it.
Have repositories and UseCase classes available in your store creation scope and use them inside action{} blocks.
fun CounterStore(
    counterRepository: CounterRepository,
): Store<CounterState, CounterAction, CounterEvent> = Store(CounterState(count = 0)) {

    state<CounterState> {

        action<CounterAction.Load> {
            val count = counterRepository.get() // load
            nextState(state.copy(count = count))
        }

        action<CounterAction.Increment> {
            val count = state.count + 1
            counterRepository.set(count) // save
            nextState(state.copy(count = count))
        }

        // ...
TIPS: Define functions as needed
Processing other than changing the State may be defined as functions, as they tend to become complex and lengthy.
fun CounterStore(
    counterRepository: CounterRepository,
): Store<CounterState, CounterAction, CounterEvent> = Store(CounterState(count = 0)) {

    // define as a function
    suspend fun loadCount(): Int {
        return counterRepository.get()
    }

    state<CounterState> {

        action<CounterAction.Load> {
            nextState(state.copy(count = loadCount())) // call the function
        }

        // ...
You may also define them as extension functions of State or Action.
In the previous examples, the State was single. If you need multiple States (for example, a UI during data loading), define them explicitly.
sealed interface CounterState : State {
    data object Loading : CounterState
    data class Main(val count: Int) : CounterState
}
fun CounterStore(
counterRepository: CounterRepository,
): Store<CounterState, CounterAction, CounterEvent> = Store(CounterState.Loading) {
state<CounterState.Loading> { // for Loading state
action<CounterAction.Load> {
val count = counterRepository.get()
nextState(CounterState.Main(count = count)) // transition to Main state
}
}
state<CounterState.Main> { // for Main state
action<CounterAction.Increment> {
// ...In this example, the CounterAction.Load action needs to be issued from the UI when the application starts.
If you want to run logic when a State starts, use the enter{} block (similarly, you can use the exit{} block if necessary).
fun CounterStore(
    counterRepository: CounterRepository,
): Store<CounterState, CounterAction, CounterEvent> = Store(CounterState.Loading) {

    state<CounterState.Loading> {
        enter {
            val count = counterRepository.get()
            nextState(CounterState.Main(count = count)) // transition to Main state
        }
    }

    state<CounterState.Main> {
        action<CounterAction.Increment> {
            // ...
The state diagram is as follows:
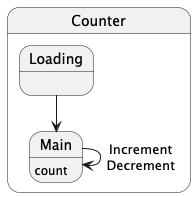
This framework's architecture can be easily visualized using state diagrams. It would be a good idea to document it and share it with your development team.
If you prepare a State for error display and handle the error in the enter{} block, it will be as follows:
sealed interface CounterState : State {
    // ...
    data class Error(val error: Exception) : CounterState
}
val store: Store<CounterState, CounterAction, CounterEvent> = Store {
// ...
state<CounterState.Loading> {
enter {
try {
val count = counterRepository.get()
nextState(CounterState.Main(count = count))
} catch (e: Exception) {
nextState(CounterState.Error(error = e))
}
}
}
}This works, but you can also handle errors with the error{} block.
val store: Store<CounterState, CounterAction, CounterEvent> = Store {
    // ...

    state<CounterState.Loading> {

        enter {
            // no error handling code
            val count = counterRepository.get()
            nextState(CounterState.Main(count = count))
        }

        // more specific exceptions should be placed first
        error<IllegalStateException> {
            // ...
            nextState(CounterState.Error(error = error))
        }

        // more general exception handlers should come last
        // you can also catch just 'Exception' and branch based on the type of the error property inside the block
        error<Exception> { // catches any remaining exceptions
            // ...
            nextState(CounterState.Error(error = error))
        }
    }
}
Errors can be caught not only in the enter{} block but also in the action{} and exit{} blocks.
In other words, your business logic errors can be handled in the error{} block.
On the other hand, uncaught errors in the entire Store (such as system errors) can be handled with the exceptionHandler() specification:
val store: Store<CounterState, CounterAction, CounterEvent> = Store {
    // ...

    exceptionHandler(...)
}You can use the launch{} specification in the enter{} block to collect flows and dispatch Actions.
This is useful for connecting external data streams to your Store:
state<MyState.Active> {
    enter {
        // launch a coroutine that lives as long as this state is active
        launch {
            // collect from an external data source
            dataRepository.observeData().collect { newData ->
                // update state with the new data in a transaction
                transaction {
                    nextState(state.copy(data = newData))
                }
            }
        }
    }
}
This pattern lets your Store react to external data changes automatically, such as database updates, user preference changes, or network events. The flow collection will be automatically cancelled when the State changes to a different State, making it easy to manage resources and subscriptions.
The Store operates using Coroutines, and the default CoroutineContext is EmptyCoroutineContext + Dispatchers.Default.
Specify it to align the Store's Coroutines lifecycle with another context or to change the execution thread.
val store: Store<CounterState, CounterAction, CounterEvent> = Store {
    // ...

    coroutineContext(...)
}
If you don’t use an auto-disposed scope like ViewModel's viewModelScope or Compose's rememberCoroutineScope(), call Store's .dispose() method explicitly when the Store is no longer needed.
Then, processing of all Coroutines will stop.
You can specify the execution thread (CoroutineDispatchers) in enter{}, exit{}, action{}, error{}, and launch{} blocks, allowing you to locally control which thread each specific operation runs on.
enter(Dispatchers.Default) {
    // work on CPU thread..

    launch(Dispatchers.IO) {
        // This code runs on IO thread
        val updates = dataRepository.observeUpdates()
        updates.collect { newData ->
            // ...
        }
    }
}
Alternatively, you can use Coroutines' withContext().
enter {
    withContext(Dispatchers.Default) {
        // work on CPU thread..

        withContext(Dispatchers.IO) {
            // This code runs on IO thread
            launch {
                val updates = dataRepository.observeUpdates()
                updates.collect { newData ->
                    // ...
                }
            }
        }
    }
}You can prepare a StateSaver to automatically handle State persistence:
val store: Store<CounterState, CounterAction, CounterEvent> = Store {
    // ...

    stateSaver(...)
}Coroutines like Store's .state (StateFlow) property and .event (Flow) property cannot be used on iOS, so use the .collectState() and .collectEvent() methods.
If the State or Event changes, you will be notified through these callbacks.
contents
You can use Store's .state (StateFlow), .event (Flow), and .dispatch() directly, but we provide a mechanism for Compose.
implementation("io.yumemi.tart:tart-compose:<latest-release>")Create an instance of the ViewStore from a Store using the rememberViewStore() function.
For example, if you have a Store in ViewModels, it would look like this:
fun CounterStore(
    coroutineContext: CoroutineContext,
    counterRepository: CounterRepository,
): Store<CounterState, CounterAction, CounterEvent> = Store {
    // ...

    coroutineContext(coroutineContext)
}
@HiltViewModel
class CounterViewModel @Inject constructor(
counterRepository: CounterRepository,
) : ViewModel() {
val store = CounterStore(
coroutineContext = viewModelScope.coroutineContext,
counterRepository = counterRepository,
)
}@Composable
fun CounterScreen(
// create an instance of ViewStore
viewStore: ViewStore<CounterState, CounterAction, CounterEvent> = rememberViewStore {
hiltViewModel<CounterViewModel>().store
},
) {
// ...
// pass the ViewStore instance to lower components if necessary
YourComposable(
viewStore = viewStore,
)
}Alternatively, you can use the Store{} DSL directly in the ViewModel as follows, but note that in this case you need tests for CounterViewModel, and sharing a Store across multiple platforms becomes harder.
@HiltViewModel
class MainViewModel @Inject constructor(
    counterRepository: CounterRepository,
) : ViewModel() {

    val store: Store<CounterState, CounterAction, CounterEvent> = Store {
        // ...

        coroutineContext(viewModelScope.coroutineContext)
    }
}
You can create a ViewStore instance without using ViewModel as shown below:
fun CounterStore(
    coroutineContext: CoroutineContext,
    stateSaver: StateSaver<CounterState>,
    counterRepository: CounterRepository,
): Store<CounterState, CounterAction, CounterEvent> = Store {
    // ...

    coroutineContext(coroutineContext)
    stateSaver(stateSaver)
}
@Composable
fun CounterScreen(
viewStore: ViewStore<CounterState, CounterAction, CounterEvent> = rememberViewStore {
CounterStore(
coroutineContext = rememberCoroutineScope().coroutineContext, // or, specify the autoDispose option in rememberViewStore {}
stateSaver = rememberStateSaver(), // state persistence during screen rotation, etc.
counterRepository = CounterRepositoryImpl(),
)
},
) {
// ...
}If you inject instances such as Repository using a DI library, it is useful to create a class like the following.
class CounterStoreContainer(
    private val counterRepository: CounterRepository,
) {
    fun build(coroutineContext: CoroutineContext, stateSaver: StateSaver<CounterState>): Store<CounterState, CounterAction, CounterEvent> = Store {
        // ...

        coroutineContext(coroutineContext)
        stateSaver(stateSaver)
    }
}If there’s a single State, just use ViewStore's .state property.
Text(
    text = viewStore.state.count.toString(),
)
If there are multiple States, use the .render() method for the target State.
viewStore.render<CounterState.Main> {
    Text(
        text = state.count.toString(),
    )
}
When drawing the UI, if it does not match the target State, the .render() will not be executed.
Therefore, you can define components for each State side by side.
viewStore.render<CounterState.Loading> {
    Text(
        text = "loading..",
    )
}

viewStore.render<CounterState.Main> {
    Text(
        text = state.count.toString(),
    )
}
If you use lower components in the render() block, pass its instance.
viewStore.render<CounterState.Main> {
    YourComposable(
        viewStore = this, // ViewStore instance for CounterState.Main
    )
}
@Composable
fun YourComposable(
// Main state is confirmed
viewStore: ViewStore<CounterState.Main, CounterAction, CounterEvent>,
) {
Text(
text = viewStore.state.count.toString()
)
}Use ViewStore's .dispatch() with the target Action.
Button(
    onClick = { viewStore.dispatch(CounterAction.Increment) },
) {
    Text(
        text = "increment"
    )
}Use ViewStore's .handle() with the target Event.
viewStore.handle<CounterEvent.ShowToast> { event ->
    // do something..
}
In the above example, you can also subscribe to the parent Event type.
viewStore.handle<CounterEvent> { event ->
    when (event) {
        is CounterEvent.ShowToast -> // do something..
        is CounterEvent.GoBack -> // do something..
// ...Create an instance of ViewStore directly with the target State.
@Preview
@Composable
fun LoadingPreview() {
    MyApplicationTheme {
        CounterScreen(
            viewStore = ViewStore {
                CounterState.Loading
            },
        )
    }
}
Therefore, if you prepare only the State, it is possible to develop the UI.
contents
You can create extensions that work with the Store.
To do this, create a class that implements the Middleware interface and override the necessary methods.
class YourMiddleware<S : State, A : Action, E : Event> : Middleware<S, A, E> {
    override suspend fun afterStateChange(state: S, prevState: S) {
        // do something..
    }
}
Apply the created Middleware as follows:
val store: Store<CounterState, CounterAction, CounterEvent> = Store {
    // ...

    // add Middleware instance
    middleware(YourMiddleware())

    // or, implement Middleware directly here
    middleware(
        object : Middleware<CounterState, CounterAction, CounterEvent> {
            override suspend fun afterStateChange(state: CounterState, prevState: CounterState) {
                // do something..
            }
        },
    )

    // add multiple Middlewares
    middlewares(..., ...)
}
Note that State is read-only in Middleware.
Each Middleware method is a suspending function, so it can be run synchronously (not asynchronously) with the Store. Because it runs synchronously and can block the Store, use a separate CoroutineScope for long-running work.
In the next section, we introduce built-in Middleware.
The source code is the :tart-logging and :tart-message modules in this repository, so you can use it as a reference for your Middleware implementation.
Middleware for logging Store operations.
implementation("io.yumemi.tart:tart-logging:<latest-release>")Apply the simpleLogging() middleware factory function to your Store to log all actions, events, state changes, and errors.
val store: Store<CounterState, CounterAction, CounterEvent> = Store {
    // ...

    middleware(simpleLogging())
}
You can create custom logging middleware by extending the LoggingMiddleware class if you need more control over the logging behavior.
middleware(
    object : LoggingMiddleware<CounterState, CounterAction, CounterEvent>(
        logger = YourLogger() // specify your logger
    ) {
        // override methods
        override suspend fun beforeStateEnter(state: CounterState) {
            log(...)
        }
    },
)Middleware for sending messages between Stores.
implementation("io.yumemi.tart:tart-message:<latest-release>")First, prepare classes for messages.
sealed interface MainMessage : Message {
    data object LoggedOut : MainMessage
    data class CommentLiked(val commentId: Int) : MainMessage
}
Apply the receiveMessages() middleware factory function to the Store that receives messages.
val myPageStore: Store<MyPageState, MyPageAction, MyPageEvent> = Store {
    // ...

    middleware(
        receiveMessages { message ->
            when (message) {
                MainMessage.LoggedOut -> dispatch(MyPageAction.doLogoutProcess)
                // ...
            }
        }
    )
}
Define the message() specification at any point in the Store that sends messages.
val mainStore: Store<MainState, MainAction, MainEvent> = Store {
    // ...

    state<MainState.LoggedIn> { // leave the logged-in state
        exit {
            message(MainMessage.LoggedOut)
        }
    }
}Tart's architecture makes writing unit tests for your Store straightforward.
For test examples, see the commonTest directory in the :tart-core module.