How To (MiniGL 1.x)
MiniGL aims for a fast 2D game development with Ruby. So let's go through a fast tutorial on how to get a game running with MiniGL.
MiniGL is available from RubyGems, so all you will need to do is:
gem install minigl -v 1.3.10
The "-v 1.3.10" indicates the latest version of the 1.x series. Of course you can specify any other version with this argument.
WARNING: MiniGL has a dependency on the Gosu gem, which has its own dependencies for building and installation (click here for details). After you install these dependencies, try running gem install minigl again.
To make sure that everything went smoothly in the installation, you should run some tests. In order to do that, you must first navigate to the gem's root directory. The path should be something like <YOUR_RUBY_HOME>/gems/ruby-<VERSION>/gems/minigl-<VERSION>.
Once you get there, you may execute two different tests: the unit tests and the "game" tests. To run unit tests, simply do:
rake test
The output must show 0 errors and 0 failures, of course. The "game" tests are simply two very basic "games" provided along with the gem itself. Run them with:
ruby test/game.rb
and
ruby test/iso_game.rb
If the window opens and shows some image and text, in the first case, and a green isometric map in the second, then it's all right. Let's get to the real work!
NOTICE: you can generate HTML documentation for MiniGL by running, in the same directory above:
rake doc
A "doc" folder will be created. Inside of it, open "index.html" for the documentation home page. Or, you could just access this page.
To build a game with MiniGL, you must create a class which inherits from Gosu::Window and implement some methods like in the example below:
# file: game.rb

require 'minigl'
include AGL

class MyGame < Gosu::Window
  def initialize
    super 800, 600, false # creating a 800 x 600 window, not full screen
    Game.initialize self  # initializing MiniGL for this window
  end

  def update
    # game logic here
  end

  def draw
    # drawing logic here
  end
end

game = MyGame.new
game.show
By running the code above, you should see a 800 x 600 window completely filled with black. Note the include AGL in the beginning of the file. It is recommended to include this module so you can refer easily to the MiniGL classes (yes, the main MiniGL namespace is "AGL", for historical reasons, I'd say). In this example, the only class from the AGL module is Game.
OK, a black window isn't properly a game, so let's add something to it. Loading and drawing images with MiniGL is pretty easy, but it requires that your project follows a certain directory hierarchy. Basically, in the same directory as the executable ruby file, you should place a directory called "data". Inside of "data", you must create a directory for each type of resource, i.e., images, sounds, fonts, etc. For images, the directory must be named "img"; for tilesets, it must be "tileset"; for sound effects, "sound"; for songs, "song"; and for fonts, "font". The example below illustrates a possible directory hierarchy for a MiniGL project:
.
|- game.rb
|- data
   |- img
      |- img1.png
      |- img2.png
   |- sound
      |- se1.wav
   |- song
      |- bgm1.ogg
So, let's say we want to draw "img1.png" in the top left corner of the screen. We need to add the following code to the MyGame class:
...
def initialize
  ...
  @img = Res.img :img1 # loading
end
...
def draw
  @img.draw 0, 0, 0    # drawing
end
...
That's it! Some points to be observed:
- If you want to use subdirectories inside of "img" to better organize your images, then all you need to do to access files in the subdirectory is to pass the argument to
Res.imgwith underscores replacing each "/" in the path to the file. For example, to load the file "img/sprite/1.png", you would write:
@img = Res.img :sprite_1Please note that this implies that your file names must not have underscores.
- When drawing an image, three coordinates are given, x, y and z. The top left corner represents x = 0 and y = 0. The x coordinate raises from left to right and y raises from top to bottom. The z coordinate defines the order in which images are painted, so images with higher z indices will cover images with lower z indices. If two images are drawn in the same z coordinate, the order of drawing is the same as of the calls to the
drawmethod.
You might be wondering what is that Res thing that we use for loading images. It is actually a class (from the AGL namespace) which takes care of loading and unloading not only images but other types of resources, like sounds, songs and fonts too. Most of its methods have some parameters with default values, so let's take a look at the ones related to images:
# Inside of the Res class...
def self.img id, global = false, tileable = false, ext = ".png"
  ...
end
The first parameter, id, is that symbol representing the path to the image, relative to the "data/img" directory.
global is more related to the resource management purposes: one of the advantages of using Res rather than loading images in the "gosu" way, is that when you ask to load an image that has already been loaded, it doesn't do all the processing again, it just returns a reference to the previously loaded image. But suppose you have a game with various stages, each stage with a different scenario and different creatures. You might not want the sprites for those "specific" creatures to be in memory during the whole execution time of the game. So, when the player leaves the stage, you call Res.clear and all non-global images will be released. Images loaded with global set to true - a good example for that are elements of the game interface, like buttons or cursors -, though, will remain in memory.
The tileable parameter basically encapsulates an option provided by Gosu. When you want an image to be used as tiles, i.e., you will draw this image many times, sibe by side, then you will want to set tileable to true. This is not exactly the same as loading a tileset, which we will cover later.
Finally, the ext parameter represents the extension for the file being loaded (note that you didn't need to provide it in the symbol). The default is PNG because it's the most common format that supports alpha (opacity), and most sprites in a game will make use of that. For backgrounds, though, you might want to load some JPGs, so you just need to go a little further in the method call.
Now that we have drawn our image, let's make the game a bit more interactive (actually, it is not interactive at all by this moment). You can easily handle user input from the mouse and keyboard with MiniGL (and a joystick module is under construction...). All you need is to use the methods from the KB and Mouse classes (again, from AGL).
First, let's say you want to move the image according to the arrow keys pressed by the user. We will need variables for the x and y coordinates, and we'll change those variables as the keys are pressed. Look:
class MyGame ...
  def initialize
    ...
    @x = 0
    @y = 0
  end

  def update
    KB.update
    @y -= 1 if KB.key_down? Gosu::KbUp
    @x += 1 if KB.key_down? Gosu::KbRight
    @y += 1 if KB.key_down? Gosu::KbDown
    @x -= 1 if KB.key_down? Gosu::KbLeft
  end

  def draw
    @img.draw @x, @y, 0
  end
end
We added just seven lines and now the player freely controls the position of the image! Notice the following:
- You must call
KB.updateto have the keyboard events refreshed in every frame. - The parameter for the
key_down?method (and other methods ofKBthat we will see later) is a constant declared in the Gosu namespace. I didn't change that because there are lots of constants like that, and I felt it would be a waste of memory with little gain. You may include the Gosu namespace as well, to make it easier to type.
Good, but not really impressive, as you could easily check if a key is down using Gosu's Window#is_key_down? method. However, the KB class becomes really handy when you have to check for other kinds of events on the keyboard: whether the key has been pressed in the current frame, whether it's been released in the current frame, whether it's been continuously held down in the last frames... The only method provided by Gosu is is_key_down?, whereas MiniGL provides, alongside KB.key_down?, these:
-
KB.key_pressed?: returnstrueif the key passed as argument has been pressed in the current frame, i.e., it is down now, but wasn't down in the previous frame. -
KB.key_released?: the opposite ofkey_pressed?, returnstrueif the key was down in the previous frame and is not currently down. -
KB.key_held?: returnstrueif the key has been held down for the last 40 frames, and respects an interval of 5 frames after that. Actually, these values (40 and 5) are the default values, but they can be changed in theGame.initializecall, as the third and fourth parameters, respectively.
Okay, now let's take a look in the Mouse class. Say you want to draw the image in the point where the user clicks. Well, that will be easy:
class MyGame ...
  ...
  def needs_cursor?
    true
  end

  def update
    ...
    Mouse.update
    if Mouse.button_pressed? :left
      @x = Mouse.x - @img.width / 2
      @y = Mouse.y - @img.height / 2
    end
  end
end
And it's done. Clarifying the details:
- The
needs_cursor?method is also provided by Gosu, and simply defines whether the default system cursor will appear over the game window. In this case we had it enabled to allow the user to see where he is clicking. - The same rule of
KB.updateapplies toMouse.update. - We used
@img.widthand@img.heightto place the image nicely centered on the point where the click happened. - Differently from the
KBmethods, theMousemethods receive a neat symbol indicating which mouse button to check. The available values are:left,:middleand:right.
Using the Mouse.button_down? and Mouse.button_released? methods, you can check the same kinds of events we already described for the keyboard. Moreover, the Mouse class provides a double_click? method, which allows you to check for a double click on any of the three mouse buttons! Finally, there's also an over? method, to which you pass parameters of a rectangular area (x coordinate, y coordinate, width and height), and it returns whether the mouse cursor is over - inside - the given area.
What if we wanted to provide the user with the possibility to return the sprite to its starting position? We could create something like a "Restart" button to achieve that. In fact, that's what we'll do, because it gets really simple to do that with MiniGL. Let's add some code to our game:
...
  def initialize
    ...
    @font = Res.font :font1, 20
    @btn = Button.new(600, 550, @font, "Restart", :btn) {
      @x = @y = 0
    }
  end
  ...
  def update
    ...
    @btn.update
  end

  def draw
    @btn.draw
  end
...
And that's all for now! Notice we have introduced two features of MiniGL here: the fonts and the buttons. The Res.font method actually returns a Gosu::Font object, which offers some simple methods to draw texts. The first argument for Res.font is the name of the font file, which must be inside data/font, without extension, if it's a ttf file (for other types, there's an optional fourth argument to specify that). The second argument is the size to load the font, in pixels (this will correspond approximately to the height of the tallest characters drawn).
And then, there's the Button. This class provides a really handy way to create functional buttons, whose actions are defined very easily via a block passed to the constructor. The other arguments are, in order:
- The x-coordinate to draw the button at.
- The y-coordinate to draw the button at.
- The
Fontobject that will be used to draw the button's text. - The text of the button.
- The image of the button. This image must have a specific format: it will be loaded as four images placed vertically in a column. For example, if you want your button to appear as a 100 x 30 rectangle, you should draw four 100 x 30 rectangles vertically adjacent to each other, resulting in a 100 x 120 pixels image. But why draw it four times? Actually, each of the four images is used for a different state of the button. The first is the normal state, the second is the mouse-hover state, the third is the clicked state and the last is the disabled state. Just draw four different colored rectangles for the image, test the game and see what happens (to test the disabled image, you will need to set the button's
enabledattribute tofalse)!
As we're talking about user controls, let me introduce one of the greatest features provided by MiniGL (in my humble opinion): the TextField. It is exactly what it sounds like: a text input where you freely type and the characters show up as you do it, and there's a blinking cursor indicating where the character will be inserted. With MiniGL, you can include such component in your game with a minimal effort:
...
  def initialize
    ...
    @txt = TextField.new 600, 10, @font, :textField
  end
  ...
  def update
    ...
    @txt.update
  end

  def draw
    @txt.draw
  end
...
It looks a lot like the way you use a Button. However, there's a lot of additional optional parameters, both for buttons and text fields, which you can provide to the constructor to get a more customized experience (things like the color of the text, an image for the cursor, character limit... you can find information about all of them in the documentation of the gem). The image for the TextField is mandatory, but, for testing, a simple white rectangle will do.
Important: the text field is very nice and all, but for now it only responds fully to brazilian-portuguese keyboards, because detecting keyboard layouts and adapting the set of Gosu key codes to these layouts is quite hard, and I haven't found a good way to do that so far. :(
For basic input like letters and numbers, though, you should have no problem.
Another common element in a game screen is text. I have showed you components which have text associated with them, but haven't showed how to draw simple, static text into the screen. So, let's get to it: the TextHelper class will help us. With TextHelper, you can easily draw a line of text, one or more paragraphs, align text to the left, center or right, and even draw justified text! Check this out:
...
  def initialize
    ...
    @th = TextHelper.new @font
  end
  ...
  def draw
    ...
    @th.write_line "Here's some left-aligned text...", 10, 200, :left, 0xffffff
    @th.write_line "...and some centered text...", 400, 240, :center, 0xffffff
    @th.write_line "...and some right-aligned text too!", 790, 280, :right, 0xffffff
    @th.write_breaking "This is a justified paragraph. Yeah, that's right, you define a width and all lines will have that same width.\nWell, except for the last line in each paragraph...", 10, 320, 300, :justified, 0xffffff
  end
...
Test the game and you will be amazed by how the text distributes on the screen! And it is just that easy. As you may have noticed, you may include line breaks in the text passed to write_breaking, but don't do that for write_line (an error will be thrown). Furthermore, you can define the color in which the text is rendered, and there's a last (optional) parameter for defining the alpha (opacity, varying from 0 to 255), which defaults to 255.
The coordinates for drawing the text (second and third parameters) work as follows:
- If the mode is
:left, the first coordinate will be the left limit for the text (all the text will be drawn from this point to the right). - If the mode is
:center, the first coordinate will be the center of the text (it will be equally distributed to the left and to the right of this point). - If the mode is
:right, the first coordinate will be the right limit for the text (all the text will be drawn from this point to the left). - If the mode is
:justified, the first coordinate works the same as for:left. - The second coordinate is, for all modes, the upper limit of the text (all text will be drawn from this point down).
Finally, for write_breaking, the fourth parameter is the maximum width for the lines.
Most games contain a set of objects with similar characteristics (regarding both appearance and behavior). In particular, most objects of a game are represented with images. Very commonly, they are animated, i.e., many images with subtle variations are used to represent the object's actions, to make it look more "alive". Furthermore, many game objects have well-defined bounds, i.e., their position and the space they occupy in the world. It is an extremely common need in games the checking of collision between objects.
So, taking all that in consideration, MiniGL provides classes and modules to grant you productivity when dealing with such common situations. Let's cover it in steps:
The Sprite class models the simplest type of game object leveraged by MiniGL. A sprite consists of an image with defined position and support for animation - using a spritesheet. Let's first look at the syntax for using a Sprite with no animation:
require 'minigl'
include AGL

class MyGame < Game
  def initialize
    super 800, 600, false
    Game.initialize self
    @sprite = Sprite.new 100, 100, :sprite_1
  end

  def update
    # nothing to do here, for now...
  end

  def draw
    @sprite.draw
  end
end

game = MyGame.new
game.show
Here, we suppose there's an image named "1.png" in folder "data/img/sprite" (the convention is the same described for the Res class).
Well, it doesn't look very different from using an Image object, right? The main difference here is that a Sprite stores its position - which, by the way, you can change at any time via the x and y attributes -, so you can call draw just like that, no parameters needed.
But the real deal about sprites is when you take advantage of its animation capabilities. In order to get there, you must first understand the concept of spritesheet. It is nothing but an image composed of various images. These various images must be positioned in a rectangular grid, with all cells of the same size (an integer number of pixels of width and height). Usually, these various images are slight variations of a main image representing an object. For instance, if your game has a main character which is controlled by the user, it is likely that this character can perform some actions, and each of these actions can be represented by an animation. Anyway... the best way to understand a spritesheet is to look at one:
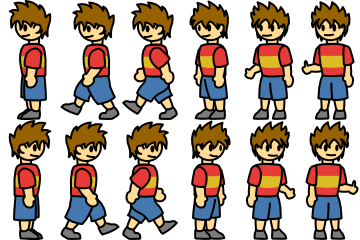
Each image of the character inside the image above is delimited by a rectangle of 60 x 120 pixels - therefore the overall image has 360 x 240 pixels. The image in the top left corner has index 0, the one to its right has index 1 and the indexing goes on, such that, in the second "row", the first image has index 6, the second has index 7 and so on. So when a spritesheet is loaded through MiniGL, it becomes an array of images.
You may realize that, by alternating images of indices 0, 1 and 2, for example, we can make the character "walk" to the left. The same goes for indices 6, 7 and 8, causing it to "walk" to the right. That's one common use of spritesheets: animating specific actions of an object/character. Of course, you can use the images in the different indices however you want. But let's take a look on how we'd write code to make the "walking" animation happen:
...
  def initialize
    ...
    @sprite = Sprite.new 100, 100, :sprite_1, 6, 2
  end

  def update
    @sprite.animate [0, 1, 0, 2], 8
  end
...
Notice that we are now providing two additional parameters to the Sprite constructor. Those are the numbers of "columns" and "rows", respectively, of the spritesheet. We are also supposing that "data/img/sprite/1.png" is now a spritesheet like the example. Moreover, we now call animate inside the update block of the game. This method receives a sequence of indices and an interval, which represents how long each image will last in the animation, in number of frames (or, more precisely, number of calls to update). The result of this will be a guy walking, while not going anywhere. =P
Now it's up to you creating logic for the character to actually move, responding to user input, and animate it according to the direction the guy is facing. You can just combine some snippets of code we already showed here to achieve that, with minor adjustments...
The effects are a particular kind of sprite. It is a sprite with a limited "lifetime", which means you will draw it in the screen, it will animate for a while and then disappear. It is ideal for visual effects like explosions and many other things... You could use it to show a little animation when the character gets an item, or unlocks an achievement, for instance. One advantage brought by the Effect class, besides the lifetime control, is that it assumes some defaults for the indices of the animation and the lifetime, based on the spritesheet size. So, for a very "default" effect, i.e., one that animates through each index exactly once, in sequence (0, 1, 2, ...), you may use a very short syntax. Let's have a look:
(data/img/effect/1.png)
...
  def initialize
    ...
    @eff = Effect.new 500, 100, :effect_1, 3, 2
  end

  def update
    unless @eff.dead
      @eff.update
      puts "it's over" if @eff.dead
    end
  end

  def draw
    @eff.draw
  end
...
So, this will show a very realistic (just kidding) explosion on the screen, just once. Notice that the effect reports it's lifetime is over via the dead attribute. Normally, instead of testing this attribute to decide whether to update the effect, you would discard it once it "dies". For instance, you could have a list of active effects, and once you find a certain effect is dead, you remove it from the list. However, if you call update or draw for a dead effect, nothing will happen.
The constructor was very short (same as for a conventional Sprite) because here we assumed all the defaults. But you could change the indices, the interval and the lifetime of the animation. Hint: if you want an animation with intervals of x frames, and you want to show exactly y sprites (images of the spritesheet) before the effect "dies", you must specify a lifetime of x * y frames.
Above all the objects listed before, there's the GameObject. As it inherits from Sprite, it offers all the functionality we explored in the "Sprites" section, and more!
The main difference is the physical aspects held by GameObject. Every instance has, besides x and y, attributes w and h, which indicate the physical width and height of the object. So, it is important to keep in mind: the physical bounds of a GameObject are always rectangular - in fact, you can obtain this as a Rectangle object via the bounds method.
Thus, it becomes very easy to check if two objects are intersecting each other. If you're interested in objects obj1 and obj2...
obj1.bounds.intersects obj2.bounds... the expression above will evaluate to true if the objects are intersecting, false otherwise.
But it doesn't end there. Not even close, actually. The Movement module adds much more to the capabilities of a GameObject. Thanks to it you can make your objects move according to forces (yeah, the concept you learned in Physics classes), and automatically check for collision with other objects, avoiding intersection. That's ideal for creating platformer games, for example. Suppose you have a bunch of objects in an array, which will serve as obstacles, and one main object that will move through those obstacles. Just have a look:
...
  def initialize
    ...
    @obj = GameObject.new 0, 0, 50, 50, :obj1
    @obstacles = [
      Block.new(0, 50, 100, 1, false),
      Block.new(100, 70, 100, 1, false),
      Block.new(300, 70, 100, 1, false)
    ]
  end

  def update
    forces = Vector.new 0, 0

    # "fill" the forces vector according to user input, something like:
    # forces.x += 5 if KB.key_down? Gosu::KbRight
    # ...
    # -----------------------------------------------------------------

    @obj.move forces, @obstacles, nil
  end
...
With the amazingly short code above, you will create a moving object that moves smoothly, affected by the force of gravity, and does not pass through any of the specified obstacles. Some things to point out in the snippet:
- The constructor for
GameObjectwill accept some additional parameters, the first of them beingimg_gap, which must be aVectorindicating the x and y offsets between the physical object and the position where its image should be drawn. This becomes useful when the object has a sophisticated image, which can't be well approximated by a rectangle. This is also more well explained visually:

- The next additional parameters are
sprite_colsandsprite_rows, which work the same as inSprite. - The obstacles in the example are using the
Blockclass. It is another class that supports movement, but has a way simpler structure, because it is intended to be just a block, not an animated object. It doesn't even have an image associated to it (although I've been thinking of adding image support to it as well). - The forces must be specified in terms of horizontal and vertical components. When initializing a
Game, you can specify the force of gravity, which has a default value ofVector.new(0, 1), i.e., a unitary acceleration in the vertical direction, headed from top to bottom (positive). If you want a uniform movement in every direction, for example, you should useVector.new(0, 0)for the gravity.
The Movement module still adds to GameObject some other types of movement methods, but it would take really long to explore all of them here, so I encourage you to have a look at the documentation.