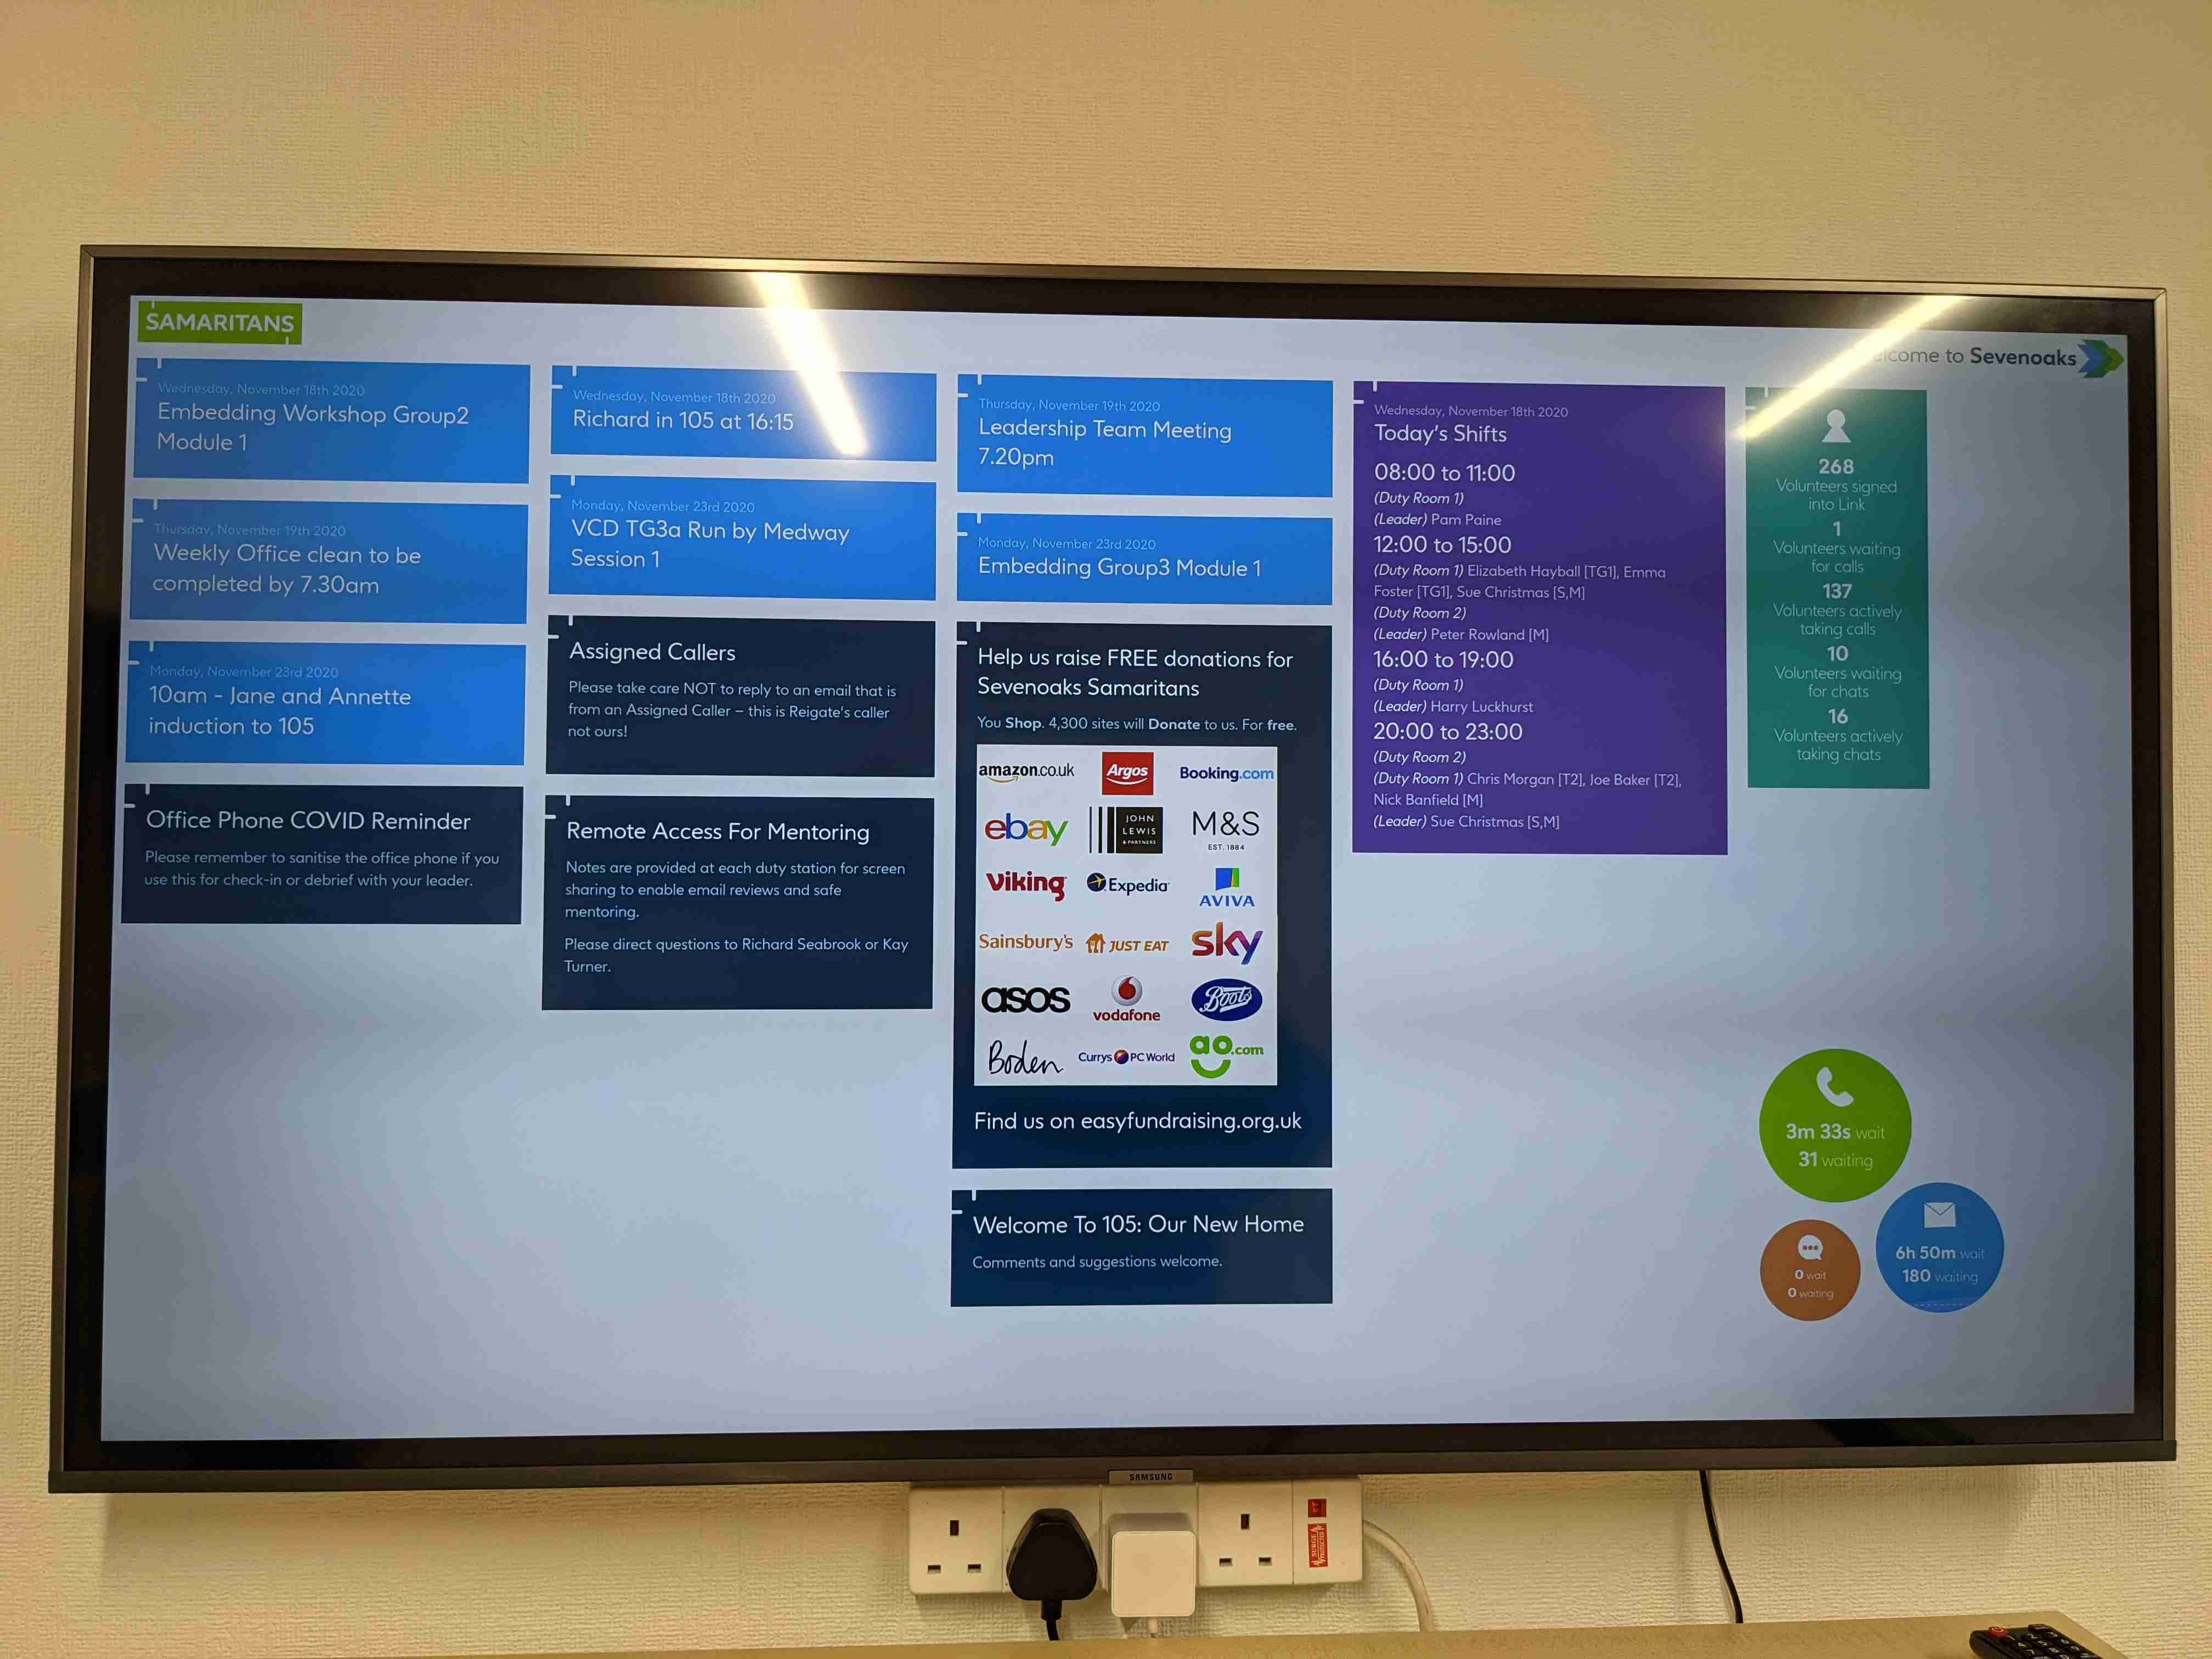
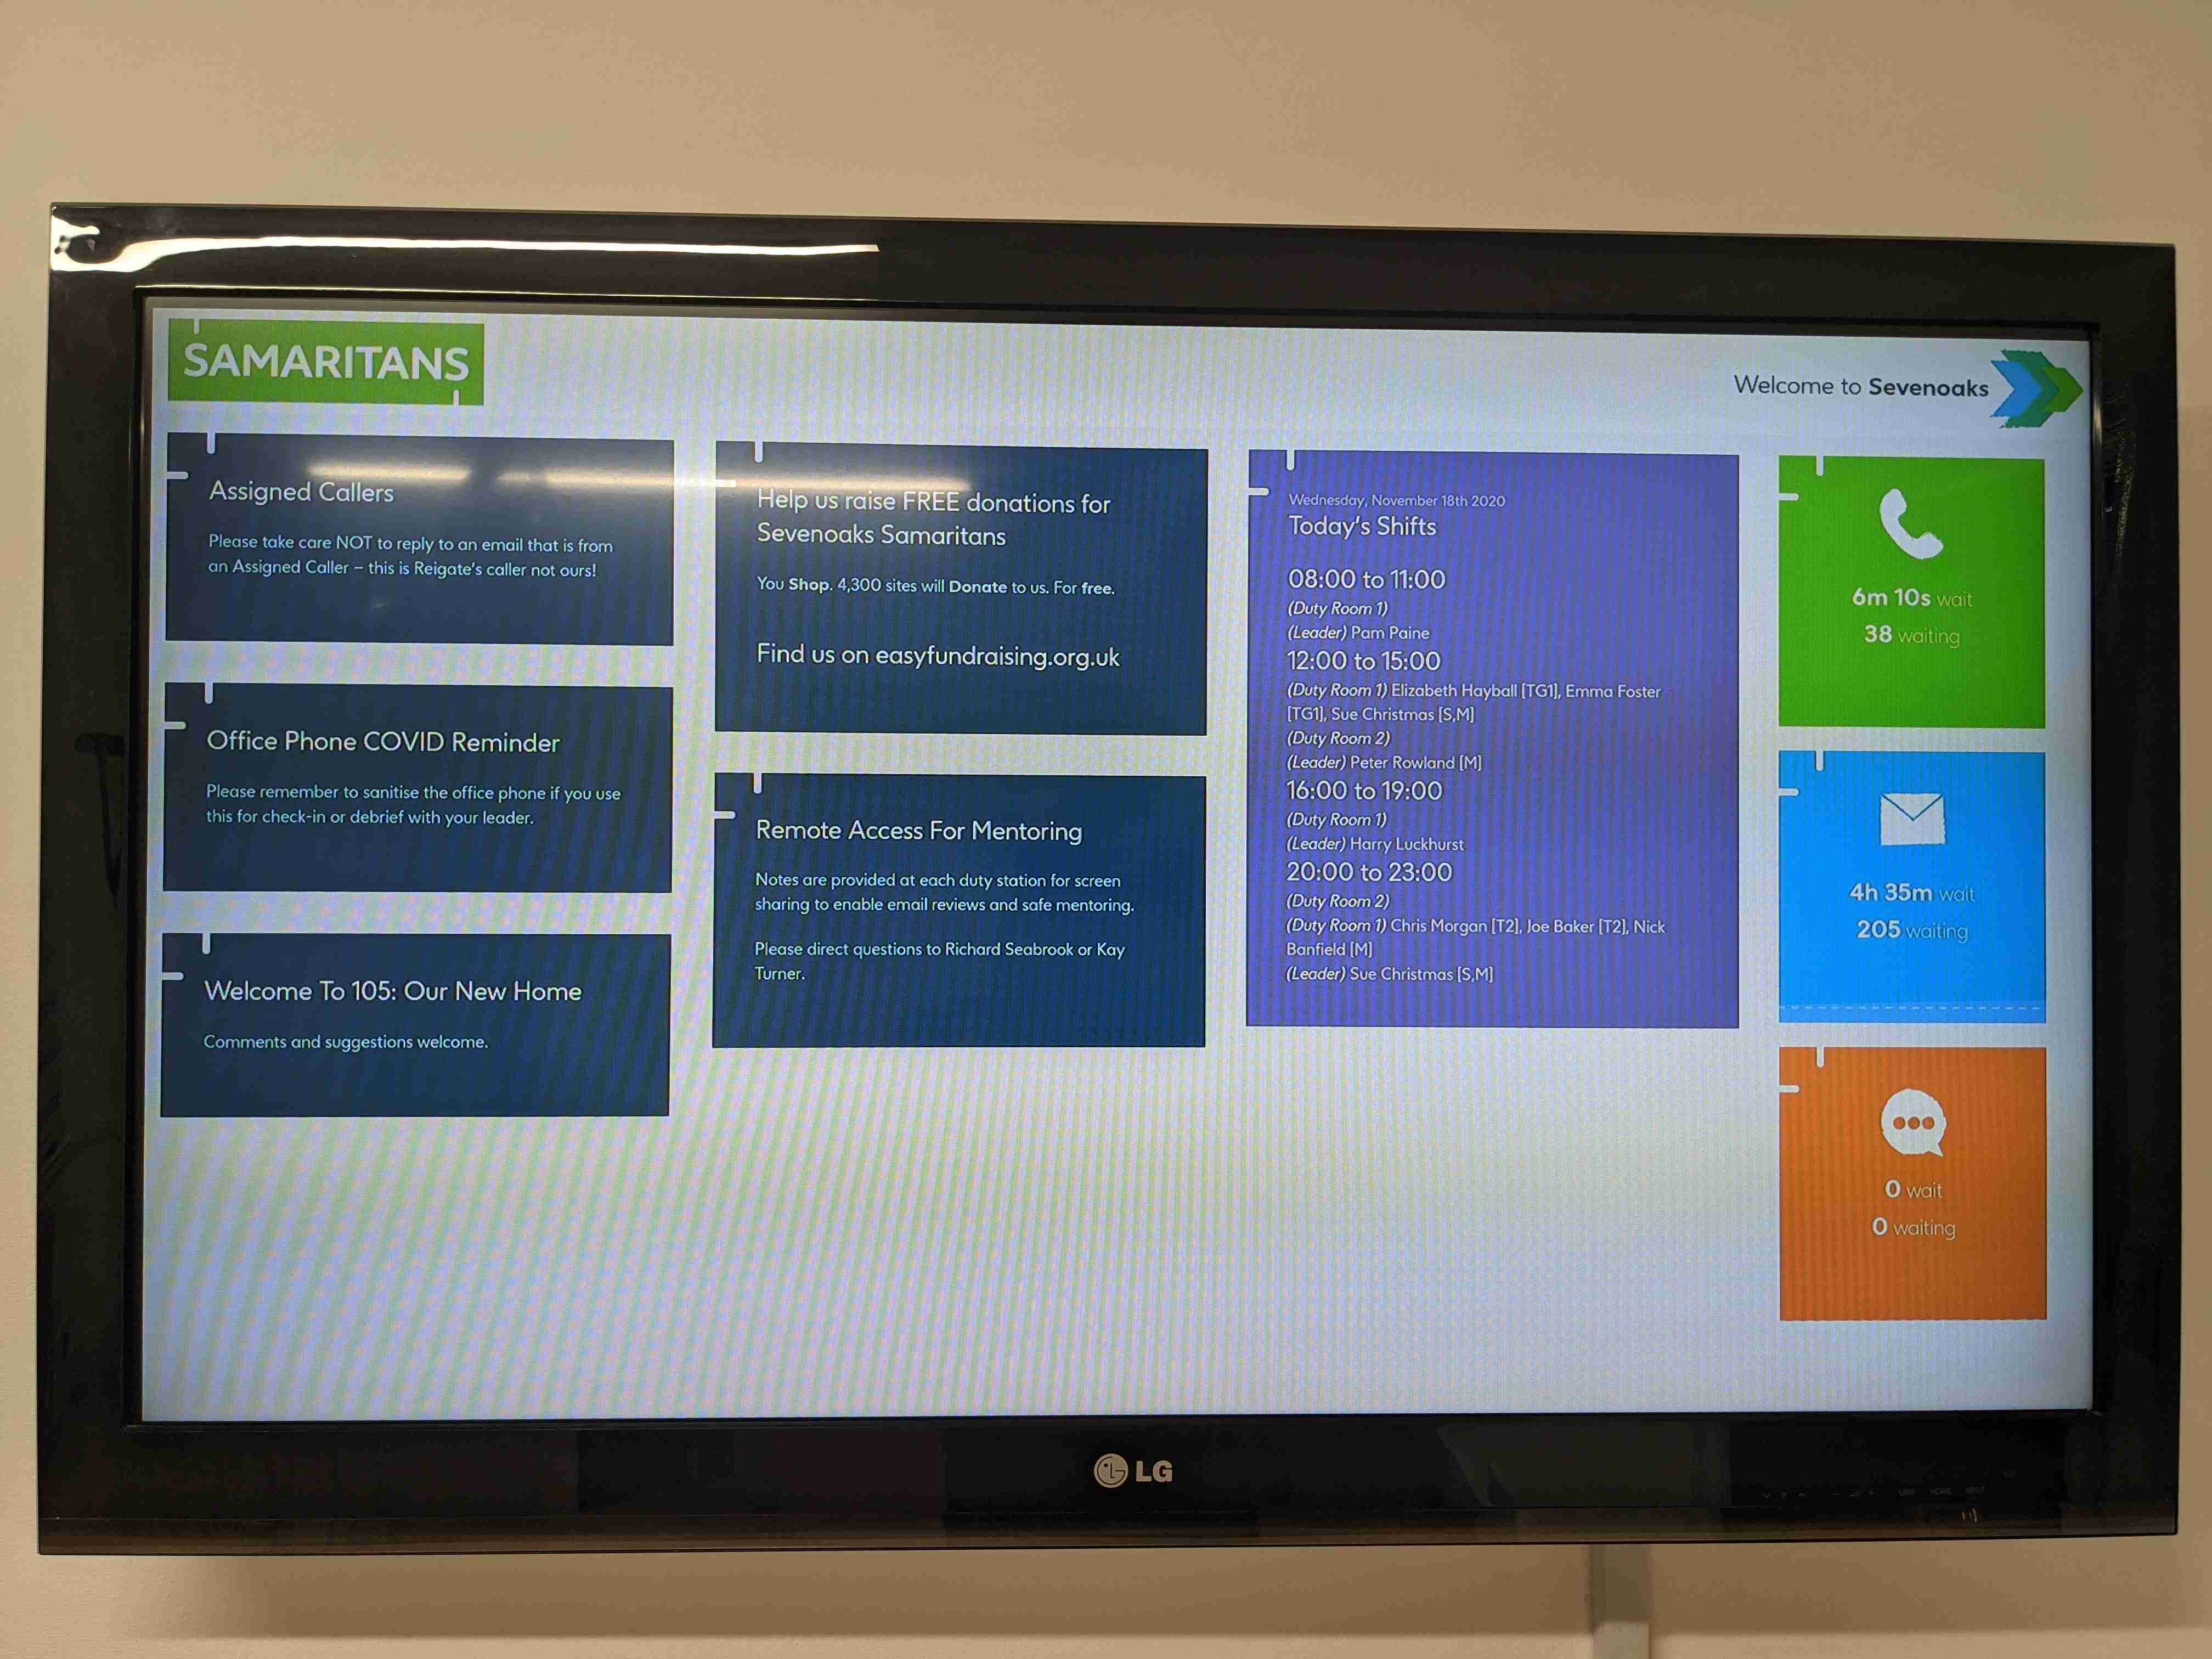
A status dashboard for Samaritans branches utilising Three Rings. It allows authorised users to post messages for others (via the 3R wiki), shows today's shifts, events for the coming week and status of inbound communications channels. It can be easily customised with a basic understanding of HTML, CSS and Javascript.
Predominantly designed for use on large screen TVs, there are two display modes which are selected automatically based on the screen size. It is strongly recommended to be utilised on 4K TVs for the additional screen real-estate:
This was written for Sevenoaks Samaritans, but is now utilised in a number of branches.
This code was written to be utilised on the low-cost and low-energy Raspberry Pi 4B, via balenaCloud which allows easy remote management and is free for our use case.
This repo contains configuration to run a multi-container stack with Chromium web browser ("browser" container) and nginx web server serving a single page web app (Vue.js/jQuery/UIkit) and authentication/CORS proxy to 3R API and SCO dashboard ("app" container).
The SCO dashboard provides realtime queue statistics for each contact method, while the 3R API is used for shift, event and message data. 3R wiki pages in the specified wiki are presented as messages on screen.
In our branch, we used:
1 x 4k TV (donated)
1 x 1080p Monitor (donated)
2 x Raspberry Pi 4 Model B - 2GB
2 x 'NOOBS' Preinstalled Micro SD Card (Latest v3.4.0) - 16GB
2 x Official UK Raspberry Pi 4 Power Supply (5.1V 3A) - White
2 x Official Raspberry Pi 4 Micro-HDMI Cable - 1M / White
There is one more Raspberry Pi than the number of screens.(Since v2.0.0 there is no need of an additional Pi to run as a server.)
- Use a good quality metal case, so that heat can be dissipated adequately.
Caution
Do not try to use old USB power supplies or low-quality SD cards! Under-rated power supplies may damage your device and result in unpredictable results. Watch out for The device is undervolted! at the top of each device page. Sticking to official power supplies, as above, will avoid this issue.
- Create a new Wiki in 3R called 'Branch Comms Screens' any pages you create in here will become on-screen messages. You may want to use 3R permissions to restrict the ability to change these and/or use the lock functionality.
- Create a new role in 3R called something similar to 'Branch Comms Screens'.
- Grant this role View on Events, under Directory Access grant View for all core roles, tick Directory Self-manage, View for Wiki and View for Stats and enable it as a Core role.
- Create a volunteer called 'Branch Comms Screens' with only this role, log in as this new account and add an API key for them via their Directory page.
- For each rota you want the screen to display, ensure Branch Comms Screens has View permissions over it.
- For the most part, we ensure that no other role can view or manage the Branch Comms Screens role, so that it does not appear in the Directory or risk being deleted.
- Download and install balenaEtcher which we will use to write to SD cards.
- Sign up for a balenaCloud account, which is free for up to 10 devices.
- Click the following button:
- Ensure the default device type matches the type of Pi you are using for your project. You must run 64bit OS (the only option for Pi 4 onwards).
- Click the Advanced toggle switch.
- Update your SITE_NAME - eg. Sevenoaks. This is used for the 'Welcome to' dashboard header and needs to be relatively short.
- Insert the THREERINGS_APIKEY you obtained above in the related value box.
- Click Create and deploy.
Now let's set up each device:
- Click Add device.
- Ensure your device type matches that which you will be using. You must use 64bit OS where you have multiple options.
- It is usually best to connect your device using a network cable, but if you want to use WiFi, select Wifi + Ethernet and enter your network details.
- All other details can be left at their default values.
- Click Flash this should open balenaEtcher ready to go with your customised image. Select your SD card using Select target and then Flash!. If your SD card shows Locked then operate the physical locking slide on the card adaptor to allow writes.
- Once this has finished, you can make further copies using the same file for each device now - or you can return to your fleet page later and add more.
- Plug your SD card into your Pi, connect your network (optional), HDMI (ensure you use HDMI0) and power cables and boot it.
- You should see the logo boot screen on the device. This will stay for a few minutes while software is deployed to the unit. However you should see the new device appear almost immediately on your fleet dashboard with download progress and logs shown. If this doesn't happen, you may want to check the network connection.
- The device may restart a few times while settings are applied, but once components have downloaded and are ready, the Samaritans Dashboard should load.
Tip
Your screen resolution should be auto-detected, but if not, go to Device Variables for the specific device, Add variable set name to WINDOW_SIZE (in capitals) with a value of the desired resolution with a comma in between - eg. 1920,1080 or 3840,2160. Locate the correct value in your display documentation.
You may also want to manually set your resolution if you see the low-resolution version (square queue statistic boxes, rather than circles and no event information) when you have a 4K resolution or higher display.
If you see the logo boot screen for a very long period, check balenaCloud - especially that the device is shown in the fleet (if not, check network) and shows progress downloading images. Also check there are no warnings about incorrect voltage (incorrect power supply).
If you are an existing user, there are a few benefits to upgrade - better support for newer displays and devices, no need to edit the HTML to replace your branch name (now done via configuration variable) and no need to have one more Pi than displays. All components now run together on each device. Deployment is now much simplified.
Due to the major changes involved, the recommended upgrade path is:
- Retrieve the THREERINGS_APIKEY value from your current nginx fleet and any WINDOW_SIZE from balena-dash fleet devices. You may not need to set WINDOW_SIZE with the new version if auto-detect works as expected.
- Follow the Deployment section above to create a new single fleet.
- Either write new SD cards for each device (preferable since you will probably also upgrade the host operating system) or move each device into the new fleet using the device's Settings page.
- Apply manual WINDOW_SIZE device variable using previous value only if required.
- You can then delete the redundant nginx and balena-dash fleets using their Settings page.
The majority of changes you may want to make will be in app/html/index.html or associated CSS files.
To change the breakpoint between the two screen modes change any reference to 3800px to a new value. Also change 3799px to a value one lower than your new setting.
You can access the app directly at http://LOCAL.IP.ADDRESS/ and a screenshot of how the browser is displaying it at http://LOCAL.IP.ADDRESS:5011/screenshot Where LOCAL.IP.ADDRESS is the LOCAL IP ADDRESS value shown in the device page on balenaCloud.
To allow easy testing of the two resolution modes, you can use the files at http://LOCAL.IP.ADDRESS/test_1080p.html and http://LOCAL.IP.ADDRESS/test_4k.html.
This code is heavily inspired by 3R My Branch Today.

