![]()
![]()
![]()
![]()
This is an adaptation of Mitchell Hashimoto's nixos-config repo
Some things I have added or changed:
- my own cachix cache
- AMD NVidia support on bare metal host
TODO
- CUDA / CuDNN support on bare metal
- Window manager i3 from the original repo does not seem to work, it uses Gnome by default. Maybe want to set up i3 or Hyprland.
Software that cannot (yet) be installed via Nix or Brew or Mac App Store:
- DaVinci Resolve Studio
- Switch Spotlight hotkey to Raycast - Raycast is a must to find GUI apps installed via Nix. Regular spotlight does not find them because it doesn't work with symlinks.
skhd --install-service && skhd --start-service
This repository contains my NixOS system configurations. This repository isn't meant to be a turnkey solution to copying my setup or learning Nix, so I want to apologize to anyone trying to look for something "easy". I've tried to use very simple Nix practices wherever possible, but if you wish to copy from this, you'll have to learn the basics of Nix, NixOS, etc.
I don't claim to be an expert at Nix or NixOS, so there are certainly improvements that could be made! Feel free to suggest them, but please don't be offended if I don't integrate them, I value having my config work over having it be optimal.
I like to use macOS as the host OS and NixOS within a VM as my primary development environment. I use the graphical applications on the host (browser, calendars, mail app, iMessage, etc.) but I do almost everything dev-related in the VM (editor, compilation, databases, etc.).
Inevitably I get asked why? I genuinely like the macOS application ecosystem, and I'm pretty "locked in" to their various products such as iMessage. I like the Apple hardware, and I particularly like that my hardware always Just Works with excellent performance, battery life, and service. However, I prefer the Linux environment for almost all my dev work. I find that modern computers are plenty fast enough for the best of both worlds.
Here is what it ends up looking like:
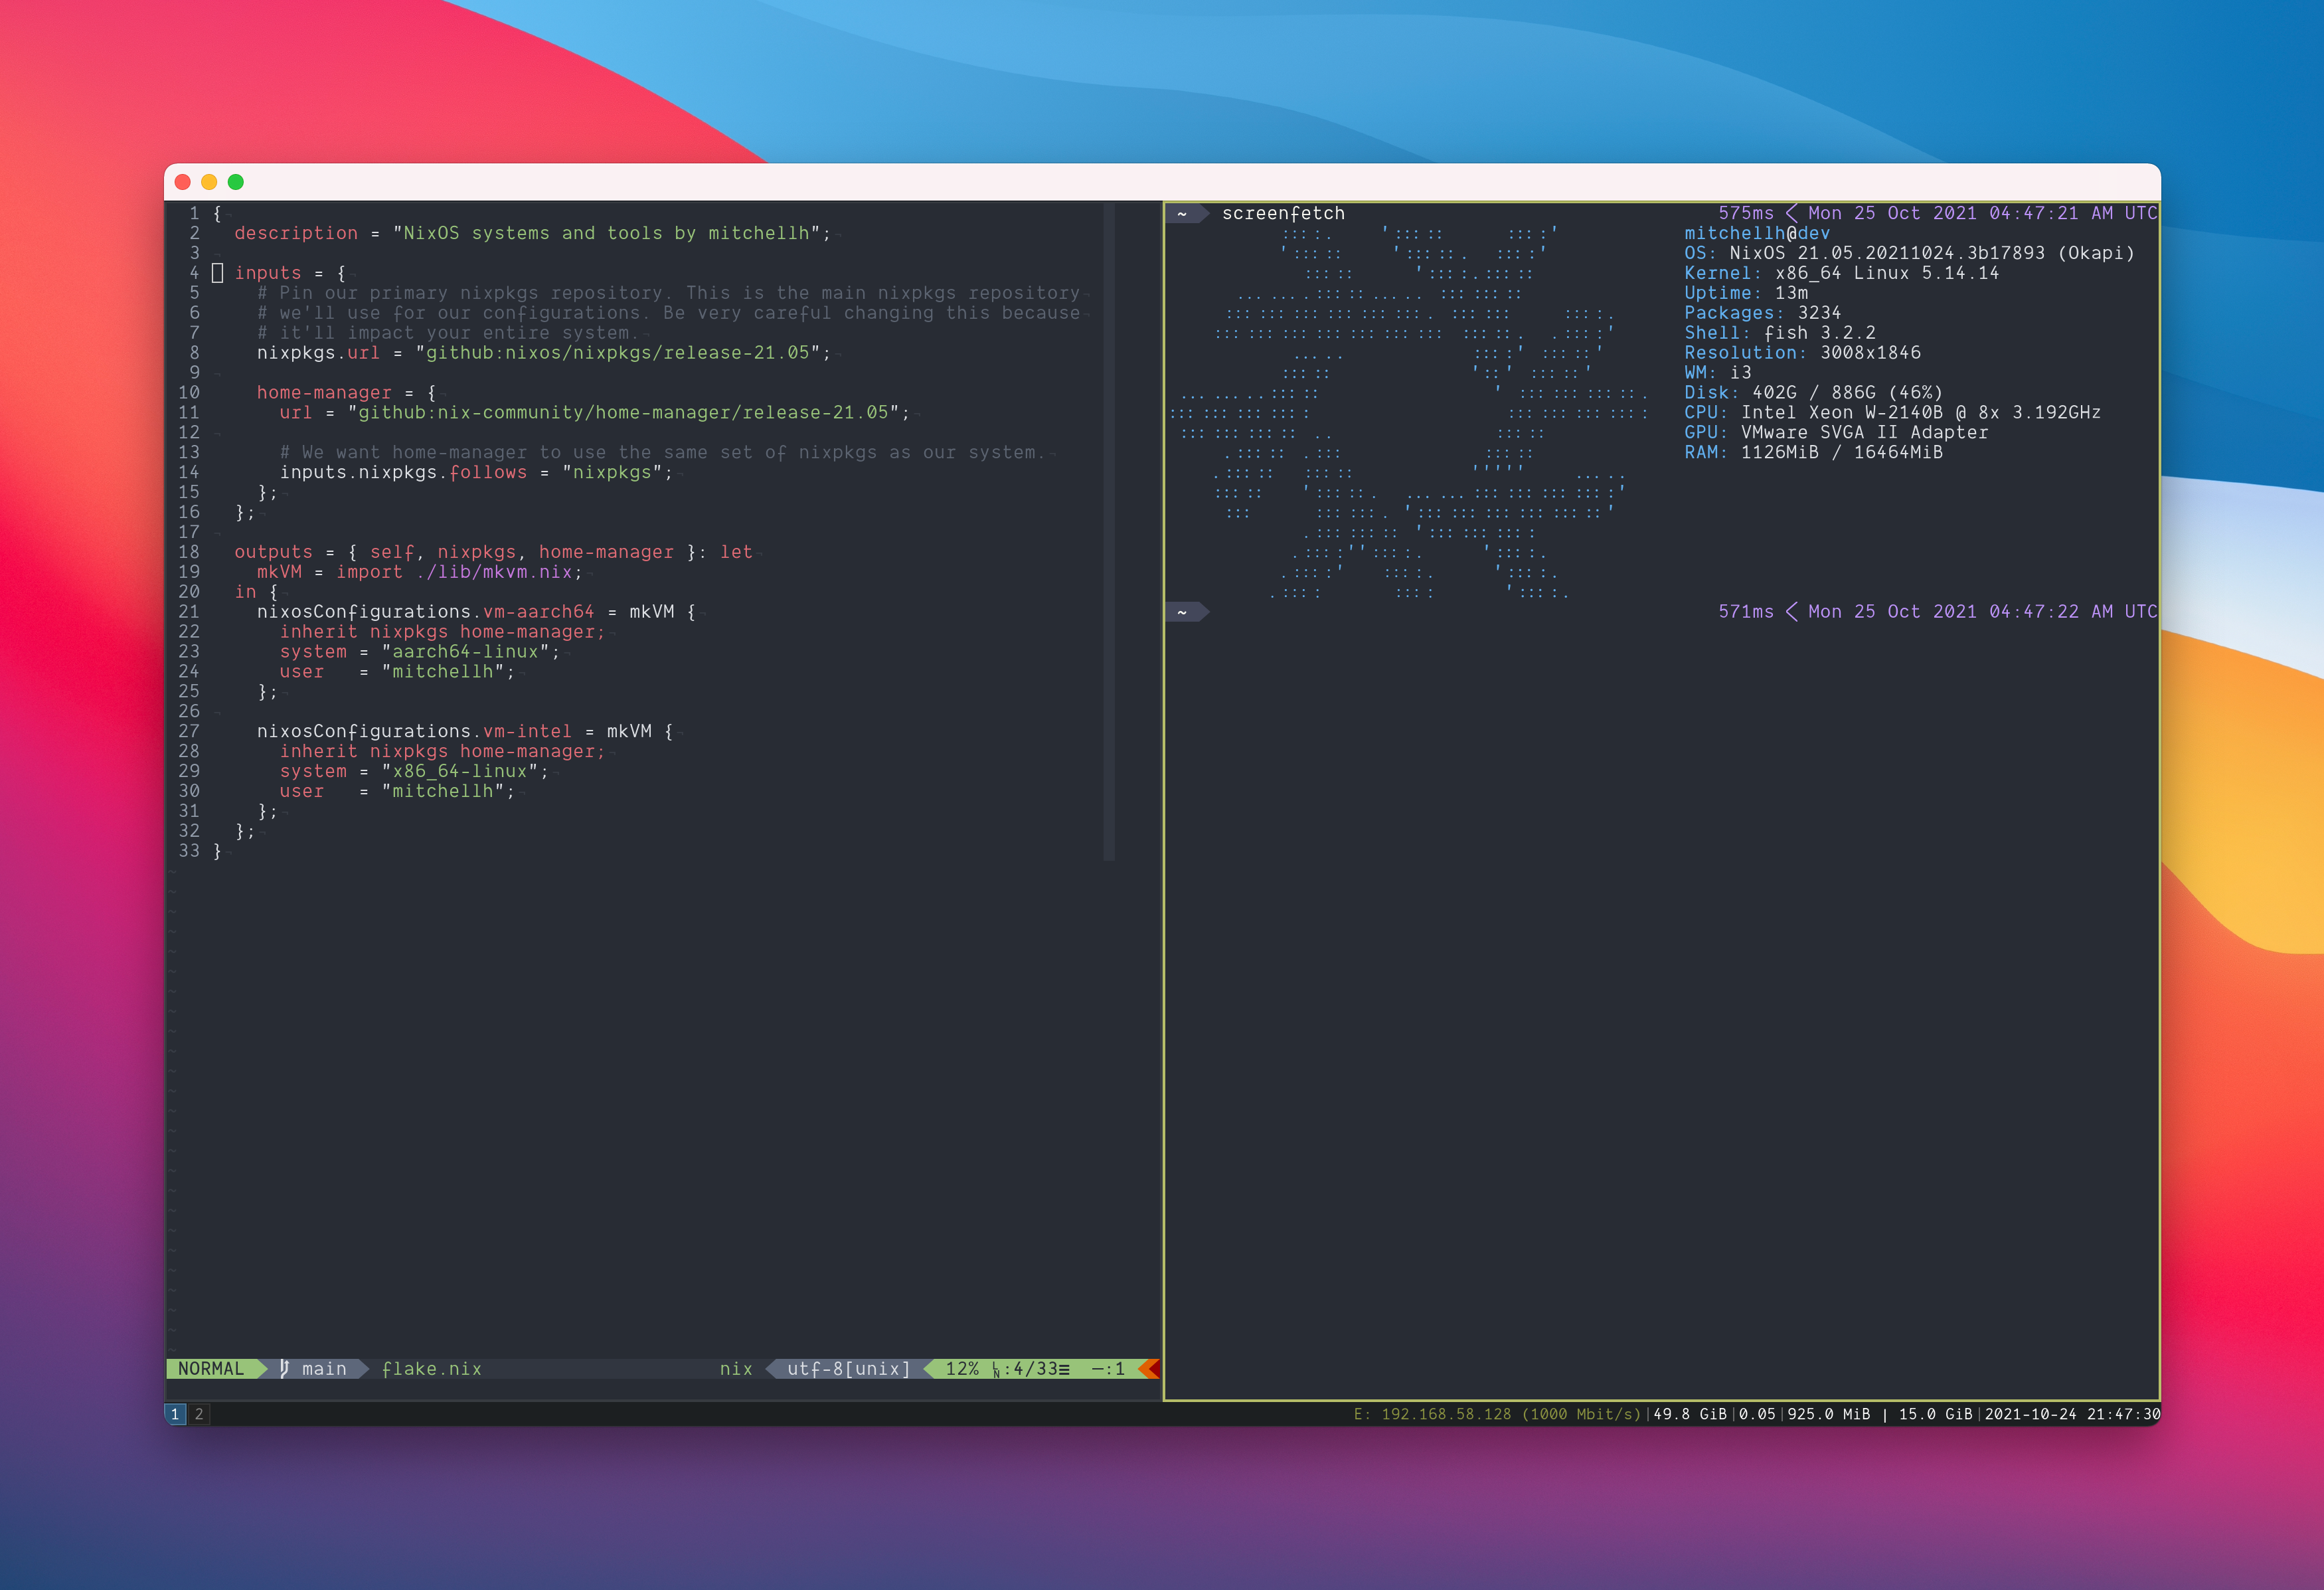

Note that I usually full screen the VM so there isn't actually a window, and I three-finger swipe or use other keyboard shortcuts to active that window.
How does web application development work? I use the VM's IP. Even
though it isn't strictly static, it never changes since I rarely run
other VMs. You just have to make sure software in the VM listens
on 0.0.0.0 so that it isn't only binding to loopback.
Does copy/paste work? Yes.
Do you use shared folders? I set up a shared folder so I can access the home directory of my host OS user, but I very rarely use it. I primarily only use it to access browser downloads. You can see this setup in these Nix files.
Do you ever launch graphical applications in the VM? Sometimes, but rarely. I'll sometimes do OAuth flows and stuff using FireFox in the VM. Most of the time, I use the host OS browser.
Do you have graphical performance issues? For the types of graphical applications I run (GUIs, browsers, etc.), not really. VMware (and other hypervisors) support 3D acceleration on macOS and I get really smooth rendering because of it.
This can't actually work! This only works on a powerful workstation! I've been doing this since late 2020, and I've developed a lot of very real software. It works for me. I also use this VM on a MacBook Pro (to be fair, it is maxed out on specs), and I have no issues whatsoever.
Does this work with Apple Silicon Macs? Yes, I use VMware Fusion but my configurations also work for Parallels and UTM. Folder syncing, clipboards, and graphics acceleration all work. I've been using an Apple Silicon Mac full time since Nov 2021 with this setup.
Does this work on Windows? Yes, I've tested this setup with both Hyper-V and VMware Workstation Pro and it works great in either case.
Video: https://www.youtube.com/watch?v=ubDMLoWz76U
Note: This setup guide will cover VMware Fusion because that is the
hypervisor I use day to day. The configurations in this repository also
work with UTM (see vm-aarch64-utm) and Parallels (see vm-aarch64-prl) but
I'm not using that full time so they may break from time to time. I've also
successfully set up this environment on Windows with VMware Workstation and
Hyper-V.
You can download the NixOS ISO from the
official NixOS download page.
There are ISOs for both x86_64 and aarch64 at the time of writing this.
Create a VMware Fusion VM with the following settings. My configurations are made for VMware Fusion exclusively currently and you will have issues on other virtualization solutions without minor changes.
- ISO: NixOS 23.05 or later.
- Disk: SATA 150 GB+
- CPU/Memory: I give at least half my cores and half my RAM, as much as you can.
- Graphics: Full acceleration, full resolution, maximum graphics RAM.
- Network: Shared with my Mac.
- Remove sound card, remove video camera, remove printer.
- Profile: Disable almost all keybindings
- Boot Mode: UEFI
Boot the VM, and using the graphical console, change the root password to "root":
$ sudo su
$ passwd
# change to root
At this point, verify /dev/sda exists. This is the expected block device
where the Makefile will install the OS. If you setup your VM to use SATA,
this should exist. If /dev/nvme or /dev/vda exists instead, you didn't
configure the disk properly. Note, these other block device types work fine,
but you'll have to modify the bootstrap0 Makefile task to use the proper
block device paths.
Also at this point, I recommend making a snapshot in case anything goes wrong. I usually call this snapshot "prebootstrap0". This is entirely optional, but it'll make it super easy to go back and retry if things go wrong.
Run ifconfig and get the IP address of the first device. It is probably
192.168.58.XXX, but it can be anything. In a terminal with this repository
set this to the NIXADDR env var:
export NIXADDR=<VM ip address>
The Makefile assumes an Intel processor by default. If you are using an
ARM-based processor (M1, etc.), you must change NIXNAME so that the ARM-based
configuration is used:
export NIXNAME=vm-aarch64
Other Hypervisors: If you are using Parallels, use vm-aarch64-prl.
If you are using UTM, use vm-aarch64-utm. Note that the environments aren't
exactly equivalent between hypervisors but they're very close and they
all work.
Perform the initial bootstrap. This will install NixOS on the VM disk image but will not setup any other configurations yet. This prepares the VM for any NixOS customization:
make vm/bootstrap0
After the VM reboots, run the full bootstrap, this will finalize the NixOS customization using this configuration:
make vm/bootstrap
You should have a graphical functioning dev VM.
At this point, I never use Mac terminals ever again. I clone this repository
in my VM and I use the other Make tasks such as make test, make switch, etc.
to make changes my VM.
If there is repos cloned to the host system, this will copy all from ~/git folder to the VM.
make vm/copyrepos
THIS IS OPTIONAL AND UNRELATED TO THE VM WORK. I recommend you ignore this unless you're interested in using Nix to manage your Mac too.
I share some of my Nix configurations with my Mac host and use Nix to manage some aspects of my macOS installation, too. This uses the nix-darwin project. I don't manage everything with Nix, for example I don't manage apps, some of my system settings, Homebrew, etc. I plan to migrate some of those in time.
To utilize the Mac setup, first install Nix using some Nix installer.
There are two great installers right now:
nix-installer
by Determinate Systems and Flox. The point of both
for my configs is just to get the nix CLI with flake support installed.
Once installed, clone this repo and run make. If there are any errors,
follow the error message (some folders may need permissions changed,
some files may need to be deleted). That's it.
WARNING: Don't do this without reading the source. This repository is and always has been my configurations. If you blindly run this, your system may be changed in ways that you don't want. Read my source!
Install Nix with the Nix installer from Determinate Systems:
curl --proto '=https' --tlsv1.2 -sSf -L https://install.determinate.systems/nix | sh -s -- install --determinateClone this repo and run make switch, replace the NIXNAME with the configuration name you want to use:
If you get errors: "ignoring untrusted substituter 'https://javdl-nixos-config.cachix.org', you are not a trusted user."
make sure to run make before running make switch to add the cachix cache.
Initial setup.
cd ~
git clone https://github.com/javdl/nixos-config.git
cd nixos-config
mkdir -p ~/.config/nix/
echo "experimental-features = nix-command flakes" > ~/.config/nix/nix.conf
Run it.
export NIXNAME=mac-studio-m1
sudo nixos-rebuild switch --flake ".#${NIXNAME}" # See also the Makefile. We
# cannot use make switch however since it is not yet installed.
Updates / changes after the first install.
export NIXNAME=mac-studio-m1
make switch
Brew casks can be configured in /users/joost/darwin.nix
The below is partially tested, it might need (tiny) changes.
- Create install USB with latest NixOS
- For systems with Nvidia GPU, choose
nomodesetoption for the installer - After install finished:
sudo nano /etc/nixos/configuration.nixand addnix.settings.experimental-features = [ "nix-command" "flakes" ];sudo nixos-rebuild switchnix-shell -p git gnumakegit clone https://github.com/javdl/nixos-config.gitcp /etc/nixos/configuration.nix ~/nixos-config/hosts/HOSTNAME.nixandcp /etc/nixos/hardware-configuration.nix ~/nixos-config/hosts/hardware/HOSTNAME.nix- Edit the copied
configuration.nixto make the include correct tohardware/HOSTNAME.nixfolder - Edit
~/nixos-config/flake.nixto add an entry for the new host. git add .to add the newly created files to git. Files must be in git for Nix to work with them. Commiting them is not necessary though.
export NIXNAME=HOSTNAME
make switch
# Or
sudo nixos-rebuild switch --flake ".#${NIXNAME}" # same command as in Makefile
# Example with host J7
cd ~/nixos-config && export NIXPKGS_ALLOW_INSECURE=1 && sudo nixos-rebuild switch --flake ".#j7"- Copy the GPG key and SSH key onto the machine from an existing one (only the keys are needed, not other files in the
~/.sshor~/.gnupgfolder)cp /run/media/joost/usbdrive/id_ed25519 /home/joost/.ssh/ - The GPG
.ascfile can also be downloaded from secure storage and then imported.gpg --import Joost_secret_key.ascfor both public and private keys. - Before the GPG key works with git, you might need to do a
gpgconf --kill gpg-agentbefore it will pick up the new settings. (I've got asigning failed: no pinentryerror. - Before the SSH key works you need to set permissions
chmod 600 ~/.ssh/id_ed25519 - Commit the changes and publish to git with the new host added.
git remote set-url origin [email protected]:javdl/nixos-config.gitandgit add . && git commit -m "add HOSTNAME" && git push - On subsequent changes, you can use
make switchinstead of the nixos-rebuild command.
THIS IS OPTIONAL AND UNRELATED TO THE VM WORK. I recommend you ignore this unless you're interested in using Nix to manage your WSL (Windows Subsystem for Linux) environment, too.
I use Nix to build a WSL root tarball for Windows. I then have my entire Nix environment on Windows in WSL too, which I use to for example run Neovim amongst other things. My general workflow is that I only modify my WSL environment outside of WSL, rebuild my root filesystem, and recreate the WSL distribution each time there are system changes. My system changes are rare enough that this is not annoying at all.
To create a WSL root tarball, you must be running on a Linux machine
that is able to build x86_64 binaries (either directly or cross-compiling).
My aarch64 VMs are all properly configured to cross-compile to x86_64
so if you're using my NixOS configurations you're already good to go.
Run make wsl. This will take some time but will ultimately output
a tarball in ./result/tarball. Copy that to your Windows machine.
Once it is copied over, run the following steps on Windows:
$ wsl --import nixos .\nixos .\path\to\tarball.tar.gz
...

$ wsl -d nixos
...

# Optionally, make it the default
$ wsl -s nixos
After the wsl -d command, you should be dropped into the Nix environment.
Voila!
I am still transitioning into a fully flaked setup. During this transition (which is indefinite, I'm in no rush), I'm using both.
Create hashed password with mkpasswd to put in users/joost/nixos.nix
(Google Cloud Shell has it installed by default)
NixOS Docs on User Management
mkpasswd -m sha-512
I had no GPG key installed on the host machine, so the copy of secrets errored out. To fix this, first install the GPG keys on the host machine. Then re-run the copy of the secrets to the VM.
export NIXADDR=<VM ip address>
make vm/secrets
The copied ssh config from the MacOS host can contain keychain settings. Lines with UseKeychain should look like:
IgnoreUnknown UseKeychain
UseKeychain yes
Source: https://www.unixtutorial.org/ssh-bad-configuration-option-usekeychain/
Go to home-manager.nix in users/joost
add, for examaple pkgs.vscode. You can look for packages with nix search or nix --extra-experimental-features "nix-command flakes" search nixpkgs firefox
then run make switch from this repo's folder.
The full command to update host j7, for example:
cd ~/nixos-config && sudo nixos-rebuild switch --flake ".#j7"Start with trying:
sudo nix-store --verify --check-contents --repair
# Update flake.lock
nix flake update

# Apply the updates
sudo nixos-rebuild switch --flake ".#j7"
In short, change references of 23.05 to 23.11 for the sources in flake.nix, then rebuild with the --upgrade flag.
An example commit can be seen here
More generic info: https://nixos.org/manual/nixos/stable/index.html#sec-upgrading
sudo NIXPKGS_ALLOW_UNSUPPORTED_SYSTEM=1 nixos-rebuild switch --upgrade --flake ".#vm-aarch64"Certain software must be installed for Hyprland to work properly. https://wiki.hyprland.org/Useful-Utilities/Must-have/

When getting the error: error: the user '_nixbld1' in the group 'nixbld' does not exist
Use this script to fix it:
curl --proto '=https' --tlsv1.2 -sSf -L https://github.com/NixOS/nix/raw/master/scripts/sequoia-nixbld-group-migration.sh | bash -sSource: https://discourse.nixos.org/t/macos-15-sequoia-update-clobbers-nixbld1-4-users/52223
ln -s /Volumes/4TBMacData/git $HOME/gitnpm install -g @anthropic-ai/claude-codeRead README.md, CLAUDE.md docs/*, and run git ls-files to understand this codebase.
git remote add upstream [email protected]:mitchellh/nixos-config.git
git fetch upstream
git log upstream/main
git cherry-pick <commit>

# example
git cherry-pick 1fa2c834308e061e60a459f607d684740fc7fcd4
git cherry-pick 1fa2c8