High-Resolution Network (HRNet) is a "backbone" convolutional neural network (CNN) or feature extracting network architecture for computer vision tasks developed by Jingdong Wang and his team at Microsoft Research Asia and University of Science and Technology of China. Before we dive into understanding HRNet, let's review some of the existing CNN architectures for computer vision tasks, i.e. image classification, object detection, image segmentation, and see what led to the development of HRNet.
Existing CNN architectures (e.g., ResNets, VGGNets) work well for image classification task in computer vision. These classification networks connect the convolutions in a series from high resolution to low resolution. They work by downsampling layers gradually which reduce the spatial size of feature maps, and lead to rich low-resolution representations of feature maps that are enough for image classification tasks. These architectures follow LeNet-5 as shown below.

For other computer vision tasks which are position sensitive (e.g. object detection, region level recognition, pixel level recognition), require high resolution representations of feature maps. Researchers extended classification networks and developed architectures that raise the feature maps resolution representation by upsampling. These CNN architectures (e.g. U-Net, SegNet) compute low resolution feature representations similar to classification networks as mentioned before but they also recover high resolution representation of feature maps from low resolution representation by sequentially-connected convolutions. However, the recovered high-resolution representations obtained with upsampling processes are weak. High to low back to high leads to position-sensitivity loss, meaning the position of pixels does not remain the same as the original after upsampling from a downsampled layer.

HRNet was designed from scratch instead of from classification networks where convolutions are connected in series from high to low resolution as shown in the image below.

HRNet connect high-to-low resolution convolutions in parallel with repeated fusions where high and low resolutions share information with each other to build stronger high and low resolutions representations.

HRNet maintain high resolution representations through the whole network rather than recovering from low resolution. It build even stronger high and low resolution representation because of repeated fusions.
HRNet is instantiated as shown below. C is channels which can be 32 or 48. There are four stages in HRNet. The nth stage contains n streams corresponding to n resolutions.

The 1st stage consists of high-resolution convolutions. The 2nd stage repeats two-resolutions with 1 block of resnet modules. The 3rd stage repeats three-resolutions with 4 blocks of resnet modules. The 4th stage repeats four-resolutions with 3 blocks of resnet modules. ResNet does something similar where different group of resnet modules are selected in different stages. The HRNet team have not experimented with different resnet modules in different stages.

The paper performed experiments using HRNet-32 and HRNet-48 design. For HRNet-W32, the widths of other three parallel subnetworks are 64, 128, 256. For HRNet-W48, widths of other three parallel subnetworks are 96, 192, 384.
HRNet has performed well on pixel-level classification, region-level classification, and image-level classification. Our task that we will be looking at specifically is using HRNet for pose estimation or keypoint detection in images. We will be looking at MPII dataset for Human pose estimation, also known as human keypoint detection, and ATRW dataset for Amur Tiger keypoint detection.
Another thing to note for HRNet is it uses the top-down approach. In the case of keypoint detection, the network is built for estimating keypoints based on person bounding boxes which are detected by another network (FasterRCNN) during inference or testing.
[1] Deep High-Resolution Representation Learning for Visual Recognition. Jingdong Wang, Ke Sun, Tianheng Cheng, Borui Jiang, Chaorui Deng, Yang Zhao, Dong Liu, Yadong Mu, Mingkui Tan, Xinggang Wang, Wenyu Liu, Bin Xiao. Accepted by TPAMI.
In this tutorial, we will create a ubuntu docker container in which we will install everything required to replicate the project on your computer. Follow the steps below to train a model using the HRNet to detect keypoints in your dataset.
I have CUDA Toolkit 11.0 + cuDNN v8.0.5 installed on my computer. The docker file in this project has been created based on this assumption and you will have to modify the docker file if you are working with a different version of the CUDA toolkit and cuDNN. I am sure you can work it out and I will help along the way as well.
Download CUDA Toolkit 11.0 https://developer.nvidia.com/cuda-11.0-download-archive. Download cuDNN v8.0.5 for CUDA 11.0: https://developer.nvidia.com/rdp/cudnn-archive.
I refer you to this great article if you need help to install Install CUDA and CUDNN on Windows or Linux operating system: https://medium.com/geekculture/install-cuda-and-cudnn-on-windows-linux-52d1501a8805
I have made modifications to the original source code to make it work for myself. I encourage you to look at the original source at HRNet/deep-high-resolution-net.pytorch. For the rest of the tutorial, I will be working with my version of the code. Clone my project using the command below:
git clone https://github.com/gurpreet-ai/hrnet_keypoint_detection.git
I have a RTX 3090 in my machine. I am using an ubuntu docker image from nvidia with CUDA 11.0.3 and cuDNN v8.0.5. You can search for the image compatible with your GPU or CUDA toolkit and modify the DockerFile before building the image.
Search for the image compatible with your setup here: NGC Containers: Develop and deploy applications faster with GPU-optimized containers.
cd hrnet_keypoint_detection/docker build -t hrnet .
It took me approx. 16 minutes to download, build the docker image, and perform some installations. The docker image will be approximately 15.2 GB.
Start the docker container from the image with a volume specified.
docker run -it -v /home/gsingh/hrnet_keypoint_detection:/root/hrnet hrnet
If running Windows Subsystem for Linux (WSL) for giving GPU access to containers:
docker run -it --ipc=host --gpus all -v /home/gsingh/hrnet_keypoint_detection/:/root/hrnet hrnet
Note: In the command above, the filepath
/home/gsingh/hrnet_keypoint_detectionwill be different for you.
Once the container starts,
cd ~/hrnet/code/cocoapi-master/PythonAPI/makepython setup.py installcd ~/hrnet/code/deep-high-resolution-net.pytorch-master/lib/make
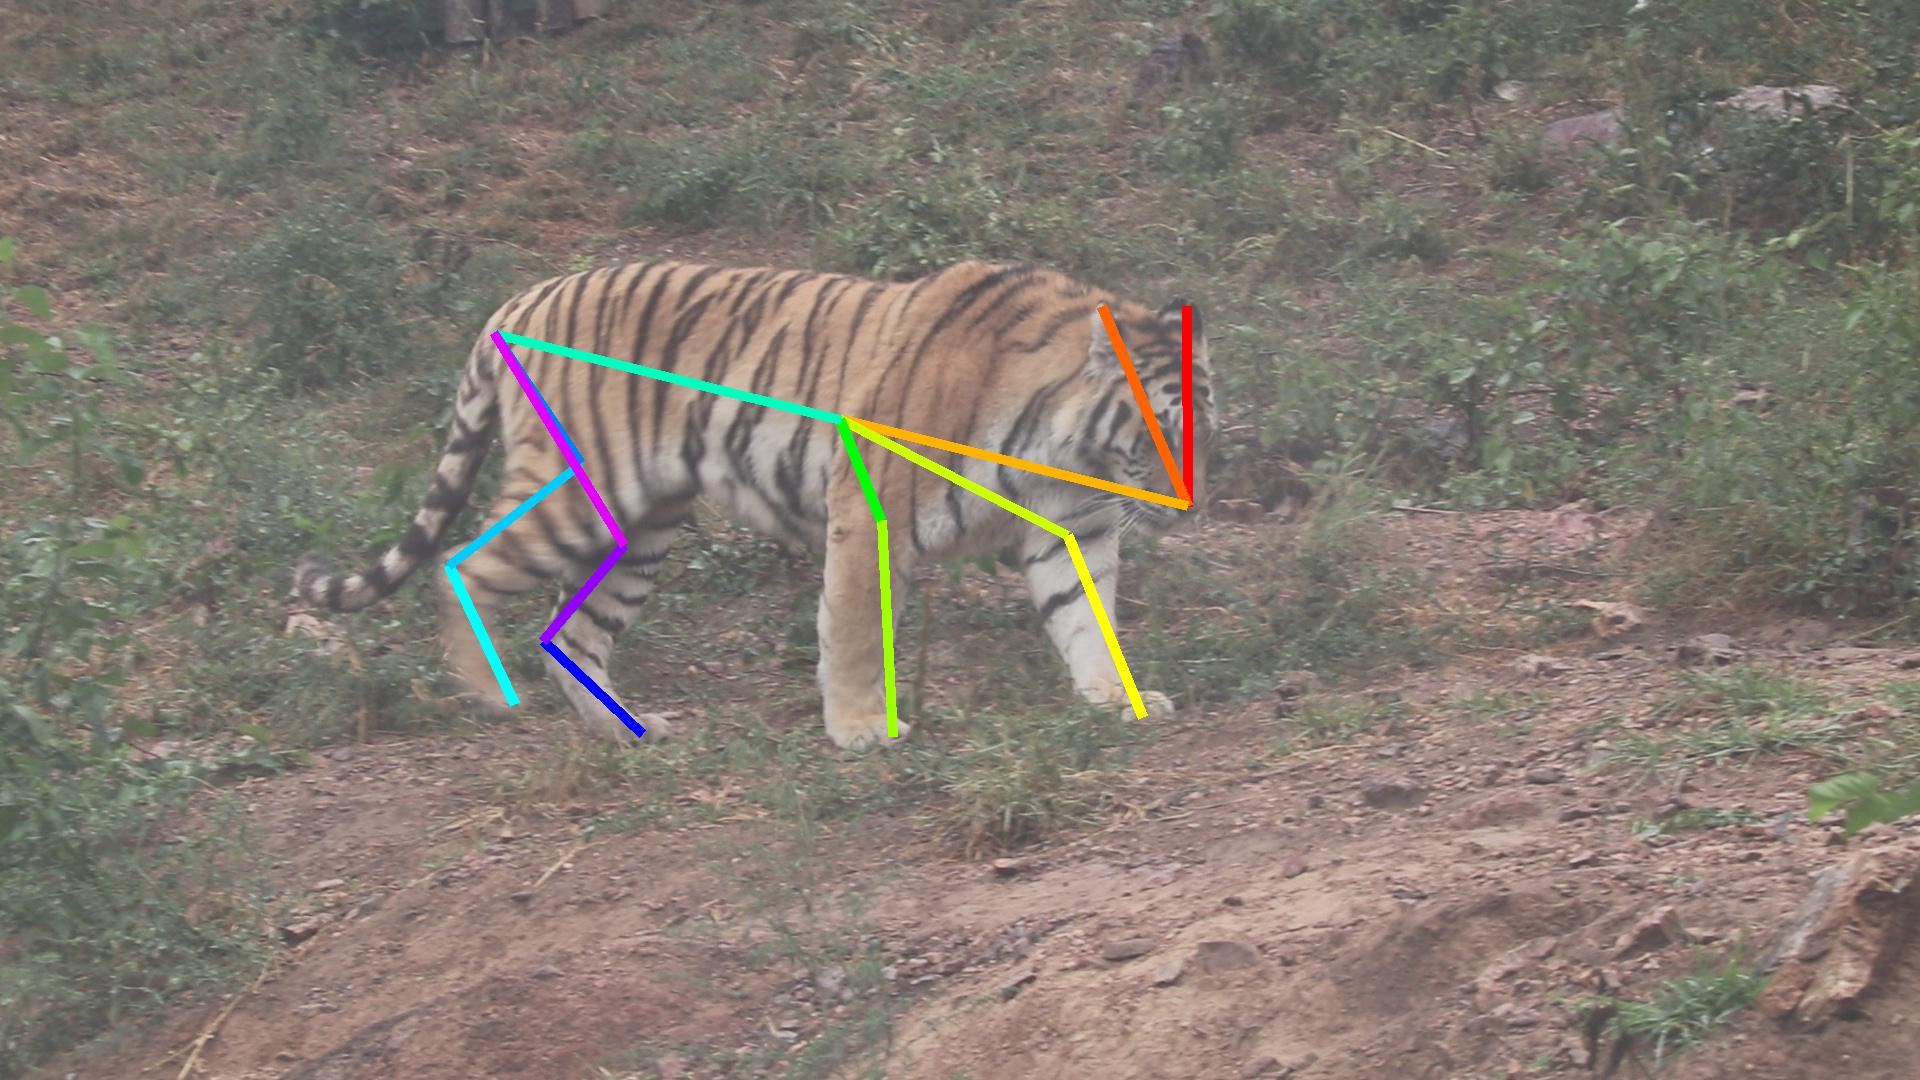
We want to detect keypoints on a tiger. The dataset we will use is ATRW (Amur Tiger Re-identification in the Wild) dataset. Follow the commands below for data preparation.
cd ~/hrnet/code/deep-high-resolution-net.pytorch-mastermkdir datacd datamkdir atwrcd atwrwget https://lilablobssc.blob.core.windows.net/cvwc2019/train/atrw_pose_train.tar.gzwget https://lilablobssc.blob.core.windows.net/cvwc2019/train/atrw_pose_val.tar.gzwget https://lilablobssc.blob.core.windows.net/cvwc2019/train/atrw_anno_pose_train.tar.gztar -xvf atrw_anno_pose_train.tar.gztar -xvf atrw_pose_train.tar.gztar -xvf atrw_pose_val.tar.gzmkdir imagesmkdir annotationsmv train imagesmv val imagesmv *.json annotations
cd ~/hrnet/code/deep-high-resolution-net.pytorch-masterpython tools/train.py --cfg experiments/atrw/w48_384x288.yaml
After training is finished, the trained model will be placed inside the output folder in ~/hrnet/code/.
cd ~/hrnet/code/deep-high-resolution-net.pytorch-masterpython demo/inference.py --cfg experiments/atrw/w48_384x288.yaml TEST.MODEL_FILE ../output/atrw/pose_hrnet/w48_384x288/final_state.pth
The output will be placed inside the ~/hrnet/code/deep-high-resolution-net.pytorch-master/demo/output_atrw. It will also contain a file showing the error between each ground truth keypoint and predicted keypoint location.