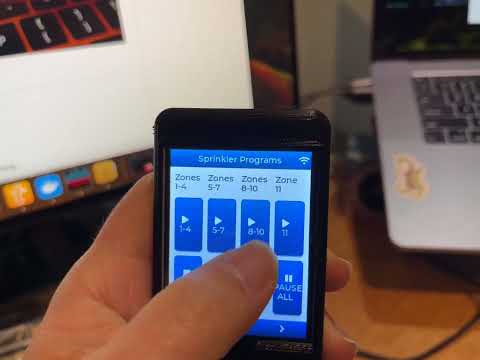
Control your OpenSprinkler system using a cheap yellow display (CYD) by leveraging LVGL graphics with ESPHome and Home Assistant. This project integrates OpenSprinkler with Home Assistant using the OpenSprinkler integration, providing a visually appealing and user-friendly interface.
Watch the final result in action on YouTube.
This guide demonstrates how to:
- Set up OpenSprinkler in a Docker container.
- Configure Home Assistant to integrate with OpenSprinkler.
- Use ESPHome to control a CYD display with LVGL widgets for sprinkler zone management.
- Tweak configurations for different CYD hardware (e.g., micro-USB vs. USB-C models).
- Docker installed: Docker Get Started Guide
-
Build and run the OpenSprinkler Docker image:
cd opensprinkler && \
docker build -t opensprinkler-demo .

docker run -d \
  --name opensprinkler-demo \
  --restart unless-stopped \
  -p 8080:80 \
  opensprinkler-demo
-
Access OpenSprinkler UI:
Open your browser and navigate to http://localhost:8080.
-
Import the backup configuration:
Use the UI to import
backup-1-11-2025.jsonfrom theopensprinklerfolder.

Reference: OpenSprinkler Firmware GitHub
-
Run Home Assistant in Docker:
cd homeassistant && \
docker run -d \
  --name homeassistant \
  --restart unless-stopped \
  -e TZ=America/New_York \
  -v "${PWD}":/config \
  -p 8123:8123 \
  ghcr.io/home-assistant/home-assistant:stable
-
Access Home Assistant:
Open your browser and navigate to http://localhost:8123. Create an account if needed.
HACS (Home Assistant Community Store) is required for third-party integrations like OpenSprinkler.
cd homeassistant && \
wget -O - https://get.hacs.xyz | bash -
Optional: Add input_boolean entities for toggle switches by including inputboolean.yaml in configuration.yaml:
echo 'input_boolean: !include inputboolean.yaml' >> configuration.yamlMake sure to restart Home Assistant to apply changes:
docker restart homeassistantFollow the UI prompts to complete HACS setup.


- Install the OpenSprinkler integration through HACS.


-
Use the following URL to access the controller, as shown in the image below.
- Controller URL:
http://host.docker.internal:8080 - Password: Match the password used in the OpenSprinkler container.
- Controller URL:

-
Run ESPHome in Docker:
cd esphome && \
docker run -d \
  --name esphome \
  --restart unless-stopped \
  -v "${PWD}":/config \
  -p 6052:6052 \
  esphome/esphome
-
Generate Secrets:
Run the following script in order to set your WiFi information. Or, if you prefer, use secrets.yaml.sample as reference and create secrets.yaml manually.
./generate_secrets.shExpected output:
Enter your WiFi SSID (default: YourWiFiSSID): <SSID>
Enter your WiFi Password (default: YourWiFiPassword): <WIFI_PASS>
Generated secrets.yaml with random passwords.
- Adjusting CYD Configuration
Depending on your CYD hardware (micro-USB or USB-C), adjust the display section in cyd.yaml as follows:
display:
  - id: main_display
    platform: ili9xxx
    model: ILI9341
    rotation: 0
color_order: bgrdisplay:
- id: main_display
platform: ili9xxx
model: ILI9342
rotation: 90
color_order: rgb-
Access ESPHome:
Open your browser and navigate to http://localhost:6052.
-
Prepare ESPHome Firmware:
Use the ESPHome dashboard to build the initial firmware for your CYD device.


-
Write Firmware:


6.1 Build
Use web.esphome.io to flash the firmware onto the CYD device.

6.2 Write
Connect device to USB port and install firmware just built in the previous step.


6.3 Collect Info on device
From logs, find out the IP Address used by the device.


Then, go back to the ESPHome link: http://localhost:6052. From there, obtain the the API key. You will be prompted for it when adding device to Home Assist.


-
Add the Device to Home Assistant:
After flashing, go to Home Assistant and add the ESPHome integration. Follow the prompts to configure your CYD device.


-
Allow the Device to perform Home Assistant actions:
Set the following option so the device can control OpenSprinkler:


The images folder contains a wealth of screenshots illustrating each step in greater detail. If you're ever stuck or unsure, refer to these visuals to guide you.
Browse the full images directory here
Explore LVGL widgets in cyd.yaml. You can customize your interface further with: