| Build server | Platforms | Build status |
|---|---|---|
| Github Actions | linux-x64, linux-arm64, win-x86, win-x64 | develop |
Package repository hosting is graciously provided by Cloudsmith. Cloudsmith is the only fully hosted, cloud-native, universal package management solution, that enables your organization to create, store and share packages in any format, to any place, with total confidence.
A simple xplat demo for installing and updating an .NET application. snapx is a powerful xplat .NET application with built-in support for delta updates, release channels (test, staging, production) and automatic deployment using GitHub Actions. Updates can delivered via NuGet or network share (UNC).
This demo application intends to demonstrate how you can build and release updates for this application on your local computer without requiring a NuGet server.
In order to get started you need to run snapx restore --build-installers which will download all assets required to create a new release.
snapx uses a concept called variable expansion (see below). By the default the following directory layout is used:
.snapx/artifactscontains your build artifacts. If you runbuild.ps1 -Version 1.0.0a new directory will be created.snapx/artifacts/$app/$rid/1.0.0..snapx/assetscontains assets for your applications. You don't need to worry about moving your existing assets to this directory it is only used for setting this application's icon. This can be seen if you open snapx.yml..snapx/installerscontains installers for your applications. There are two types of installersofflineandweb. The installers are only built when you runsnapx packorsnapx restore -i..snapx/packagescontains the nuget packages.nupkgrequired to build a new release for your applications. There are two types ofnupkgs, delta and full. A full package is only built when creating agenesis(full) release which contains everything required to run your application. When you build the next release adeltanupkg will be created. Thisnupkgcontains only the files that has been updated or deleted. A binary diff algorithm has been implemented so only the bits that has change is included in yourdeltanupkg.
Variable expansion
$appis the application name.$ridis a dotnet runtime identifier.
snapx.yml can be thought of as a nuspec for your applications. It allows you to customize which installer types that should be built, what icons that should be created during installation, persistent assets etc.
- Please follow installation instructions for .NET SDK that can be installed by visiting this link.
- After installing the SDK the next step is to install Powershell (only a required for this demo). You can install Powershell running
dotnet tool update powershell -g. This command installs Powershell as global dotnet tool on your computer machine. - The final step is to install
snapxby runningdotnet tool update snapx -g
git clone https://github.com/fintermobilityas/snapx.demoapp.git
This can be done by editing nuget.config found in this directory. Change demoapp-publish, demoapp-update to c:\demoapp_nupkgs. On Linux you can use /tmp/demoapp_nupkgs.
Windows
- Start a powershell terminal
$env:SNAPX_DEMOAPP_LOCK_TOKEN="<insert random guid here>".\build.ps1 -Version 1.0.0(Build output can be found in in.snapx/artifacts/1.0.0directory)snapx pack demoapp -r win-x64 -v 1.0.0
There should be two packages in your local NuGet feed, e.g. c:\demoapp_nupkgs
- Execute
.snapx/installers/win-x64/Setup-win-x64-demoapp-test-web.exe
The application should now be running. Repeat step 3. and 4. and increment the minor version by 1, e.g. .\build.ps1 -Version 1.0.1.
- Tap the
Check for updatesbutton. The application should now update to version1.0.1
Linux
- Open a powershell terminal (pwsh)
$env:SNAPX_DEMOAPP_LOCK_TOKEN="<insert random guid here>".\build.ps1 -Version 1.0.0(Build output can be found in in.snapx/artifacts/1.0.0directory)snapx pack demoapp -r linux-x64 -v 1.0.0
There should be two packages in your local NuGet feed, e.g. /tmp/demoapp_nupkgs
chmod +x .snapx/installers/linux-x64/Setup-linux-x64-demoapp-test-web | sh
The application should now be running. Repeat step 3. and 4. and increment the minor version by 1, e.g. .\build.ps1 -Version 1.0.1.
- Tap the
Check for updatesbutton. The application should now update to version1.0.1
snapx updates can be installed without user interaction. This is great for unattended applications. The demo application has button that is called Check for updates. There is nothing wrong with creating a background job (using either a Thread, Task or Hangfire) to check for updates every minute.
snapx automatically creates a delta nupkg each time you run snapx pack command. This means that your end-users only have to download the bits that changes between releases. This is great for users that do not have a fast broadband connection or customers that live in rural areas with poor cellphone reception.
Google Chrome has three different release cadence channels (canary, beta, stable). The same concept is implemented in snapx. In this demo application there are two channels available, test and production. Each commit pushed to the develop branch produces a delta update that can be consumed by end-users. This is not a recommended practice though, it's only for demoing purposes. You should push releases when merging to master branch.
You can list available release by running snapx inside the directory of this repository. It will render an overview for all your release.
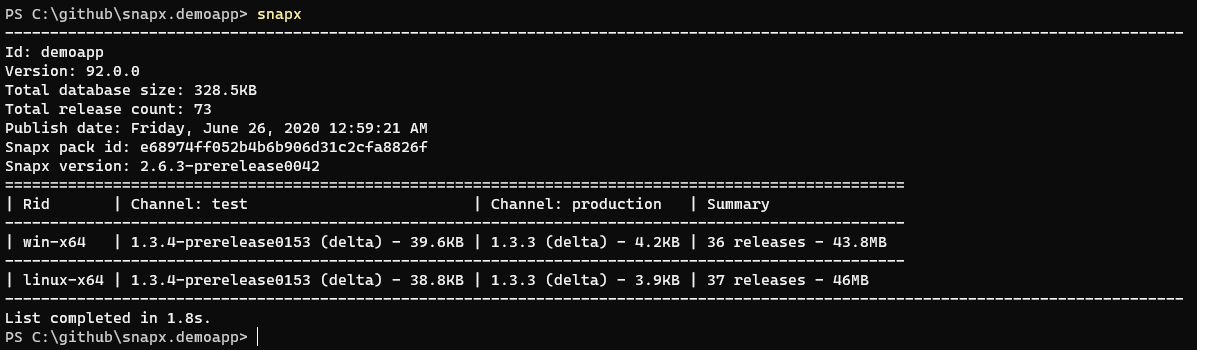
Because releases are always pushed to the first channel defined in your snapx.yml these releases are not available to users that consumes updates using the demoapp's production channel. In order for them to receive this update you have to promote the release. You can list available releases by running snapx inside this repository directory.
If you want to promote the current version for the test channel run the following command snapx promote demoapp -r win-x64 -c test. Then current release will be promoted to the production channels.
The supervisor monitors your applications. Snapx uses a stub executable that is responsible for starting your application. All shortcuts that are created during installation uses this stub application. Common use cases are automatic restart of your application after an unattended update or your application crashed. The demo application shows you how to start and stop the supervisor. It's optional if you want to enable this functionality.
No. You can push updates from your local machine to a local directory, a UNC path or a NuGet server such as Github Packages, nuget.org, cloudsmith.io etc.. Using a NuGet server is the preferred way because you never have to worry about your storing your release nupkgs.
snapx supports two types of installers, offline and web. The offline installer contains all the dependencies required to install your application. An offline installer has to be built each time you pack a new release. The web installer only has to be built once or when there has been an update to the snapx tool itself. This means that the web installer will always download the latest version of your application.
Because installers are built using your dependency graph you do not have to worry about storing them on a file share, or an external blob service such as Amazon S3, Azure Blobs etc. Installers can be rebuilt on-the-fly by running snapx restore -i. This repository uses a GitHub Actions Workflow to build the installers. When develop is merged into master the installers will be automatically attached to the GitHub release.
Windows: %LOCALAPPDATA%\demoapp
Linux: $HOME/.local/demoapp
Its common to have assets that should be persisted as the installer can be ran multiple times. In your .snapx/snapx.yml file you can set relative paths that will never be deleted when an application is reinstalled. For example if you add application.json to persistentAssets section this file will never be deleted from your application installation directory. If you add myimportantfolder then this directory will never be deleted.