This project uses real-time hand gesture recognition with MediaPipe and OpenCV to control an RGB LED. It connects to an ESP32 acting as its own Wi-Fi hotspot. You can adjust the Red, Green, and Blue color values of the LED wirelessly using simple hand movements detected by the system.
- Real-time Gesture Detection: Utilizes MediaPipe for accurate and fast hand landmark tracking.
- Customizable Gesture Recognition: Employs a
GradientBoostingClassifiertrained on a custom dataset (gestures_dataset.csv) to interpret specific hand gestures (e.g., "NUMBER_1" for Red, "THUMB_UP" for increment). - Wireless Communication: ESP32 creates its own Wi-Fi hotspot, allowing any connected device to send commands.
- HTTP-Based Control: Python script sends color data (hexadecimal format) to the ESP32 via simple HTTP POST requests.
- Dynamic RGB LED Control: Adjust Red, Green, and Blue values independently.
- Python 3.x
- MediaPipe: For hand landmark detection.
- OpenCV (
cv2): For camera interaction and visualization. - Scikit-learn: For machine learning model training (
GradientBoostingClassifier). - Pandas: For data handling.
- Requests: For HTTP communication.
- Joblib: For saving and loading the trained machine learning model.
- ESP32: Microcontroller acting as a Wi-Fi Access Point and LED driver.
- Arduino Framework: For ESP32 programming.
Follow these steps to get the project up and running on your system and ESP32 board.
1. Python Environment Setup & Project Execution This section guides you through setting up the Python environment, installing dependencies, and running the gesture detection application.:
-
Clone this repository Start by cloning the project to your local machine:
git clone https://github.com/Abzikel/LightSign.git cd LightSign -
Install required dependencies Install all necessary Python libraries from the
requirements.txtfile:pip install -r requirements.txt
-
Run the program Finally, launch the gesture detection application. Ensure you are connected to the ESP32's Wi-Fi hotspot BEFORE running this command in case you want to see the program working on a RGB LED.
python3 detection.py
(Note: If
python3doesn't work, trypythondepending on your system configuration.)
2. Customizing Your Gesture Dataset (Optional) If you wish to create your own gesture dataset or add new labels, follow these steps.
-
Change label Open
create_dataset.pyand modify thecurrent_labelvariable to the new gesture you want to record.current_label = "TESTING" # Example: "NUMBER_1"
-
Execute the program Run the script to start collecting data for the specified label:
python3 create_dataset.py
-
Collect Data
- Perform the gesture you defined.
- Press the
SPACEbar to save each frame's hand landmark data to the DataFrame for the current label. Collect enough samples for robust training.
-
Finish Collection When you are done collecting data for that specific label, press
ESCto stop the program. The collected data will be stored in a CSV file within thedatasetsfolder. -
Merge datasets After collecting data for all your desired labels, merge them into a single
gestures_dataset.csvfile for model training:python3 merge_dataset.py
This merged file will then be used by
train_model.py. -
Train the Machine Learning Model To train the gesture recognition model. This script will load your gestures_dataset.csv, train the GradientBoostingClassifier, and save the trained model as gesture_model.joblib. You only need to run this once, or whenever your dataset changes.
python3 train_model.py
3. ESP32 Program Upload This section details how to compile and upload the ESP32 firmware using PlatformIO.
-
Open ESP32 Firmware in PlatformIO Navigate to the
rgb_controller/directory within your project in PlatformIO IDE or VS Code with the PlatformIO extension. This folder contains theplatformio.inifile and the source code. -
Verify ESP32 Libraries Ensure your PlatformIO environment has the necessary libraries for the ESP32 web server:
WiFi.h(comes with ESP32 Arduino Core)WebServer.h(comes with ESP32 Arduino Core)
-
Configure Wi-Fi Hotspot Credentials Open
rgb_controller/src/main.cppand modify thessidandpasswordvariables to your desired Wi-Fi hotspot name and password. The password must be at least 8 characters long.const char* ssid = "YOUR_HOTSPOT_NAME"; // e.g., "ESP32_LED_Hotspot" const char* password = "YOUR_PASSWORD"; // Must be at least 8 characters
-
Upload to ESP32 Board Connect your ESP32 board to your computer via USB. In PlatformIO, click the "Upload" button (the right arrow icon) or run the
PlatformIO: Uploadcommand from the VS Code Command Palette (Ctrl+Shift+P).
- Select Channel: ("NUMBER_1" for Red, "NUMBER_2" for Green, "NUMBER_3" for Blue)
- Adjust Color Value: ("THUMB_UP" to increase, "THUMB_DOWN" to decrease)
- Observe the LED: If you have an ESP32 connected via WIFI you can check the LED to see the changes in real life.
- Exit: (
ESCkey)
1. MediaPipe Hand Landmark Selection
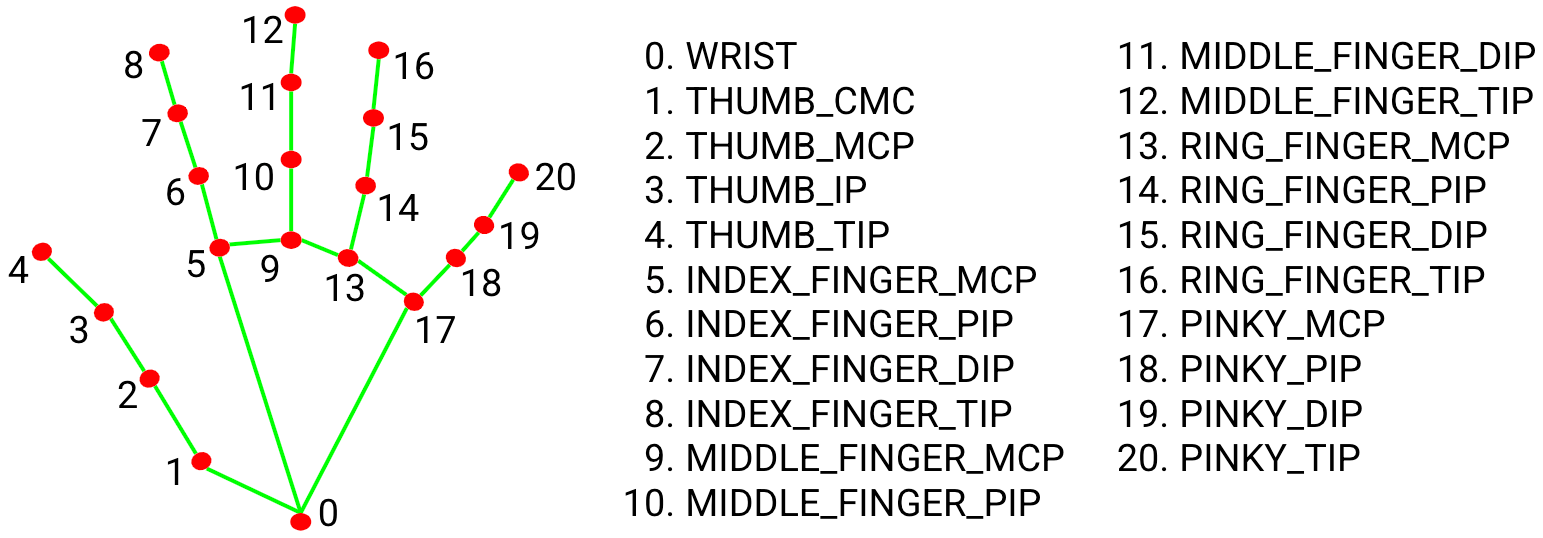
To ensure accurate gesture recognition, specific hand landmarks are crucial for normalization and feature extraction. I utilize the following key points provided by MediaPipe's hand tracking model:
WRIST(Landmark 0): Used as the origin point for normalizing all other landmark coordinates. This makes the gesture robust to hand size and distance from the camera.THUMB_TIP(Landmark 4): Essential for identifying thumb-related gestures (e.g., "THUMB_UP", "THUMB_DOWN").INDEX_TIP(Landmark 8): Key for numerical gestures (e.g., "NUMBER_1") and general finger extensions.MIDDLE_TIP(Landmark 12): Used in conjunction with other tips for numerical gestures (e.g., "NUMBER_2", "NUMBER_3").MIDDLE_MCP(Landmark 9): The metacarpophalangeal joint of the middle finger, used to calculate a dynamic scaling factor (d = distance(wrist, middle_mcp)) which further improves the robustness of the normalization against hand perspective changes.
Why these points? By normalizing coordinates relative to the WRIST and scaling by the WRIST to MIDDLE_MCP distance, the system becomes highly adaptable to varying camera distances and hand sizes, ensuring consistent gesture recognition.
2. ESP32 - RGB LED Wiring Diagram
To connect your RGB LED to the ESP32, follow this simple wiring diagram. Ensure you are using a Common Cathode RGB LED and resistors to protect your LED from excessive current (Minimum recommended 220Ω).

Pin Connections:
- RED LED Pin: ESP32 GPIO 23
- GREEN LED Pin: ESP32 GPIO 22
- BLUE LED Pin: ESP32 GPIO 21
- Common Cathode ESP32 GND
3. Communication Protocol (Python to ESP32)
The Python script communicates with the ESP32 via a simple HTTP POST request.
- ESP32 Endpoint: The ESP32 hosts a web server on its AP IP address (e.g.,
192.168.4.1) on port 80. - Color Endpoint: The primary endpoint for color control is
/setColor. - Request Method:
POST - Request Body: The hexadecimal color code (e.g.,
#FF00FF) is sent directly in the plain text body of the POST request.
The ESP32's handleColorChange function parses this body and updates the LED PWM values accordingly.
This project is open-source and available under the LICENSE