虚拟化让我们可以方便的在主机系统上创建一个或多个虚拟机(或称成为客户机系统)。虚拟系统以进程的形式在用户空间运行,与主机系统隔离,并且可以具有与主机不同的系统。分配给虚拟系统的硬件资源是在软件层面实现的,具备可伸缩性和细粒化。虚拟系统及其配置都是以文件的形式保存在主机上,因此可以很方便地进行创建、删除、克隆、迁移、远程控制或连接到远程存储。
NOTE:
Not all operating systems are supported as a guest OS in a RHEL 8 host. For details, see Section 20.2, “Recommended features in RHEL 8 virtualization”.
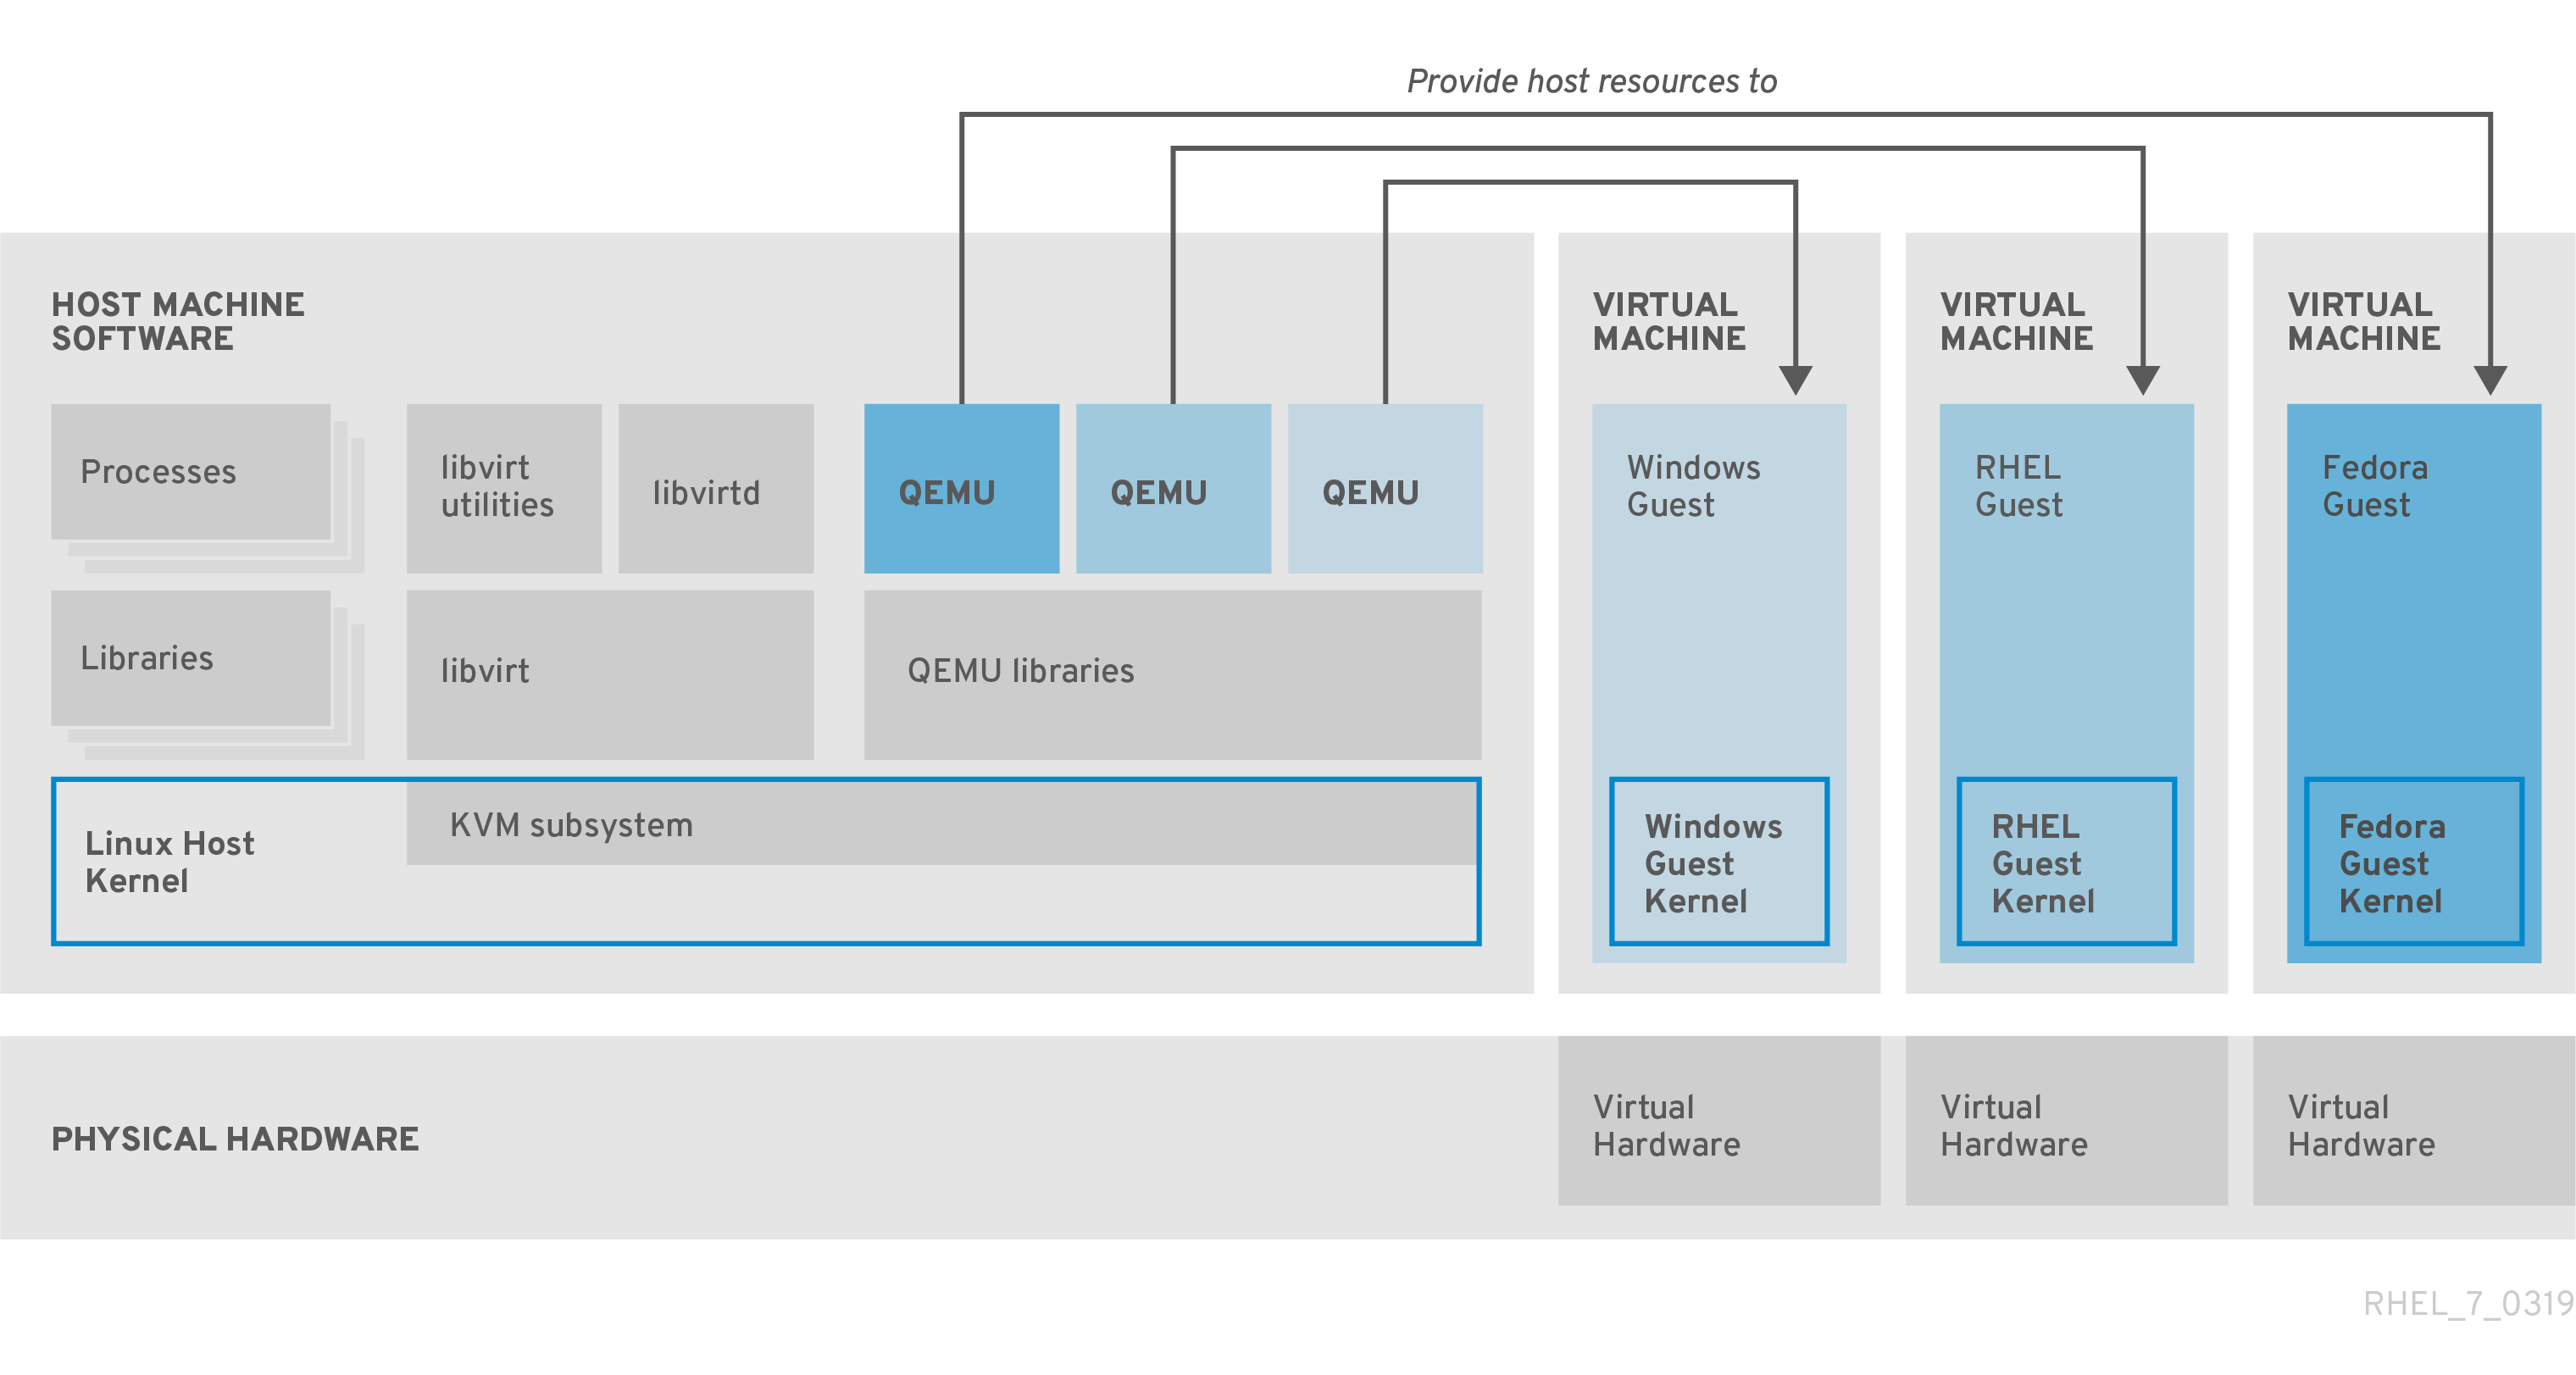
Virtualization in RHEL 8 consists of the following principal software components:
Hypervisor
The basis of creating virtual machines (VMs) in RHEL 8 is the hypervisor, a software layer that controls hardware and enables running multiple operating systems on a host machine.
The hypervisor includes the Kernel-based Virtual Machine (KVM) module and virtualization kernel drivers, such as virtio and vfio. These components ensure that the Linux kernel on the host machine provides resources for virtualization to user-space software.
At the user-space level, the QEMU emulator simulates a complete virtualized hardware platform that the guest operating system can run in, and manages how resources are allocated on the host and presented to the guest.
In addition, the libvirt software suite serves as a management and communication layer, making QEMU easier to interact with, enforcing security rules, and providing a number of additional tools for configuring and running VMs.
XML configuration
A host-based XML configuration file (also known as a domain XML file) determines all settings and devices in a specific VM. The configuration includes:
-
Metadata such as the name of the VM, time zone, and other information about the VM.
-
A description of the devices in the VM, including virtual CPUs (vCPUS), storage devices, input/output devices, network interface cards, and other hardware, real and virtual.
-
VM settings such as the maximum amount of memory it can use, restart settings, and other settings about the behavior of the VM.
For more information on the contents of an XML configuration, see sample VM XML configuration.
Component interaction
When a VM is started, the hypervisor uses the XML configuration to create an instance of the VM as a user-space process on the host. The hypervisor also makes the VM process accessible to the host-based interfaces, such as the virsh, virt-install, and guestfish utilities, or the web console GUI.
When these virtualization tools are used, libvirt translates their input into instructions for QEMU. QEMU communicates the instructions to KVM, which ensures that the kernel appropriately assigns the resources necessary to carry out the instructions. As a result, QEMU can execute the corresponding user-space changes, such as creating or modifying a VM, or performing an action in the VM’s guest operating system.
Note:
While QEMU is an essential component of the architecture, it is not intended to be used directly on RHEL 8 systems, due to security concerns. Therefore, using qemu-* commands is not supported by Red Hat, and it is highly recommended to interact with QEMU using libvirt.
For more information on the host-based interfaces, see Section 1.4, “Tools and interfaces for virtualization management”.
Figure 1.1. RHEL 8 virtualization architecture
You can manage virtualization in RHEL 8 using the command-line interface (CLI) or several graphical user interfaces (GUIs).
Command-line interface
The CLI is the most powerful method of managing virtualization in RHEL 8. Prominent CLI commands for virtual machine (VM) management include:
-
virsh - A versatile virtualization command-line utility and shell with a great variety of purposes, depending on the provided arguments. For example:
- Starting and shutting down a VM -
virsh startandvirsh shutdown - Listing available VMs -
virsh list - Creating a VM from a configuration file -
virsh create - Entering a virtualization shell -
virsh
- Starting and shutting down a VM -
For more information, see the virsh(1) man page.
-
virt-install- A CLI utility for creating new VMs. For more information, see the virt-install(1) man page. -
virt-xml- A utility for editing the configuration of a VM. -
guestfish- A utility for examining and modifying VM disk images. For more information, see theguestfish(1)man page.
Graphical interfaces
You can use the following GUIs to manage virtualization in RHEL 8:
- The RHEL 8 web console, also known as Cockpit, provides a remotely accessible and easy to use graphical user interface for managing VMs and virtualization hosts.
For instructions on basic virtualization management with the web console, see Chapter 5, Managing virtual machines in the web console.
- The Virtual Machine Manager (virt-manager) application provides a specialized GUI for managing VMs and virtualization hosts.
Important
Although still supported in RHEL 8, virt-manager has been deprecated. The web console is intended to become its replacement in a subsequent release. It is, therefore, recommended that you get familiar with the web console for managing virtualization in a GUI.
However, in RHEL 8, some features may only be accessible from either virt-manager or the command line. For details, see Section 5.4, “Differences between virtualization features in Virtual Machine Manager and the web console”.
- The Gnome Boxes application is a lightweight graphical interface to view and access VMs and remote systems. Gnome Boxes is primarily designed for use on desktop systems.
Important
Gnome Boxes is provided as a part of the GNOME desktop environment and is supported on RHEL 8, but Red Hat recommends that you use the web console for managing virtualization in a GUI.
Additional resources
For instructions on basic virtualization management using CLI and GUI, see Chapter 2, Getting started with virtualization.
The following Red Hat products are built on top of RHEL 8 virtualization features and expand the KVM virtualization capabilities available in RHEL 8. In addition, many limitations of RHEL 8 virtualization do not apply to these products:
Red Hat Virtualization (RHV)
RHV is designed for enterprise-class scalability and performance, and enables the management of your entire virtual infrastructure, including hosts, virtual machines, networks, storage, and users from a centralized graphical interface.
Red Hat Virtualization can be used by enterprises running large deployments or mission-critical applications. Examples of large deployments suited to Red Hat Virtualization include databases, trading platforms, and messaging systems that must run continuously without any downtime.
For more information about Red Hat Virtualization, see the Red Hat Customer Portal or the Red Hat Virtualization documentation suite.
To download a fully supported 60-day evaluation version of Red Hat Virtualization, see the Red Hat Customer Portal.
Red Hat OpenStack Platform (RHOSP)
Red Hat OpenStack Platform offers an integrated foundation to create, deploy, and scale a secure and reliable public or private OpenStack cloud.
For more information about Red Hat OpenStack Platform, see the Red Hat Customer Portal or the Red Hat OpenStack Platform documentation suite.
Note
For details on virtualization features not supported on RHEL but supported on RHV or RHOSP, see Section 20.3, “Unsupported features in RHEL 8 virtualization”.
In addition, specific Red Hat products provide operating-system-level virtualization, also known as containerization:
-
Containers are isolated instances of the host OS and operate on top of an existing OS kernel. For more information on containers, see the Red Hat Customer Portal.
-
Containers do not have the versatility of KVM virtualization, but are more lightweight and flexible to handle. For a more detailed comparison, see the Introduction to Linux Containers.
To start using virtualization in RHEL 8, follow the steps below. The default method for this is using the command-line interface (CLI), but for user convenience, some of the steps can be completed in the the web console GUI.
- Enable the virtualization module and install the virtualization packages.
- Create a virtual machine (VM).
- Start the VM.
- Connect to the VM.
Note
The web console currently provides only a subset of VM management functions, so using the command line is recommended for advanced use of virtualization in RHEL 8.
To use virtualization in RHEL 8, you must enable the virtualization module, install virtualization packages, and ensure your system is configured to host virtual machines (VMs).
-
Install the packages in the RHEL 8 virtualization module:
# yum module install virt -
Install the
virt-installandvirt-viewerpackages:# yum install virt-install virt-viewer -
Start the
libvirtdservice.# systemctl start libvirtd -
Verify that your system is prepared to be virtualization host:
# virt-host-validate
[...]
QEMU: Checking for hardware virtualization              : PASS
QEMU: Checking if device /dev/kvm exists                : PASS
QEMU: Checking if device /dev/kvm is accessible         : PASS
QEMU: Checking if device /dev/vhost-net exists          : PASS
[...]
-
If all virt-host-validate checks return a
PASSvalue, your system is prepared for creating VMs.If any of the checks return a
FAILvalue, follow the displayed instructions to fix the problem.If any of the checks return a
WARNvalue, consider following the displayed instructions to improve virtualization capabilities.
Additional information
-
Note that if virtualization is not supported by your host CPU, virt-host-validate generates the following output:
QEMU: Checking for hardware virtualization: FAIL (Only emulated CPUs are available, performance will be significantly limited)However, attempting to create VMs on such a host system will fail, rather than have performance problems.
To create a virtual machine (VM) in RHEL 8, use the command line interface or the RHEL 8 web sonsole.
Prerequisites
- Virtualization is installed and enabled on your system.
- You have sufficient amount of system resources to allocate to your VMs, such as disk space, RAM, or CPUs. The recommended values may vary significantly depending on the intended tasks and workload of the VMs.
Warning
Installing from a host CD-ROM or DVD-ROM device is not possible in RHEL 8. If you select a CD-ROM or DVD-ROM as the installation source when using any VM installation method available in RHEL 8, the installation will fail. For more information, see the Red Hat Knowledgebase.
To create a virtual machine (VM) on your RHEL 8 host using the virt-install utility, follow the instructions below.
Prerequisites
- Virtualization is enabled on your host system.
- An openrating system (OS) installation source is available locally or on a network. This can be one fo the following:
- An ISO image of an installation medium
- A disk image of an existing VM installation
- Optional: A Kickstart file can be provided for faster and easier configuration of the installation.
Procedure
To create a VM and start its OS installation, use the virt-install command, along with the following mandatory arguments:
- The name of the new machine
- The amount of allocated memory
- The number of allocated CPUs (vCPUs)
- The type and size of the allocated storage
- The type and location of the OS installation source
Based on the chosen installation method, the necessary options and values can vary. See below for examples:
-
The following creates a VM named demo-guest1
# virt-install --name demo-guest1 --memory 2048 --vcpus 2 --disk size=80 --os-variant win10 --cdrom /home/username/Downloads/Win10install.iso -
The following creates a VM named demo-guest2
# virt-install --name demo-guest2 --memory 4096 --vcpus 4 --disk none --livecd --os-variant rhel8.0 --cdrom /home/username/Downloads/rhel8.iso -
The following creates a VM that connects to an existing disk image.
# virt-install --name demo-guest3 --memory 2048 --vcpus 2 --os-variant rhel8.0 --import --disk /home/username/backup/disk.qcow2 -
The following creates a VM by using a URL. the OS is automatically configured with a kickstart file.
# virt-install --name demo-guest4 --memory 2048 --vcpus 2 --disk size=160 --os-variant rhel8.0 --location http://example.com/OS-install --initrd-inject /home/username/ks.cfg --extra-args="ks=file:/ks.cfg console=tty0 console=ttyS0,115200n8" -
The following creates a VM which installs in text-only mode, without graphics. It connects the guest console to the serial console. This kind of installation is useful when connecting to a host over a slow network link.
# virt-install --name demo-guest5 --memory 16384 --vcpus 16 --disk size=280 --os-variant rhel8.0 --location RHEL8.iso --graphics none --extra-args='console=ttyS0' -
The following creates a VM named demo-guest6, which has the same configuration as demo-guest5, but resides on the 10.0.0.1 remote host.
# virt-install --connect qemu+ssh://root@10.0.0.1/system --name demo-guest6 --memory 16384 --vcpus 16 --disk size=280 --os-variant rhel8.0 --location RHEL8.iso --graphics none --extra-args='console=ttyS0'
If the VM is created successfully, a virt-viewer window opens with a graphical console of the VM and starts the guest OS installation.
Troubleshooting
-
If
virt-installfails with acannot find default networkerror:a. Ensure that the libvirt-daemon-config-network package is installed:
# yum info libvirt-daemon-config-network
Installed Packages
Name         : libvirt-daemon-config-network
[...]
b. Verify that the libvirt default network is active and configured to start automatically:
# virsh net-list --all
Name      State    Autostart   Persistent
--------------------------------------------
default   active   yes         yes
c. If it is not, activate the default network and set it to auto-start:
# virsh net-autostart default Network default marked as autostarted # virsh net-start default Network default started- If activating the default network fails with the following error, the libvirt-daemon-config-network package has not been installed correctly.
error: failed to get network 'default'
error: Network not found: no network with matching name 'default'
To fix this, re-install libvirt-daemon-config-network.
# yum reinstall libvirt-daemon-config-network- If activating the default network fails with an error similar to the following, a conflict has occurred between the default network’s subnet and an existing interface on the host.
error: Failed to start network default
error: internal error: Network is already in use by interface ens2
To fix this, use the virsh net-edit default command and change the 192.168.122.* values in the configuration to a subnet not already in use on the host.
To interact with the terminal of a virtual machine (VM) using the SSH connection protocol, follow the procedure below:
Prerequisites
-
You have network connection and root access privileges to the target VM.
-
If the target VM is located on a remote host, you also have connection and root access privileges to that host.
-
The
libvirt-nsscomponent is installed and enabled on the VM’s host. If it is not, do the following:- Install the
libvirt-nsspackage:
# yum install libvirt-nss- Edit the
/etc/nsswitch.conffile and addlibvirt_guestto the hosts line:
[...] passwd: compat shadow: compat group: compat hosts: files libvirt_guest dns [...] - Install the
Procedure
- Optional: When connecting to a remote VM, SSH into its physical host first. The following example demonstrates connecting to a host machine 10.0.0.1 using its root credentials:
# ssh root@10.0.0.1
root@10.0.0.1's password:
Last login: Mon Sep 24 12:05:36 2018
root~#
- Use the VM’s name and user access credentials to connect to it. For example, the following connects to to the "testguest1" VM using its root credentials:
# ssh root@testguest1
root@testguest1's password:
Last login: Wed Sep 12 12:05:36 2018
root~]#
Troubleshooting
-
If you do not know the VM’s name, you can list all VMs available on the host using the virsh list --all command:
# virsh list --all
Id    Name                           State
----------------------------------------------------
2     testguest1                    running
-     testguest2                    shut off
Using the virsh console command, it is possible to connect to the serial console of a virtual machine (VM).
This is useful when the VM:
- Does not provide VNC or SPICE protocols, and thus does not offer video display for GUI tools.
- Does not have a network connection, and thus cannot be interacted with using SSH.
Prerequisites
- The VM must have the serial console configured in its kernel command line. To verify this, the cat /proc/cmdline command output on the VM should include console=ttyS0. For example:
# cat /proc/cmdline
BOOT_IMAGE=/vmlinuz-3.10.0-948.el7.x86_64 root=/dev/mapper/rhel-root ro console=tty0 console=ttyS0,9600n8 rd.lvm.lv=rhel/root rd.lvm.lv=rhel/swap rhgb
If the serial console is not set up properly on a VM, using virsh console to connect to the VM connects you to an unresponsive guest console. However, you can still exit the unresponsive console by using the Ctrl+] shortcut.
-
To set up serial console on the VM, do the following:
a. On the VM, edit the /etc/default/grub file and add console=ttyS0 to the line that starts with GRUB_CMDLINE_LINUX.
b. Clear the kernel options that may prevent your changes from taking effect.
# grub2-editenv - unset kerneloptsc. Reload the Grub configuration:
# grub2-mkconfig -o /boot/grub2/grub.cfg
Generating grub configuration file ...
Found linux image: /boot/vmlinuz-3.10.0-948.el7.x86_64
Found initrd image: /boot/initramfs-3.10.0-948.el7.x86_64.img
[...]
done
d. Reboot the VM.
Procedure
- On your host system, use the virsh console command. The following example connects to the guest1 VM, if the libvirt driver supports safe console handling:
# virsh console guest1 --safe
Connected to domain guest1
Escape character is ^]

Subscription-name
Kernel 3.10.0-948.el7.x86_64 on an x86_64

localhost login:
- You can interact with the virsh console in the same way as with a standard command-line interface.
Additional resources
- For more information about the VM serial console, see the virsh man page.
Virtualization in RHEL 8 can present several distinct types of virtual devices that you can attach to virtual machines (VMs):
Emulated devices
Emulated devices are software implementations of widely used physical devices. Drivers designed for physical devices are also compatible with emulated devices. Therefore, emulated devices can be used very flexibly.
However, since they need to faithfully emulate a particular type of hardware, emulated devices may suffer a significant performance loss compared with the corresponding physical devices or more optimized virtual devices.
The following types of emulated devices are supported:
-
Virtual CPUs (vCPUs), with a large choice of CPU models available. The performance impact of emulation depends significantly on the differences between the host CPU and the emulated vCPU.
-
Emulated system components, such as PCI bus controllers
-
Emulated storage controllers, such as SATA, SCSI or even IDE
-
Emulated sound devices, such as ICH9, ICH6 or AC97
-
Emulated graphics cards, such as VGA or QXL cards
-
Emulated network devices, such as rtl8139
Paravirtualized devices
Paravirtualization provides a fast and efficient method for exposing virtual devices to VMs. Paravirtualized devices expose interfaces that are designed specifically for use in VMs, and thus significantly increase device performance. RHEL 8 provides paravirtualized devices to VMs using the virtio API as a layer between the hypervisor and the VM. The drawback of this approach is that it requires a specific device driver in the guest operating system.
It is recommended to use paravirtualized devices instead of emulated devices for VM whenever possible, notably if they are running I/O intensive applications. Paravirtualized devices decrease I/O latency and increase I/O throughput, in some cases bringing them very close to bare-metal performance. Other paravirtualized devices also add functionality to VMs that is not otherwise available.
The following types of paravirtualized devices are supported:
-
The paravirtualized network device (virtio-net).
-
Paravirtualized storage controllers:
- virtio-blk - provides block device emulation.
- virtio-scsi - provides more complete SCSI emulation.
-
The paravirtualized clock.
-
The paravirtualized serial device (virtio-serial).
-
The balloon device (virtio-balloon), used to share information about guest memory usage with the hypervisor.
Note, however, that the balloon device also requires the balloon service to be installed.
-
The paravirtualized random number generator (virtio-rng).
-
The paravirtualized graphics card (QXL).
Physically shared devices
Certain hardware platforms enable VMs to directly access various hardware devices and components. This process is known as device assignment or passthrough.
When attached in this way, some aspects of the physical device are directly available to the VM as they would be to a physical machine. This provides superior performance for the device when used in the VM. However, devices physically attached to a VM become unavailable to the host, and also cannot be migrated.
Nevertheless, some devices can be shared across multiple VMs. For example, a single physical device can in certain cases provide multiple mediated devices, which can then be assigned to distinct VMs.
The following types of passthrough devices are supported:
-
Virtual Function I/O (VFIO) device assignment - safely exposes devices to applications or VMs using hardware-enforced DMA and interrupt isolation.
-
USB, PCI, and SCSI passthrough - expose common industry standard buses directly to VMs in order to make their specific features available to guest software.
-
Single-root I/O virtualization (SR-IOV) - a specification that enables hardware-enforced isolation of PCI Express resources. This makes it safe and efficient to partition a single physical PCI resource into virtual PCI functions. It is commonly used for network interface cards (NICs).
-
N_Port ID virtualization (NPIV) - a Fibre Channel technology to share a single physical host bus adapter (HBA) with multiple virtual ports.
-
GPUs and vGPUs - accelerators for specific kinds of graphic or compute workloads. Some GPUs can be attached directly to a VM, while certain types also offer the ability to create virtual GPUs (vGPUs) that share the underlying physical hardware.
- Locate the bus and device value of the USB that you want to attach to the VM.
$ sudo lsusb
[...]
Bus 001 Device 002: ID 8087:8000 Intel Corp.
Bus 001 Device 001: ID 1d6b:0002 Linux Foundation 2.0 root hub
Bus 003 Device 006: ID 0951:1666 Kingston Technology DataTraveler 100 G3/G4/SE9 G2
[...]
- Use the
virt-xmlutility along with the--add-deviceargument. To attach a USB device to a running VM, add the--updateargument to the previous command.
virt-xml vm --update --add-device --hostdev 003.006
- To remove the usb attaching to the vm.
virt-xml vm --update --remove-device --hostdev 003.006
- To attach an ISO image as a virtual optical drive.
# virt-xml vm --add-device --disk /host/path/rhel?.iso,device=cdrom
note: the image must be on the host and the vm has been shutdown.
- To replace ISO images in virtual optical drives.
/* Locate the target device where the CD-ROM is attached to the VM.
# virsh dumpxml vm
[...]
<disk type='file' device='cdrom'>
      <driver name='qemu' type='raw'/>
      <source file='/host/path/rhel?.iso' index='1'/>
      <backingStore/>
      <target dev='sdb' bus='sata'/>
      <readonly/>
    </disk>
[...]

# virt-xml vm --edit target=sdb --disk /host/path/rhel?.iso
- To remove an ISO image from a virtual optical drive.
/* Locate the target device where the CD-ROM is attached to the VM.
# virsh dumpxml vm

# virt-xml vm --edit target=sdb --disk path=
- To remove an optinal drive attached to a vm.
/* Locate the target device where the CD-ROM is attached to the vm.
# virsh dumpxml vm

# virt-xml vm --remove-device --disk target=sdb
An emulated virtual device often uses more CPU and memory than a hardware network device. This can limit the performance of a virtual machine (VM). However, if any devices on your virtualization host support Single Root I/O Virtualization (SR-IOV), you can use this feature to improve the device performance, and possibly also the overall performance of your VMs.
(Please learn this Chapter again)
The following sections provide information about storage for virtual machines (VMs), including information about storage pools, storage volumes, and how they are used to provide storage for VMs.
Virtual machine storage
The following provides information about how storage pools and storage volumes are used to create storage for virtual machines (VMs).
A storage pool is a quantity of storage managed by the host and set aside for use by VMs. Storage volumes can be created from space in the storage pools. Each storage volume can be assigned to a VM as a block device, such as a disk, on a guest bus.
Storage pools and volumes are managed using libvirt. With the libvirt remote protocol, you can manage all aspects of VM storage. These operations can be performed on a remote host. As a result, a management application that uses libvirt, such as the RHEL web console, can be used to perform all the required tasks for configuring the storage for a VM.
The libvirt API can be used to query the list of volumes in the storage pool or to get information regarding the capacity, allocation, and available storage in the storage pool. A storage volume in the storage pool may be queried to get information such as allocation and capacity, which may differ for sparse volumes.
For storage pools that support it, the libvirt API can be used to create, clone, resize, and delete storage volumes. The APIs can also be used to upload data to storage volumes, download data from storage volumes, or wipe data from storage volumes.
Once a storage pool is started, a storage volume can be assigned to a VM using the storage pool name and storage volume name instead of the host path to the volume in the XML configuration files of the VM.
Storage pools
A storage pool is a file, directory, or storage device, managed by libvirt to provide storage to virtual machines (VMs). Storage pools are divided into storage volumes that store VM images or are attached to VMs as additional storage. Multiple VMs can share the same storage pool, allowing for better allocation of storage resources.
Storage pools can be persistent or transient:
- A persistent storage pool survives a system restart of the host machine.
- A transient storage pool only exists until the host reboots.
The virsh pool-define command is used to create a persistent storage pool, and the virsh pool-create command is used to create a transient storage pool.
Storage pool storage types
Storage pools can be either local or network-based (shared):
-
Local storage pools
Local storage pools are attached directly to the host server. They include local directories, directly attached disks, physical partitions, and Logical Volume Management (LVM) volume groups on local devices.
Local storage pools are useful for development, testing, and small deployments that do not require migration or large numbers of VMs.
-
Networked (shared) storage pools
Networked storage pools include storage devices shared over a network using standard protocols.
Storage pool usage example
To illustrate the available options for managing storage pools, the following describes a sample NFS server that uses mount -t nfs nfs.example.com:/path/to/share /path/to/data.
A storage administrator could define an NFS Storage Pool on the virtualization host to describe the exported server path and the client target path. This will allow libvirt to perform the mount either automatically when libvirt is started or as needed while libvirt is running. Files with the NFS Server exported directory are listed as storage volumes within the NFS storage pool.
When the storage volume is added to the VM, the administrator does not need to add the target path to the volume. They just needs to add the storage pool and storage volume by name. Therefore, if the target client path changes, it does not affect the VM.
When the storage pool is started, libvirt mounts the share on the specified directory, just as if the system administrator logged in and executed mount nfs.example.com:/path/to/share /vmdata. If the storage pool is configured to autostart, libvirt ensures that the NFS shared disk is mounted on the directory specified when libvirt is started.
Once the storage pool is started, the files in the NFS shared disk are reported as storage volumes, and the storage volumes' paths may be queried using the libvirt API. The storage volumes' paths can then be copied into the section of a VM’s XML definition that describes the source storage for the VM’s block devices. In the case of NFS, an application that uses the libvirt API can create and delete storage volumes in the storage pool (files in the NFS share) up to the limit of the size of the pool (the storage capacity of the share).
Stopping (destroying) a storage pool removes the abstraction of the data, but keeps the data intact.
Not all storage pool types support creating and deleting volumes. Stopping the storage pool (pool-destroy) undoes the start operation, in this case, unmounting the NFS share. The data on the share is not modified by the destroy operation, despite what the name of the command suggests. For more details, see man virsh.
Supported and unsupported storage pool types
The following is a list of storage pool types supported by RHEL:
- Directory-based storage pools
- Disk-based storage pools
- Partition-based storage pools
- GlusterFS storage pools
- iSCSI-based storage pools
- LVM-based storage pools
- NFS-based storage pools
- SCSI-based storage pools with vHBA devices
- Multipath-based storage pools
- RBD-based storage pools
The following is a list of libvirt storage pool types that are not supported by RHEL:
- Sheepdog-based storage pools
- Vstorage-based storage pools
- ZFS-based storage pools
Storage volumes
Storage pools are divided into storage volumes. Storage volumes are abstractions of physical partitions, LVM logical volumes, file-based disk images, and other storage types handled by libvirt. Storage volumes are presented to VMs as local storage devices, such as disks, regardless of the underlying hardware.
On the host machine, a storage volume is referred to by its name and an identifier for the storage pool from which it derives. On the virsh command line, this takes the form --pool storage_pool volume_name.
For example, to display information about a volume named firstimage in the guest_images pool.
# virsh vol-info --pool guest_images firstimage
  Name:             firstimage
  Type:             block
  Capacity:         20.00 GB
  Allocation:       20.00 GB
(read it later)
The vGPU feature makes it possible to divide a physical NVIDIA GPU device into multiple virtual devices, referred to as mediated devices. These mediated devices can then be assigned to multiple virtual machines (VMs) as virtual GPUs. As a result, these VMs can share the performance of a single physical GPU.
For your virtual machines (VMs) to connect over a network to your host, to other VMs on your host, and to locations on an external network, the VM networking must be configured accordingly. To provide VM networking, the RHEL 8 hypervisor and newly created VMs have a default network configuration, which can also be modified further. For example:
-
You can enable the VMs on your host to be discovered and connected to by locations outside the host, as if the VMs were on the same network as the host.
-
You can partially or completely isolate a VM from inbound network traffic to increase its security and minimize the risk of any problems with the VM impacting the host.
The following sections explain the various types of VM network configuration and provide instructions for setting up selected VM network configurations.
13.1. Understanding virtual networking
The connection of virtual machines (VMs) to other devices and locations on a network has to be facilitated by the host hardware. The following sections explain the mechanisms of VM network connections and describe the default VM network setting.
How virtual networks work
Virtual networking uses the concept of a virtual network switch. A virtual network switch is a software construct that operates on a host machine. VMs connect to the network through the virtual network switch. Based on the configuration of the virtual switch, a VM can use use an existing virtual network managed by the hypervisor, or a different network connection method.
The following figure shows a virtual network switch connecting two VMs to the network:
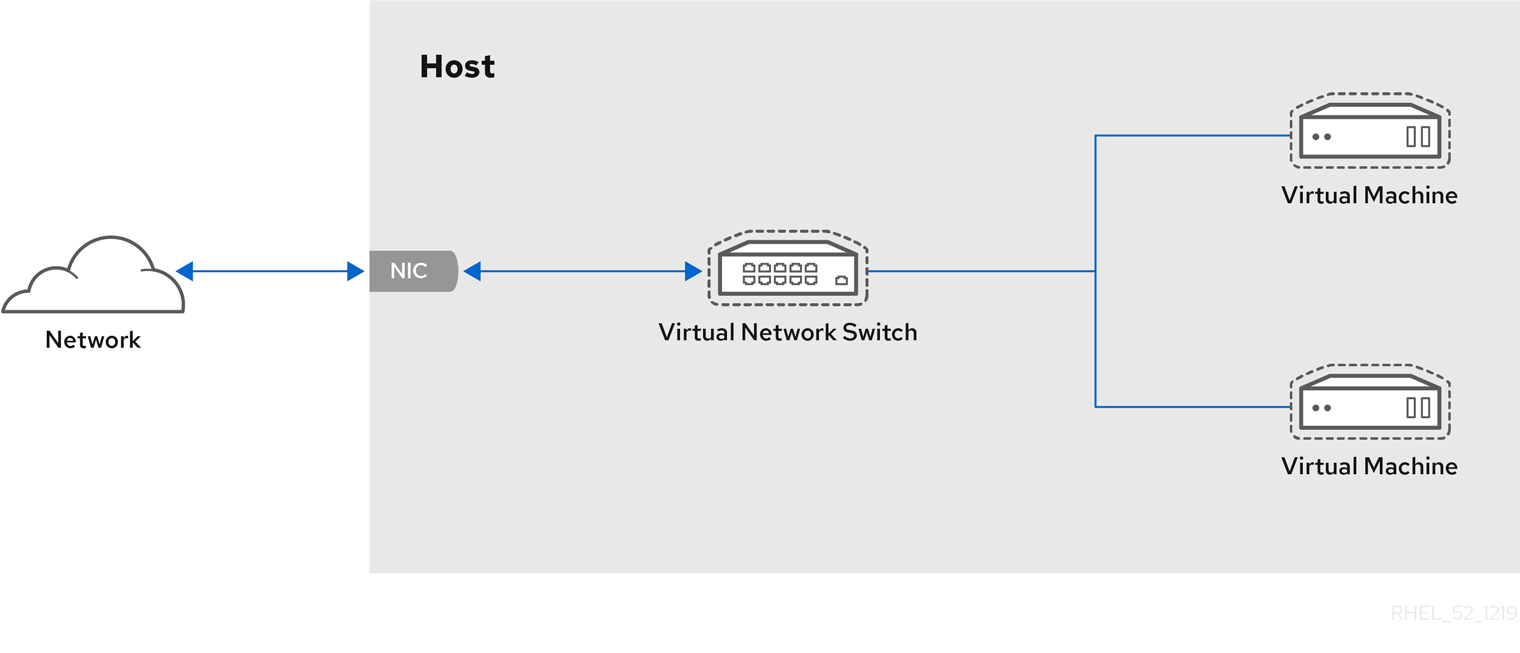
From the perspective of a guest operating system, a virtual network connection is the same as a physical network connection. Host machines view virtual network switches as network interfaces. When the libvirtd service is first installed and started, it creates virbr0, the default network interface for VMs.
To view information about this interface, use the ip utility on the host.
$ ip addr show virbr0
3: virbr0: <BROADCAST,MULTICAST,UP,LOWER_UP> mtu 1500 qdisc noqueue state
 UNKNOWN link/ether 1b:c4:94:cf:fd:17 brd ff:ff:ff:ff:ff:ff
 inet 192.168.122.1/24 brd 192.168.122.255 scope global virbr0
By default, all VMs on a single host are connected to the same NAT-type virtual network, named default, which uses the virbr0 interface. For details, see Section 13.1.2, “Virtual networking default configuration”.
For basic outbound-only network access from VMs, no additional network setup is usually needed, because the default network is installed along with the libvirt package, and is automatically started when the libvirtd service is started.
If a different VM network functionality is needed, you can create additional virtual networks and network interfaces and configure your VMs to use them. In addition to the default NAT, these networks and interfaces can be configured to use one of the following modes:
- Routed mode
- Bridged mode
- Isolated mode
- Open mode
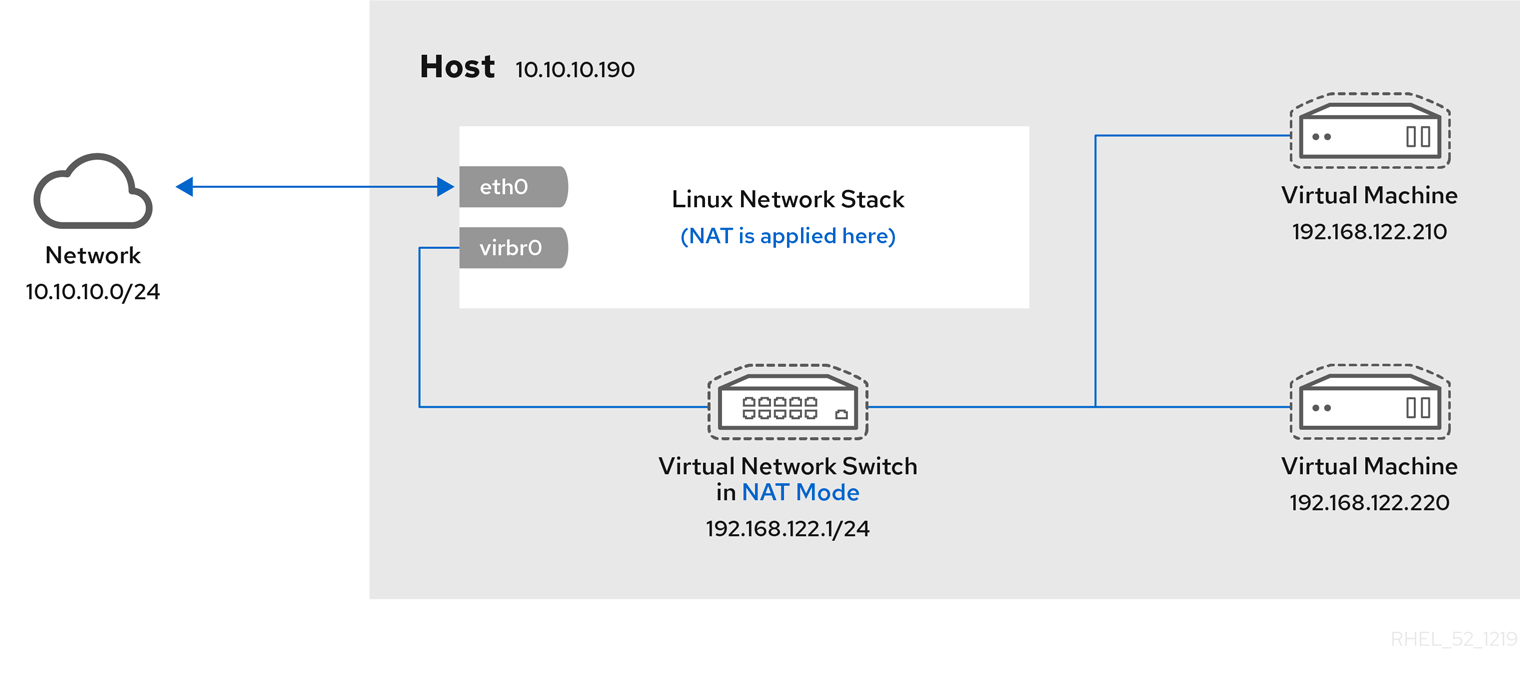
Virtual networking default configuration
When the libvirtd service is first installed on a virtualization host, it contains an initial virtual network configuration in network address translation (NAT) mode. By default, all VMs on the host are connected to the same libvirt virtual network, named default. VMs on this network can connect to locations both on the host and on the network beyond the host, but with the following limitations:
-
VMs on the network are visible to the host and other VMs on the host, but the network traffic is affected by the firewalls in the guest operating system’s network stack and by the libvirt network filtering rules attached to the guest interface.
-
VMs on the network can connect are not visible to locations outside the host. Outbound traffic is affected by the NAT rules, as well as the host system’s firewall.
The following diagram illustrates the default VM network configuration:

In many scenarios, the default VM networking configuration is sufficient. However, if adjusting the configuration is required, you can use the command-line interface (CLI) to do so. The following sections describe selected VM network setups for such situations.
Configuring externally visible virtual machines using the command-line interface
By default, a newly created VM connects to a NAT-type network that uses virbr0, the default virtual bridge on the host. This ensures that the VM can use the host’s network interface controller (NIC) for connecting to outside networks, but the VM is not reachable from external systems.
If you require a VM to appear on the same external network as the hypervisor, you must use bridged mode instead. To do so, attach the VM to a bridge device connected to the hypervisor’s physical network device. To use the command-line interface for this, follow the instructions below.
Prerequisites
-
A shut-down existing VM.
-
The IP configuration of the hypervisor. This varies depending on the network connection of the host. As an example, this procedure uses a scenario where the host is connected to the network using an ethernet cable, and the hosts' physical NIC MAC address is assigned to a static IP on a DHCP server. Therefore, the ethernet interface is treated as the hypervisor IP.
To obtain the IP configuration of the ethernet interface, use the ip addr utility:
# ip addr
[...]
enp0s25: <BROADCAST,MULTICAST,UP,LOWER_UP> mtu 1500 qdisc fq_codel state UP group default qlen 1000
    link/ether 54:ee:75:49:dc:46 brd ff:ff:ff:ff:ff:ff
    inet 10.0.0.148/24 brd 10.0.0.255 scope global dynamic noprefixroute enp0s25
Procedure
- Create and set up a bridge connection for the physical interface on the host. For instructions, see the Configuring a network bridge.
Note that in a scenario where static IP assignment is used, you must move the IPv4 setting of the physical ethernet interface to the bridge interface.
- Modify the VM’s network to use the created bridged interface. For example, the following sets testguest to use bridge0.
# virt-xml testguest --edit --network bridge=bridge0
Domain 'testguest' defined successfully.
- Start the VM.
# virsh start testguest
- In the guest operating system, adjust the IP and DHCP settings of the system’s network interface as if the VM was another physical system in the same network as the hypervisor.
The specific steps for this will differ depending on the guest OS used by the VM. For example, if the guest OS is RHEL 8, see Configuring an Ethernet connection.
Verification
- Ensure the newly created bridge is running and contains both the host’s physical interface and the interface of the VM.
# ip link show master bridge0
2: enp0s25: <BROADCAST,MULTICAST,UP,LOWER_UP> mtu 1500 qdisc fq_codel master bridge0 state UP mode DEFAULT group default qlen 1000
    link/ether 54:ee:75:49:dc:46 brd ff:ff:ff:ff:ff:ff
10: vnet0: <BROADCAST,MULTICAST,UP,LOWER_UP> mtu 1500 qdisc fq_codel master bridge0 state UNKNOWN mode DEFAULT group default qlen 1000
    link/ether fe:54:00:89:15:40 brd ff:ff:ff:ff:ff:ff
- Ensure the VM appears on the same external network as the hypervisor:
In the guest operating system, obtain the network ID of the system. For example, if it is a Linux guest:
# ip addr
[...]
enp0s0: <BROADCAST,MULTICAST,UP,LOWER_UP> mtu 1500 qdisc fq_codel state UP group default qlen 1000
    link/ether 52:54:00:09:15:46 brd ff:ff:ff:ff:ff:ff
    inet 10.0.0.150/24 brd 10.0.0.255 scope global dynamic noprefixroute enp0s0
From an external system connected to the local network, connect to the VM using the obtained ID.
# ssh root@10.0.0.150
root@10.0.0.150's password:
Last login: Mon Sep 24 12:05:36 2019
root~#*
If the connection works, the network has been configured successfully.
Additional resources
-
For instructions on creating an externally visible VM using the web console, see Section 13.4.1, “Configuring externally visible virtual machines using the web console”.
-
For additional information on bridged mode, see Section 13.5.3, “Virtual networking in bridged mode”.
-
In certain situations, such as when a using client-to-site VPN while the VM is hosted on the client, using bridged mode for making your VMs available to external locations is not possible.
To work around this problem, you can set a destination NAT for the VM. For details, see the Configuring and managing networking document.
Isolating virtual machines from each other using the command-line interface
To prevent a virtual machine (VM) from communicating with other VMs on your host, for example to avoid data sharing or to increase system security, you can completely isolate the VM from host-side network traffic.
By default, a newly created VM connects to a NAT-type network that uses virbr0, the default virtual bridge on the host. This ensures that the VM can use the host’s NIC for connecting to outside networks, as well as to other VMs on the host. This is a generally secure connection, but in some cases, connectivity to the other VMs may be a security or data privacy hazard. In such situations, you can isolate the VM by using direct macvtap connection in private mode instead of the default network.
In private mode, the VM is visible to external systems and can receive a public IP on the host’s subnet, but the VM and the host cannot access each other, and the VM is also not visible to other VMs on the host.
For instructions to set up macvtap private mode on your VM using the CLI, see below.
Prerequisites
-
An existing VM with the default NAT setup.
-
The name of the host interface that you want to use for the macvtap connection. The interface you must select will vary depending on your use case and the network configuration on your host. As an example, this procedure uses the host’s physical ethernet interface.
To obtain the name of the targeted interface:
$ ip addr
[...]
2: enp0s31f6: <NO-CARRIER,BROADCAST,MULTICAST,UP> mtu 1500 qdisc fq_codel state DOWN group default qlen 1000
    link/ether 54:e1:ad:42:70:45 brd ff:ff:ff:ff:ff:ff
[...]
Procedure
- Use the selected interface to set up private macvtap on the selected VM. The following example configures macvtap in private mode on the enp0s31f6 interface for the VM named panic-room.
# virt-xml panic-room --edit --network type=direct,source=enp0s31f6,source.mode=private
Domain panic-room XML defined successfully
Verification
- Start the updated VM.
# virsh start panic-room
Domain panic-room started
- List the interface statistics for the VM.
# virsh domstats panic-room --interface
Domain: 'panic-room'
  net.count=1
  net.0.name=macvtap0
  net.0.rx.bytes=0
  net.0.rx.pkts=0
  net.0.rx.errs=0
  net.0.rx.drop=0
  net.0.tx.bytes=0
  net.0.tx.pkts=0
  net.0.tx.errs=0
  net.0.tx.drop=0
If the command displays similar output, the VM has been isolated successfully.
Additional resources
-
For instructions on isolating a VM using the web console, see Section 13.4.2, “Isolating virtual machines from each other using the web console”.
-
For additional information about macvtap private mode, see Section 13.5.6, “Direct attachment of the virtual network device”.
-
For additional security measures that you can set on a VM, see Chapter 15, Securing virtual machines.
To modify the networking properties and behavior of your VMs, change the type of virtual network or interface the VMs use. The following sections describe the connection types available to VMs in RHEL 8. 13.5.1. Virtual networking with network address translation
By default, virtual network switches operate in network address translation (NAT) mode. They use IP masquerading rather than Source-NAT (SNAT) or Destination-NAT (DNAT). IP masquerading enables connected VMs to use the host machine’s IP address for communication with any external network. When the virtual network switch is operating in NAT mode, computers external to the host cannot communicate with the VMs inside the host.
WARNING
Virtual network switches use NAT configured by iptables rules. Editing these rules while the switch is running is not recommended, because incorrect rules may result in the switch being unable to communicate.
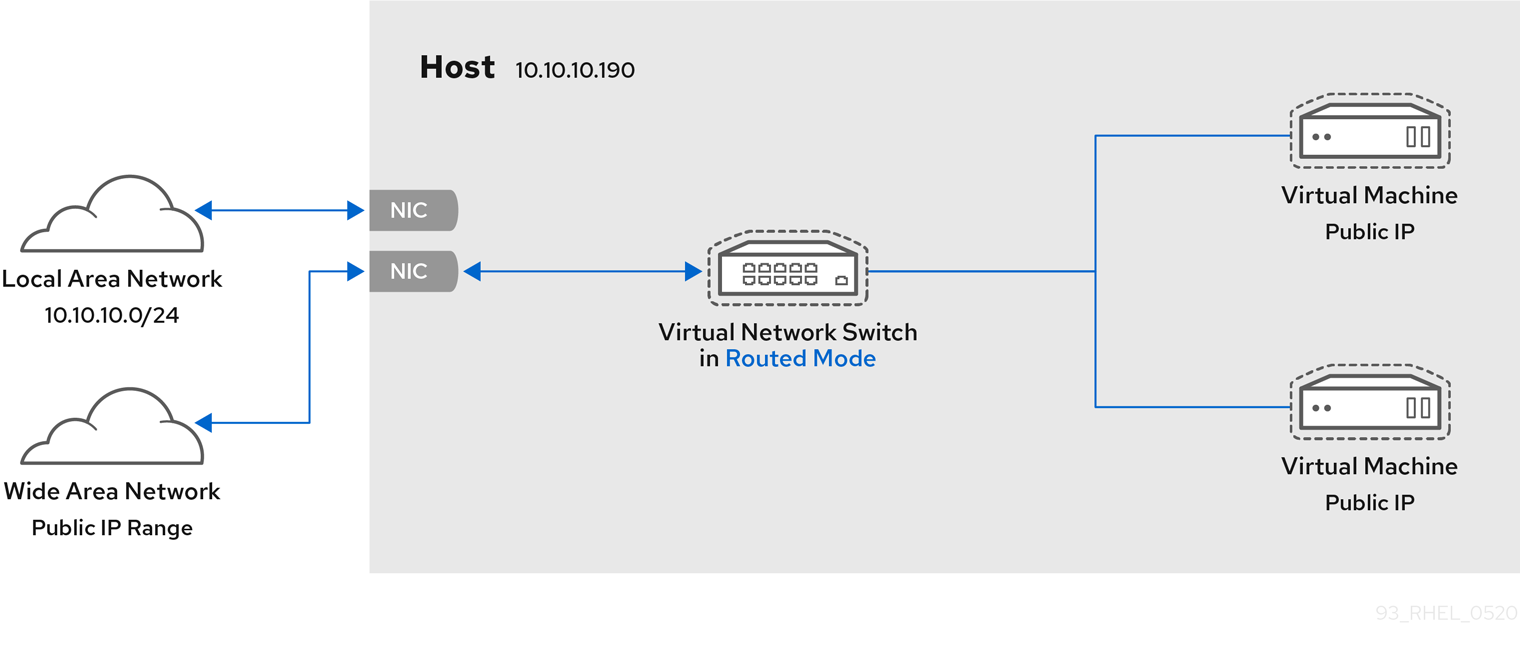
Virtual networking in routed mode
When using Routed mode, the virtual switch connects to the physical LAN connected to the host machine, passing traffic back and forth without the use of NAT. The virtual switch can examine all traffic and use the information contained within the network packets to make routing decisions. When using this mode, the virtual machines (VMs) are all in a single subnet, separate from the host machine. The VM subnet is routed through a virtual switch, which exists on the host machine. This enables incoming connections, but requires extra routing-table entries for systems on the external network.
Routed mode uses routing based on the IP address:

Common topologies that use routed mode include DMZs and virtual server hosting.
DMZ
You can create a network where one or more nodes are placed in a controlled sub-network for security reasons. Such a sub-network is known as a demilitarized zone (DMZ).

Host machines in a DMZ typically provide services to WAN (external) host machines as well as LAN (internal) host machines. Since this requires them to be accessible from multiple locations, and considering that these locations are controlled and operated in different ways based on their security and trust level, routed mode is the best configuration for this environment.
Virtual server hosting
A virtual server hosting provider may have several host machines, each with two physical network connections. One interface is used for management and accounting, the other for the VMs to connect through. Each VM has its own public IP address, but the host machines use private IP addresses so that only internal administrators can manage the VMs.
Virtual networking in bridged mode
In most VM networking modes, VMs automatically create and connect to the virbr0 virtual bridge. In contrast, in bridged mode, the VM connects to an existing Linux bridge on the host. As a result, the VM is directly visible on the physical network. This enables incoming connections, but does not require any extra routing-table entries.
Bridged mode uses connection switching based on the MAC address:
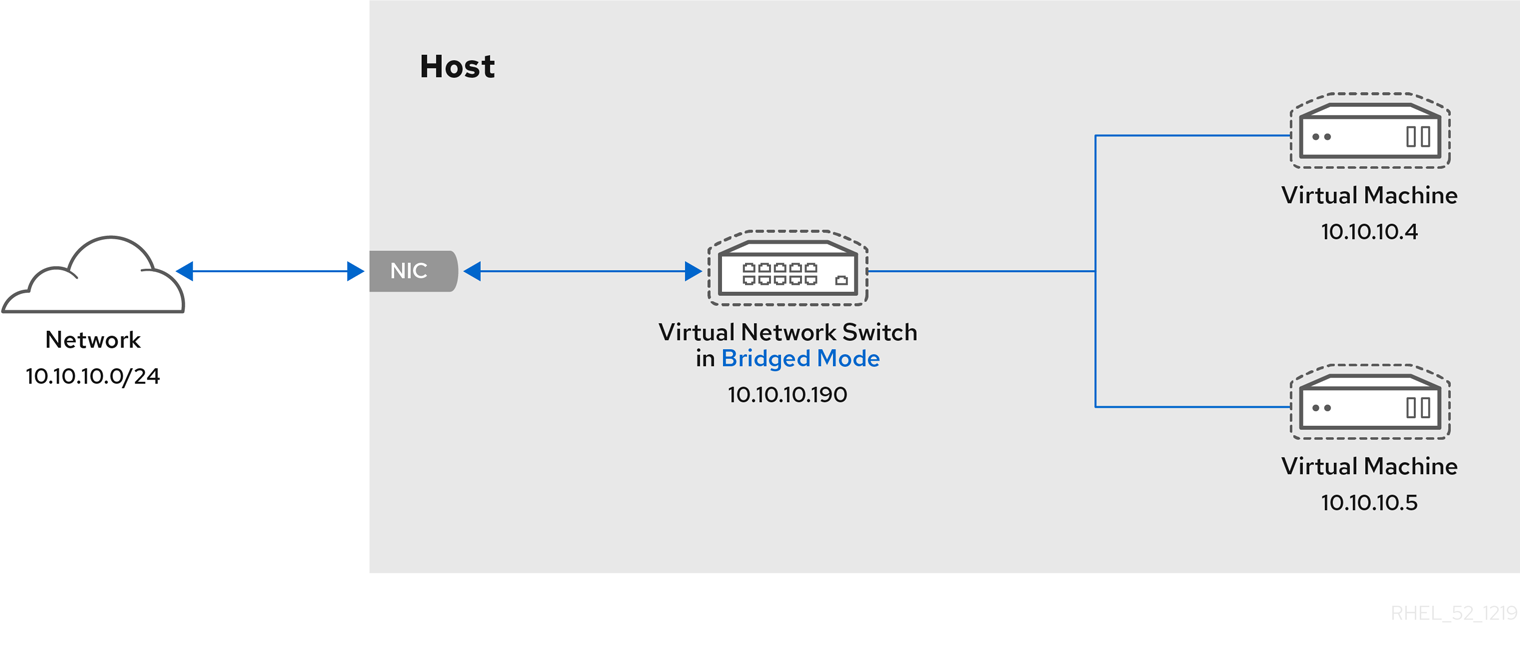
In bridged mode, the VM appear within the same subnet as the host machine. All other physical machines on the same physical network can detect the VM and access it.
Bridged network bonding
It is possible to use multiple physical bridge interfaces on the hypervisor by joining them together with a bond. The bond can then be added to a bridge, after which the VMs can be added to the bridge as well. However, the bonding driver has several modes of operation, and not all of these modes work with a bridge where VMs are in use.
The following bonding modes are usable:
- mode 1
- mode 2
- mode 4
In contrast, using modes 0, 3, 5, or 6 is likely to cause the connection to fail. Also note that media-independent interface (MII) monitoring should be used to monitor bonding modes, as Address Resolution Protocol (ARP) monitoring does not work correctly.
For more information on bonding modes, refer to the Red Hat Knowledgebase.
Common scenarios
The most common use cases for bridged mode include:
-
Deploying VMs in an existing network alongside host machines, making the difference between virtual and physical machines invisible to the end user.
-
Deploying VMs without making any changes to existing physical network configuration settings.
-
Deploying VMs that must be easily accessible to an existing physical network. Placing VMs on a physical network where they must access DHCP services.
-
Connecting VMs to an existing network where virtual LANs (VLANs) are used.
Additional resources
-
For instructions on configuring your VMs to use bridged mode, see Section 13.3.1, “Configuring externally visible virtual machines using the command-line interface” or Section 13.4.1, “Configuring externally visible virtual machines using the web console”.
-
For a detailed explanation of bridge_opts parameters, used to configure bridged networking mode, see the Red Hat Virtualization Administration Guide.
Virtual networking in isolated mode
When using isolated mode, virtual machines connected to the virtual switch can communicate with each other and with the host machine, but their traffic will not pass outside of the host machine, and they cannot receive traffic from outside the host machine. Using dnsmasq in this mode is required for basic functionality such as DHCP.

Virtual networking in open mode
When using open mode for networking, libvirt does not generate any iptables rules for the network. As a result, libvirt does not overwrite iptables rules provided by the host, and the user can therefore manually manage the VM’s iptables rules.
Direct attachment of the virtual network device
You can use the macvtap driver to attach a virtual machine’s NIC directly to a specified physical interface of the host machine. The macvtap connection has a number of modes, including private mode.
In this mode, all packets are sent to the external switch and will only be delivered to a target VM on the same host machine if they are sent through an external router or gateway and these send them back to the host. Private mode can be used to prevent the individual VMs on a single host from communicating with each other.

Additional resources
For instructions on configuring your VMs to use macvtap in private mode, see Section 13.3.2, “Isolating virtual machines from each other using the command-line interface” or Section 13.4.2, “Isolating virtual machines from each other using the web console”.
Comparison of virtual machine connection types
The following table provides information about the locations to which selected types of virtual machine (VM) network configurations can connect, and to which they are visible.
Table 13.1. Virtual machine connection types
| Connection to the host | Connection to other VMs on the host | Connection to outside locations | Visible to outside locations | |
|---|---|---|---|---|
| Bridged mode | YES | YES | YES | YES |
| NAT | YES | YES | YES | no |
| Routed mode | YES | YES | YES | YES |
| Isolated mode | YES | YES | no | no |
| Private mode | no | no | YES | YES |
| Open mode | Depends on the host’s iptables rules |
-
For additional information on networking configurations in RHEL 8, see the Configuring and managing networking document.
-
Specific network interface cards can be attached to VMs as SR-IOV devices, which increases their performance. For details, see Section 10.8, “Managing SR-IOV devices”.
You may frequently require to share data between your host system and the virtual machines (VMs) it runs. To do so quickly and efficiently, you can set up NFS or Samba file shares on your system.
(read it later)
As an administrator of a RHEL 8 system with virtual machines (VMs), ensuring that your VMs are as secure as possible significantly lowers the risk of your guest and host OSs being infected by malicious software.
This document outlines the mechanics of securing VMs on a RHEL 8 host and provides a list of methods to increase the security of your VMs.
When using virtual machines (VMs), multiple operating systems can be housed within a single host machine. These systems are connected with the host through the hypervisor, and usually also through a virtual network. As a consequence, each VM can be used as a vector for attacking the host with malicious software, and the host can be used as a vector for attacking any of the VMs.
Figure 15.1. A potential malware attack vector on a virtualization host
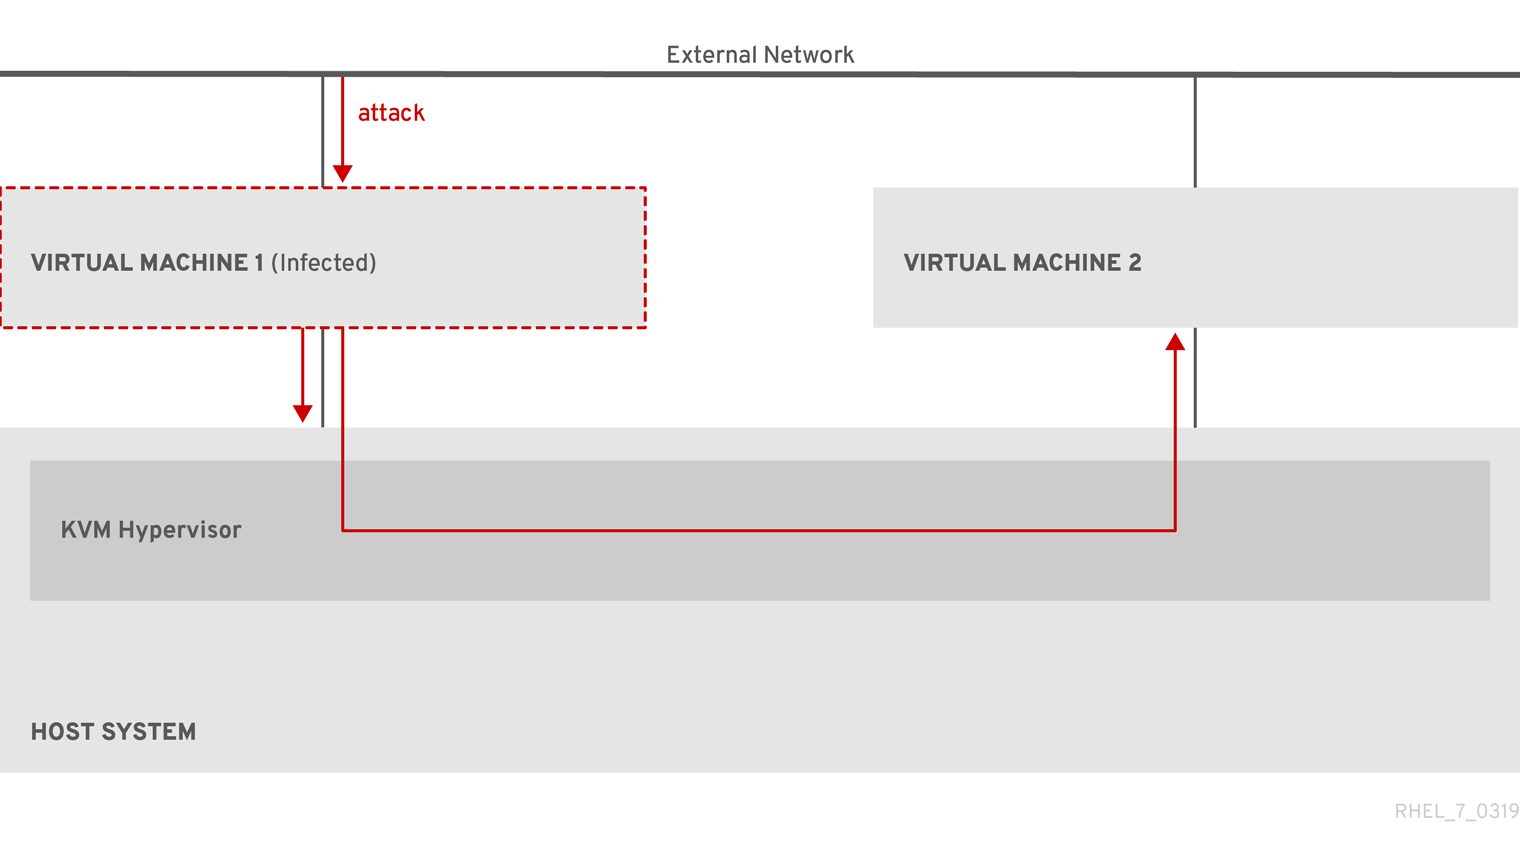
Because the hypervisor uses the host kernel to manage VMs, services running on the VM’s operating system are frequently used for injecting malicious code into the host system. However, you can protect your system against such security threats by using a number of security features on your host and your guest systems.
These features, such as SELinux or QEMU sandboxing, provide various measures that make it more difficult for malicious code to attack the hypervisor and transfer between your host and your VMs.
Figure 15.2. Prevented malware attacks on a virtualization host

Many of the features that RHEL 8 provides for VM security are always active and do not have to be enabled or configured. For details, see Section 15.4, “Automatic features for virtual machine security”.
In addition, you can adhere to a variety of best practices to minimize the vulnerability of your VMs and your hypervisor. For more information, see Section 15.2, “Best practices for securing virtual machines”.
Following the instructions below significantly decreases the risk of your virtual machines being infected with malicious code and used as attack vectors to infect your host system.
On the guest side:
-
Secure the virtual machine as if it was a physical machine. The specific methods available to enhance security depend on the guest OS.
If your VM is running RHEL 8, see Configuring and managing security in RHEL 8 for detailed instructions on improving the security of your guest system.
On the host side:
-
When managing VMs remotely, use cryptographic utilities such as SSH and network protocols such as SSL for connecting to the VMs.
-
Ensure SELinux is in Enforcing mode:
# getenforce
Enforcing
If SELinux is disabled or in Permissive mode, see the Using SELinux document for instructions on activating Enforcing mode.
Note
SELinux Enforcing mode also enables the sVirt RHEL 8 feature. This is a set of specialized SELinux booleans for virtualization, which can be manually adjusted for fine-grained VM security management.
-
Use VMs with SecureBoot:
SecureBoot is a feature that ensures that your VM is running a cryptographically signed OS. This prevents VMs whose OS has been altered by a malware attack from booting.
SecureBoot can only be applied when installing a Linux VM that uses OVMF firmware. For instructions, see Section 15.3, “Creating a SecureBoot virtual machine”.
-
Do not use
qemu-*commands, such asqemu-img.QEMU is an essential component of the virtualization architecture in RHEL 8, but it is difficult to manage manually, and improper QEMU configurations may cause security vulnerabilities. Therefore, using
qemu-*commands is not supported by Red Hat. Instead, it is highly recommended to interact with QEMU using libvirt utilities, such asvirsh,virt-install, andvirt-xml, as these orchestrate QEMU according to the best practices.
Additional resources
- For detailed information on modifying your virtualization booleans, see Section 15.5, “Virtualization booleans”.
The following provides instructions on creating a Linux virtual machine (VM) that uses the SecureBoot feature, which ensures that your VM is running a cryptographically signed OS. If the guest OS of a VM has been altered by malware, SecureBoot prevents the VM from booting, which stops the potential spread of the malware to your host machine.
Prerequisites
-
The VM is using the Q35 machine type.
-
The edk2-OVMF packages is installed:
# yum install edk2-ovmf
-
An operating system (OS) installation source is available locally or on a network. This can be one of the following formats:
- An ISO image of an installation medium
- A disk image of an existing VM installation
-
Optional: A Kickstart file can be provided for faster and easier configuration of the installation.
Procedure
- Use the
virt-installcommand to create a VM as detailed in Section 2.2.1, “Creating virtual machines using the command-line interface”. For the--bootoption, use theuefi,nvram_template=/usr/share/OVMF/OVMF_VARS.secboot.fdvalue. This uses theOVMF_VARS.secboot.fdandOVMF_CODE.secboot.fdfiles as templates for the VM’s non-volatile RAM (NVRAM) settings, which enables the SecureBoot feature.
For example:
# virt-install --name rhel8sb \
 --memory 4096 \
 --vcpus 4 \
 --os-variant rhel8.0 \
 --boot uefi,nvram_template=/usr/share/OVMF/OVMF_VARS.secboot.fd \
 --disk boot_order=2,size=10 \
 --disk boot_order=1,device=cdrom,bus=scsi,path=/images/RHEL-8.0-installation.iso
- Follow the OS installation procedure according to the instructions on the screen.
Verification
-
After the guest OS is installed, access the VM’s command line by opening the terminal in the graphical guest console or connecting to the guest OS using SSH.
-
To confirm that SecureBoot has been enabled on the VM, use the
mokutil --sb-statecommand:
# mokutil --sb-state
SecureBoot enabled
Additional resources
- For details on the installation process when creating VMs that use RHEL 8 as the guest OS, see Booting the RHEL 8 installation.
In addition to manual means of improving the security of your virtual machines listed in Section 15.2, “Best practices for securing virtual machines”, a number of security features are provided by the libvirt software suite and are automatically enabled when using virtualization in RHEL 8. These include:
System and user sessions
To access all the available utilities for virtual machine management in RHEL 8, you need to use the system session of libvirt. To do so, you must have root privileges on the system or be a part of the libvirt user group.
Non-root users that are not in the libvirt group can only access a user session of libvirt, which has to respect the access rights of the local user when accessing resources. For example, in the user session, you cannot detect or access VMs created in the system session or by other users. Also, available VM networking configuration options are significantly limited.
Note
The RHEL 8 documentation assumes you have libvirt system session privilege
Virtual machine separation
Individual VMs run as isolated processes on the host, and rely on security enforced by the host kernel. Therefore, a VM cannot read or access the memory or storage of other VMs on the same host.
QEMU sandboxing
A feature that prevents QEMU code from executing system calls that can compromise the security of the host.
Kernel Address Space Randomization (KASLR)
Enables randomizing the physical and virtual addresses at which the kernel image is decompressed. Thus, KASLR prevents guest security exploits based on the location of kernel objects.
For fine-grained configuration of virtual machines security on a RHEL 8 system, you can configure SELinux booleans on the host to ensure the hypervisor acts in a specific way.
To list all virtualization-related booleans and their statuses, use the getsebool -a | grep virt command:
$ getsebool -a | grep virt
[...]
virt_sandbox_use_netlink --> off
virt_sandbox_use_sys_admin --> off
virt_transition_userdomain --> off
virt_use_comm --> off
virt_use_execmem --> off
virt_use_fusefs --> off
[...]
To enable a specific boolean, use the setsebool -P boolean_name on command as root. To disable a boolean, use setsebool -P boolean_name off.
The following table lists virtualization-related booleans available in RHEL 8 and what they do when enabled:
Table 15.1. SELinux virtualization booleans
| SELinux Boolean | Description |
|---|---|
| staff_use_svirt | Enables non-root users to create and transition VMs to sVirt. |
| unprivuser_use_svirt | Enables unprivileged users to create and transition VMs to sVirt. |
| virt_sandbox_use_audit | Enables sandbox containers to send audit messages. |
| virt_sandbox_use_netlink | Enables sandbox containers to use netlink system calls. |
| virt_sandbox_use_sys_admin | Enables sandbox containers to use sys_admin system calls, such as mount. |
| virt_transition_userdomain | Enables virtual processes to run as user domains. |
| virt_use_comm | Enables virt to use serial/parallel communication ports. |
| virt_use_execmem | Enables confined virtual guests to use executable memory and executable stack. |
| virt_use_fusefs | Enables virt to read FUSE mounted files. |
| virt_use_nfs | Enables virt to manage NFS mounted files. |
| virt_use_rawip | Enables virt to interact with rawip sockets. |
| virt_use_samba | Enables virt to manage CIFS mounted files. |
| virt_use_sanlock | Enables confined virtual guests to interact with the sanlock. |
| virt_use_usb | Enables virt to use USB devices. |
| virt_use_xserver | Enables virtual machine to interact with the X Window System. |
To secure Windows virtual machines (VMs), you can enable basic level security using the standard hardware capabilities of the Windows device.
Prerequisites
-
Make sure you have installed the latest WHQL certified VirtIO drivers.
-
Make sure the VM’s firmware supports UEFI boot.
-
Install the
edk2-OVMFpackage on your host machine.
# yum install edk2-ovmf
- Install the
vTPMpackages on your host machine.
# yum install swtpm libtpms
-
Make sure the VM is using the Q35 machine architecture.
-
Make sure you have the Windows installation media.
Procedure
- Enable TPM 2.0 by adding the following parameters to the
<devices>section in the VM’s XML configuration.
<devices>
[...]
  <tpm model='tpm-crb'>
    <backend type='emulator' version='2.0'/>
  </tpm>
[...]
</devices>
-
Install Windows in UEFI mode. For more information on how to do so, see Creating a SecureBoot virtual machine.
-
Install the VirtIO drivers on the Windows VM. For more information on how to do so, see Installing virtio drivers on a Windows guest.
-
In UEFI, enable Secure Boot. For more information on how to do so, see Secure Boot.
Verification
- Ensure that the Device Security page on your Windows machine displays the following message:
Your device meets the requirements for standard hardware security.
Virtual machines (VMs) always experience some degree of performance deterioration in comparison to the host. The following sections explain the reasons for this deterioration and provide instructions on how to minimize the performance impact of virtualization in RHEL 8, so that your hardware infrastructure resources can be used as efficiently as possible.
(read it later)
VMs are run as user-space processes on the host. The hypervisor therefore needs to convert the host’s system resources so that the VMs can use them. As a consequence, a portion of the resources is consumed by the conversion, and the VM therefore cannot achieve the same performance efficiency as the host.
The impact of virtualization on system performance
More specific reasons for VM performance loss include:
-
Virtual CPUs (vCPUs) are implemented as threads on the host, handled by the Linux scheduler.
-
VMs do not automatically inherit optimization features, such as NUMA or huge pages, from the host kernel.
-
Disk and network I/O settings of the host might have a significant performance impact on the VM.
-
Network traffic typically travels to a VM through a software-based bridge.
-
Depending on the host devices and their models, there might be significant overhead due to emulation of particular hardware.
The severity of the virtualization impact on the VM performance is influenced by a variety factors, which include:
- The number of concurrently running VMs.
- The amount of virtual devices used by each VM.
- The device types used by the VMs.
Reducing VM performance loss
RHEL 8 provides a number of features you can use to reduce the negative performance effects of virtualization. Notably:
-
The tuned service can automatically optimize the resource distribution and performance of your VMs.
-
Block I/O tuning can improve the performances of the VM’s block devices, such as disks.
-
NUMA tuning can increase vCPU performance.
-
Virtual networking can be optimized in various ways.
Important
Tuning VM performance can have adverse effects on other virtualization functions. For example, it can make migrating the modified VM more difficult.
The tuned utility is a tuning profile delivery mechanism that adapts RHEL for certain workload characteristics, such as requirements for CPU-intensive tasks or storage-network throughput responsiveness. It provides a number of tuning profiles that are pre-configured to enhance performance and reduce power consumption in a number of specific use cases. You can edit these profiles or create new profiles to create performance solutions tailored to your environment, including virtualized environments.
Red Hat recommends using the following profiles when using virtualization in RHEL 8:
-
For RHEL 8 virtual machines, use the
virtual-guestprofile. It is based on the generally applicablethroughput-performanceprofile, but also decreases the swappiness of virtual memory. -
For RHEL 8 virtualization hosts, use the
virtual-hostprofile. This enables more aggressive writeback of dirty memory pages, which benefits the host performance.
Prerequisites
- The
tunedservice is installed and enabled.
Procedure
To enable a specific tuned profile:
- List the available
tunedprofiles.
# tuned-adm list

Available profiles:
- balanced             - General non-specialized tuned profile
- desktop              - Optimize for the desktop use-case
[...]
- virtual-guest        - Optimize for running inside a virtual guest
- virtual-host         - Optimize for running KVM guests
Current active profile: balanced
- Optional: Create a new
tunedprofile or edit an existing tuned profile.
For more information, see Customizing tuned profiles.
- Activate a tuned profile.
# tuned-adm profile selected-profile
 - To optimize a virtualization host, use the virtual-host profile.

 `# tuned-adm profile virtual-host`

 - On a RHEL guest operating system, use the virtual-guest profile.

 `# tuned-adm profile virtual-guest`
Additional resources
- For more information about
tunedandtunedprofiles, see Monitoring and managing system status and performance.
(read it later)
(read it later)
(read it later)
(read it later)
虚拟化管理的工具和接口
命令行工具
virsh
启动和关闭虚拟机。
列表虚拟机。
用配置文件创建虚拟机。
进入虚拟 shell。
virt-install
创建虚拟机的工具。
virt-xml
编辑虚拟机配置文件的工具。
guestfish
检测和修改虚拟机镜像的工具。
安装虚拟化环境和命令。
$ sudo lsmod | grep kvm		/* 查看内核是否加载了 kvm 模块。
$ sudo modprobe kvm		/* 如果未加载,则加载。

/* 可能需要加载符合处理器的模块。
$ sudo modprobe kvm_intel	/* Intel 处理器。
$ sudo modprobe kvm_amd		/* AMD 处理器。
注:如果使用半虚拟化磁盘或网络适配器,则需要加载 virtio_pci.ko,virtio_rng.ko,virtio_blk.ko 和 virtio_net.ko 模块(内核版本 2.6.25 开始提供)。
$ sudo dnf module install virt		/* 安装虚拟化模组。
/* 安装虚拟化工具集。
$ sudo dnf install virt-install virt-viewer libguestfs-tools-c

$ sudo systemctl start libvirtd		/* 启动 libvirtd 服务。

$ sudo virt-host-validate	/* 验证系统是否准备好备成为虚拟主机。

$ virt-install --name rhel7.9-node1 \
 --memory 1024 \
 --vcpus 1 \
 --disk size=20 \
 --os-variant rhel7.9 \
 --cdrom /tmp/rhel-server-7.9-x86_64-dvd.iso

$ virsh list --all		/* 现实所有的虚拟客户机。
$ virsh dominfo VM		/* 查看指定虚拟客户机信息。
$ virsh dumpxml VM		/* 获取指定虚拟客户机 XML 配置文件。
$ virsh domblklist VM		/* 列表指定虚拟客户机的块设备。
$ virsh domfsinfo VM		/* 获取指定虚拟客户机的文件系统及其挂载点。
$ virsh vcpuinfo VM		/* 获取指定虚拟客户机的处理器信息。
$ virsh start VM		/* 启动指定虚拟客户机。
$ virt-viewer VM		/* 连接指定虚拟客户机。
$ virsh shutdown VM		/* 关闭指定虚拟客户机。
$ virsh destroy VM		/* 销毁虚拟机实例,一般在无法关闭时使用。

/* 查询可选的选项参数时,可以使用 [virt-install | virt-xml] option=? 来查询。

/* 删除虚拟客户机。
$ virsh undefine guest1 --remove-all-storage --nvram

/* 保存虚拟客户机的状态。默认保存在目录 /var/lib/libvirt/qemu/save,文件为 VM_SA.save。
$ virsh managedsave VM_SA
$ virsh list --managed-save --all	/* 列表虚拟客户机。
$ virsh list --with-managed-save --all	/* 列表保存状态的虚拟客户机。
virt-install 命令
provision new virtual machines.
virt-install [OPTION]
/* 通用选项
-n, --name NAME		/* 指定虚拟机名,必须唯一。
--memory		/* 指定虚拟机内存。规格为 M。
--vcpus			/* 指定 cpu 数量。

/* 安装选项
-c, --cdrom PATH	/* 指定安装虚拟机的 ISO 文件或 CDROM。
--pxe			/* 指定首次从网路引导。
--boot uefi		/* 指定从 UEFI 引导。

/* 客户机选项
/* 指定客户机系统。使用 osinfo-query os 来查询可用的选项。
--os-variant OS_VARIANT

/* 存储选项
--disk size		/* 指定存储器大小。规格为 G。
       format		/* 指定存储器镜像格式,raw,qcow2,vmdk,等。默认 qcow2。
如果 virt-install 安装失败,报错: cannot find default network 错误。
/* 确保 libvirt-daemon-config-network 已安装。
# yum info libvirt-daemon-config-network

# virsh net-list --all	/* 验证 libvirt 默认网络已激活并且配置为自动启动。
# virsh net-info default /* For information about a specific interface.

# virsh net-autostart default
# virsh net-start default

/* 修改指定虚拟客户机配置。
$ virt-xml CentOS7-node1 --edit --network bridge=virbr0

/* 添加一个磁盘到到虚拟机。
$ virt-xml vm --add-device --disk /var/lib/libvirt/images/newdisk.qcow2,format=qcow2,size=20

/* 添加一个 usb 到虚拟机,并指定 usb 总线和设备号。 可以用 lsusb 查询。
$ virt-xml vm --add-device --update --hostdev 002.004

/* 用 virsh dumpxml 备份的 xml 文件来恢复无法启动的虚拟机。
$ virsh define domain.xml

/* 停机后,移除制定设备。
$ virt-xml vm --remove-device --disk target=vdb

/* 从运行的虚拟机中移除设备。
$ virt-xml vm --remove-device --update --hostdev type=usb
/* 克隆虚拟客户机。
/* 为了确保正确克隆虚拟机,首先要清除源虚拟机的唯一性信息,如何 SSH 密钥,固定的网络 MAC 地址配置。
/* 复制虚拟机文件以作为虚拟机克隆模板。
$ cp ~/.local/share/libvirt/images/rhel7.9-node1.qcow2 ~/.local/share/libvirt/images/rhel7.9-node1-orig.qcow2

/* 清除虚拟客户机唯一性数据。
$ virt-sysprep -a ~/.local/share/libvirt/images/rhel7.9-node1.qcow2
/* 比较清除后与源虚拟机的差异,以确保清洗成功。
$ virt-diff -a ~/.local/share/libvirt/images/rhel7.9-node1-orig.qcow2 -A ~/.local/share/libvirt/images/rhel7.9-node1.qcow2

/* 克隆 rhel7.9-node1,自动生成文件 rhel7.9-node1-clone.qcow2。
$ virt-clone --original rhel7.9-node1 --auto-clone

/* 克隆 rhel7.9-node1,并指定生成的机器名和文件名。
$ virt-clone --original rhel7.9-node1 --name rhel7.9-node2 --file ~/.local/share/libvirt/images/rhel7.9-node2.qcow2
红帽订阅注册
subscription-manager
	register
		--username=username
		--password=password
		--name=system_name
		--org=org		/* register your organization.

		--force			/* re-register your subscription.

		--activationkey=key	/* use key.
		--auto-attach	/* automatically attaches compatible subscriptions to this system.

	attach
		--auto		/* automatically attaches the compatible subscription.
		--pool=poolid	/* use subscriptions pool id to attach to the system.

	list
		--all		/* list all purchased subscriptions.
		--available	/* list available subscriptions which are not yet attached to the system.
		--consumed	/* list all of the subscriptions currently attached to the system.

	release
		--list		/* the available OS versions.
		--set=release	/* set the minor (Y-stream) release version to use.
		--unset		/* remove release version preference.

	refresh			/* refresh subscription data from the server.

	remove
		--pool=poolid	/* removes all subscriptions with the specifed pool id from the system.
		-all		/* remove all of the subscriptions from the system.

	unregister		/* remove the system's subscription and removes it from the subscription management service.

	/* equivalent to syspurpose command.
	role 		--set | --unset=VALUE
	service-level 	--set | --unset=VALUE
	usage 		--set | --unset=VALUE

	repos
		--list		/* list all repositories.
		--list-enabled	/* list all of the enabled repositories.
		--list-disabled /* list all of the disabled repositories.
		--enable=repo_id	/* enable the specified repo.
		--disable=repo_id	/* disabl the specified repo.


/* Set the intended purpose for this system.
syspurpose
	set-role VALUE		/* set the role property.
	unset-role VALUE	/* clear the role property.
		VALUE:
			Red Hat Enterprise Linux Server
			Red Hat Enterprise Linux Workstation
			Red Hat Enterprise Linux Computer Node

	set-sla VALUE		/* set the service level agreement property.
	unset-sla VALUE		/* clear the service lever agreement property.
		VALUE:
			Premium
			Standard
			Self-Support

	set-usage VALUE		/* set the system usage property.
	unset-usage VALUE	/* clear the system usage property.
		VALUE:
			Production
			Disaster Recovery
			Development/Test

	add-addons VALUE	/* add values to the add-ons property.
	remove-addons VALUE	/* remove values from the add-ons property.

	show			/* show the current of the system purpose property.

/* the other format of this command.
syspurpose
	set 	PROPERTY VALUE
	unset 	PROPERTY VALUE
	add 	PROPERTY VALUE
	remove 	PROPERTY VALUE
/* 这样不容易出错。 subscription-manager register --username=username --password=password --auto-attach
/* If --auto-attach doesn't work, check out the pool id of your subscription and do like below, subscription-manager register --username=username --password=password --name=desired_hostname --pool=pool_id --force
配置虚拟网络连接
/* 当 libvirtd 服务首次安装和启动后,会创建连接虚拟机的默认网络接口 virbr0。 /* 默认虚拟机都连接到命名为 default 的,使用 virbr0 的 NAT 类型的虚拟网络。 /* 四种网络模式:Routed mode,Bridged mode,Isolated mode,Open mode。