Almost every website in the world has user authentication, in this project you have to implement user authentication using the Python Flask framework for building a backend REST API and React.js and sessionStorage API for the front end web application.
Implement an authentication system with the following parts:
- Signup: The user must be able to pick its email, any password and submit the form, a new user must be created in the database and the user must be redirected to the login form afterwards.
- Login: The user fills out its email, and password and it's redirected to the private dashboard after successfull authentication.
- Validation: Any page considered "private" must always validate that the current user is valid, if not, the page must redirect the user back to login.
- Logout: Any moment the user must be able to press "logout" in the navbar, and it will get redirected back to the login path.
At least the following pages and react components must be implemented into the project:
| Path | Component | Functionality |
|---|---|---|
/signup |
<Signup> |
Renders the signup form |
/login |
<Login> |
Renders the login form |
/private |
<Private> |
Validates that only authenticated users and render this component |
Do not clone this repository because we are going to be using a different template.
We recommend opening the React.js + Flask API boilerplate using a provisioning tool like Codespaces (recommended) or Gitpod. Alternatively, you can clone it on your local computer using the git clone command.
This is the repository you need to open or clone:
https://github.com/4GeeksAcademy/react-flask-hello
👉 Please follow these steps on how to start a coding project.
💡 Important: Remember to save and upload your code to GitHub by creating a new repository, updating the remote (git remote set-url origin <your new url>), and uploading the code to your new repository using the add, commit and push commands from the git terminal.
Usually an authentication system is implemented in 4 parts:
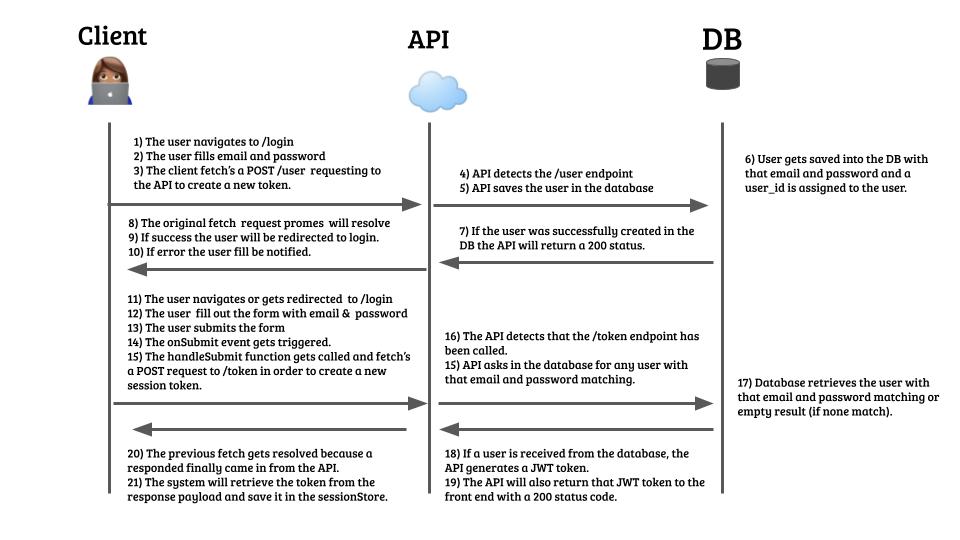
At the beginning of every application that is not users or tokens, so the first step that makes sense to build is user signup.
- The user navigates to the
/signuppath. - The React.js application (probably using the React Router library) will detect the route
/signupand match it with its corresponding React.js page component that will take care of rendering the signup HTML. - The user picks and writes an email and password and clicks submit.
- The React.js page is listening to the onSubmit event, it gets triggered and the handleSubmit function fetches the email and password to the backend Python Flask API, probably doing a
POST /tokenrequest with the email and password on the body payload.
This part of the process occurs only when new tokens have to be generated.
- The user lands in the myapplication.com/login path.
- The React.js application (probably using the React Router library) will detect the
/loginpath and match it with its corresponding React.js page component, this page will take care of rendering the login form. - The user fills out the login form and submits it.
- The page is listening (waiting) for the form submit event to trigger, and it finally triggers because the user submits the form.
- The page now retrieves the username and password information and fetch (POST) that data to the API.
- The API validates that the username and password are correct and returns a
tokenobject. - The front-end application saves that token in the sessionStorage.
- The front end application redirects to the
/private.
This process occurs when the user desires to logout.
- Normally there is a button to log out somewhere in your application.
- The user press that button and the onClick event handler is called.
- The front-end application removes the token from the sessionStorage.
- The front-end application redirects to the home page (public).
Any user can just type /private to attempt visiting a private page, that is why we need to implement a validation that prevents anonymous users to see the content of this page, and we must redirect the user to /login or any other public page. This is usually how the process goes:
- The user types any private URL, for example: myapplication.com/private
- The React.js application (probably using the React Router library) will detect the route
/privateand match it with its corresponding React.js page component that will take care of rendering the HTML. - Before rendering the HTML -and only because this is a private route- the component must verify that the sessionStorage contains the authenticated token, you normally would do that in the useEffect (component did mount) because you want to do it very early during the application loading.
- If sessionStorage 👎 does not have the token, the current user is not considered to be logged in and the component must redirect to the login view.
- If the sessionStorage 👍 does contain the token, the current user is successfully logged in and the rest of the
/privateview component is loaded.
This and many other projects are built by students as part of the 4Geeks Academy Coding Bootcamp by Alejandro Sanchez and many other contributors. Find out more about our Full Stack Developer Course, and Data Science Bootcamp.