ReportsAndTransactionSetup
 |
is brought to you by |  |
Because of the conversion from Google Code to GitHub, there are likely cross-wiki links that may be broken. Please report to support@yozons.com any errors you find in the documentation and we'll get it fixed ASAP. Thank you!
- Concepts, Tips & Tricks (Read first)
- User's Guide (Read first)
- System Administrator's Guide
- Point & Click Programming Guide
- Reports and Transaction Setup Guide (this guide)
- Point & Click Programming Integration API Guide
- Point & Click Programming Tutorial
Report templates and transaction templates are setup under the Programming tab.
Report fields are first mapped in Packages before they are added to reports. That is, you must define which fields in your package of documents can be reported on. This maps field values in documents to "report fields" that are then used in reports.
Packages must be linked to transaction templates before they can be run by users and parties.
# Transaction Templates 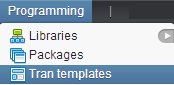Transaction templates are used to define a runnable package of documents.
Click on Programming->Tran templates to list all transactions templates available to you.
Click on a transaction template to view or configure it. To create a new transaction template, select a template or similar existing transaction template you have permission to access and click the Create like button.
- Select Production enabled if you are ready to run production-level transactions. Your package must be at the production level, and you should also ensure all components used by the package are also at the production level. When you first enable production transactions, please run a "Test Like Production" transaction to see how it works using only production-level components. Select Production disabled to prevent production transactions from starting.
- Enter a # number and Production retention value to specify how long to keep production transactions. If you select "Forever" or "Now", the number field will not be necessary. Use of "Now" makes little sense in this context. Be very careful when reducing the retention for production transactions because it will update all existing production transactions of this type to use the new value.
- Select Test enabled if you are ready to run testing-only transactions. You will then be able to run test transactions. Select Test disabled to prevent test transactions from starting.
- Enter a # number and Test retention value to specify how long to keep test transactions. If you select "Forever" or "Now", the number field will not be necessary. Use of "Now" makes little sense in this context. We recommend shorter retention values for test transactions, such as keeping them for 3 to 6 months. This will update all existing test transactions of this type to use the new retention value.
- In PathName enter the name of this transaction template. It will be displayed under the Start transaction menu item.
- In Display name put a friendly name to display for this transaction type. This name will be used in the menu display under the Start transaction option.
- In Description give a brief overview of what this transaction is.
- In Package to use select the package that will be run.
- In Branding library to use select the library to be searched first to resolve components like images/logos, property sets, To Do parties, email templates, etc. If those items are not found in the branding library, it will look in the library where the current document is defined, and then ESF/Library/Template last.
- In Comments enter any information you want to maintain about the transaction.
The transaction template has standard List, View Details, Create Like, Update and Delete permissions under Permissions to access this transaction template.
Note that a user must have at least List permission in order for it to appear in a report that the user is allowed to run. Each report includes a list of transaction templates that it covers, hence the need for List permission.
It also has special permissions related to the transactions that are specified under Permissions for transaction
- Start permission specifies who can start the transaction. Specify ESF/Group/ExternalUsers to allow non-authenticated users to start the transaction, such as from a link on your web site.
- Cancel permission specifies who can cancel a running transaction.
- Re-Activate permission specifies who can re-activate a canceled transaction.
- Suspend permission specifies who can suspend a running transaction.
- Resume permission specifies who can resume a suspended transaction.
- Use the Update API permission specifies who can use the Update API (via the /U/ path) to update an existing transaction.
On the lower left side are URLs that can be used to start a transaction of this type. The Production URL is the base URL used to start a transaction. The Test URL adds the ESFTEST=Yes parameter. And the Test like Production URL adds the ESFLIKEPRODUCTION=Yes parameter to the Test URL.
Report templates are used to define a custom report that lists data elements about and from within the package of document specified in a transaction template. You must first map data elements in the package to report fields to list them in a custom report.
Click on Programming->Report templates to list all report templates available to you.
Click on a report template to view or configure it. To create a new report template, select a template or similar existing report template you have permission to access and click the Create like button.
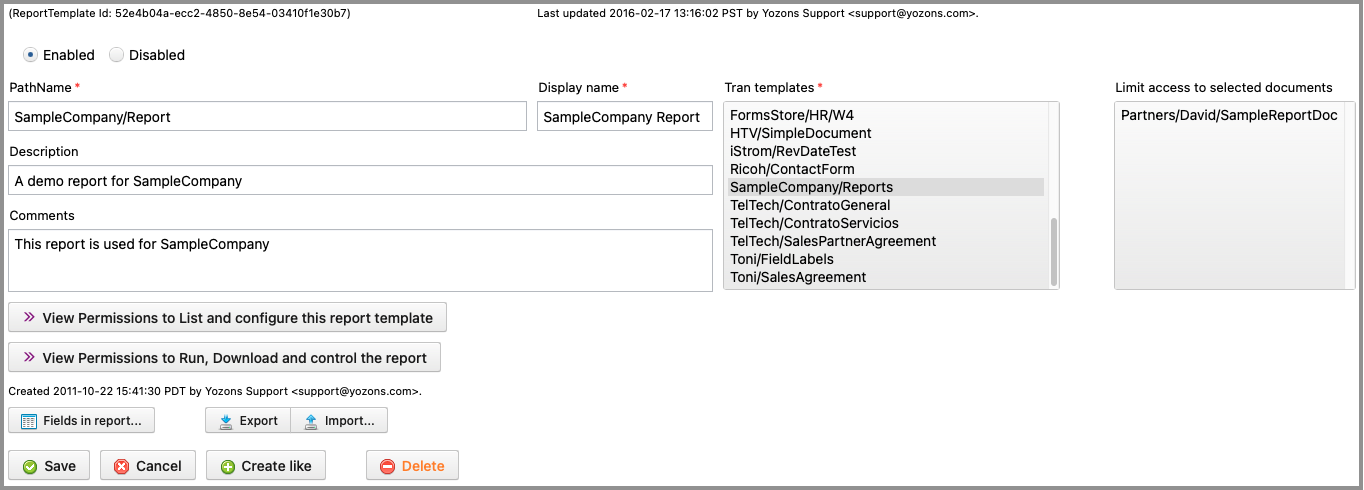
- Click Enabled to allow this report to be run. Click Disabled to prevent it from running.
- In PathName give this report template a name. The name will appear under Reports menu item.
- In Display name enter a friendly name for this report. It will be shown in the menu under Reports.
- In Description enter a short description of this report.
- In Comments enter any information you want to remember about this report.
- In Tran templates select one or more transaction types to be included this report. Of course, for the report to run as expected, the report fields must make sense across the various transaction types. Any report field that is not mapped by the transaction's package will be blank in the report. Note that a user who has permission to run this report may not report against any transaction templates listed if the user doesn't also have List permission to that transaction template.
- In Limit access to selected documents select all documents that should be made available to those running the report. By default, no limits are in place, so all documents in the selected transactions are made available. However, there may be times when a report for a particular set of users must limit access to only a subset of documents, and this allows such a limit to be configured.
The report template has standard List, View Details, Create Like, Update and Delete permissions under Permissions to access this report template.
It also has special permissions related to the reports that are specified under Permissions for reports
- Run permission specifies who can run the report. By default, users can only see test transactions they started themselves or they were a party to. Even with Run permission, a User will be limited to those transaction templates they have List permission to.
- See transactions started by external users specifies who can also see transactions started by external users.
- See transactions started by any other user specifies who can also see transactions started by any other user. Note that "any user" is limited to those users the user running the report is allowed to list.
- See transactions with any other user a party to specifies who can also see transactions in which any other user was a party. Note that "any user" is limited to those users the user running the report is allowed to list.
- See Production Transactions as well as Test specifies who can also see production transactions. By default, only Test transactions can be seen.
- Download report data in Excel or CSV format specifies who can download report data in Excel or CSV formats.
- View transaction email log specifies who can see email details about a transaction.
- View/download document snapshots specifies who can see and download document snapshots.
- View/download data and uploaded files specifies who can see and download data snapshots, which includes the data values stored in documents as well as files uploaded to a given field.
- Download complete transaction archives specifies who can download a complete transaction archive.
-
View live documents in a transaction specifies who can view "live" documents in a transaction. By default, users only are allowed to see completed documents by each party (document snapshots created as each party completes a document). A "live" view means it will render the documents as they currently are. Users with this permission will use the special
ESF_reports_accessparty to view the documents. All document access is logged in the transaction's audit trail. -
Update live documents in a transaction specifies who can update "live" documents in a transaction. By default, each party is able to update documents and fields based on their configuration when the party is active. A "live" view means it will render the documents as they currently are. Users with this permission will use the special
ESF_reports_accessparty to update the documents. All document access is logged in the transaction's audit trail. This feature is designed for transactions that are to be treated more like "records" that are updated repeatedly rather than for transactions that are processed by parties. However, it may be used to also correct data in a live transaction before subsequent parties access it. If a package doesn't define this party, one will be auto-created with view only access to all documents. You must specifically give the specialESF_reports_accessparty the ability to play an updating party in order to change any data. You may also define the party on a document to give it fine control over the fields and validation that take place for updating via the reports.
Click on the Fields in report button 
Click the Fields in report button on the report template to set up the report fields to include in the custom report.
Click on the Report field templates button 
Click on the Add report field button 
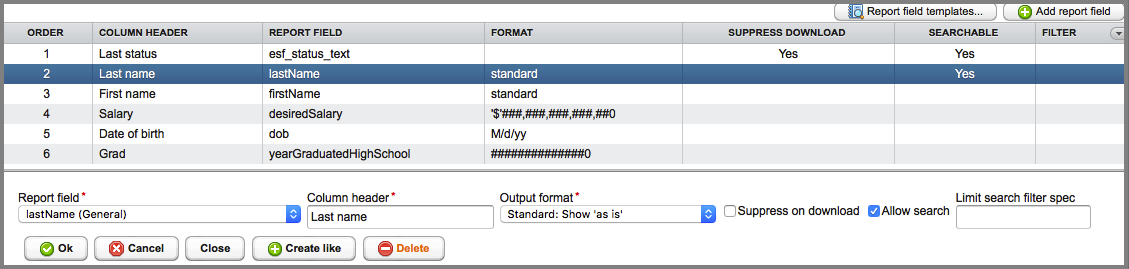
You can drag to re-order existing fields to control the order they will appear in the report.
- In Report field select a user-defined or built-in report field to show in the report. The following are the built-in fields:
- esf_cancel_timestamp is the date/time the transaction was canceled.
- esf_created_by_user is the user who started the transaction, when it's not started by an external user.
-
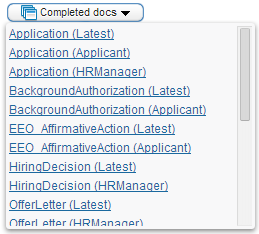
esf_download_html_selected_snapshot will produce an "Completed docs" popup button that will produce a list of completed documents (by party, or latest) that when clicked will show that HTML document.
-
esf_download_pdf_latest_snapshots will produce an "All completed docs" button that will download a PDF containing all of the latest completed documents.
-
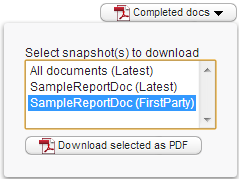
esf_download_pdf_selected_snapshots will produce a "Completed docs" dropdown button to select which completed documents and versions you want to download as a PDF.
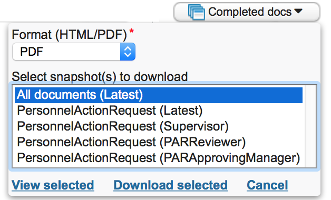
-
esf_download_selected_snapshots will produce a "Completed docs" dropdown button to select which completed documents and versions you want to view or download as a PDF or in HTML format.
- esf_expire_timestamp is the date/time the transaction is set to expire and be deleted from the system (this is set based on the transaction template's retention values).
- esf_last_updated_by_user is the user who last updated the transaction, when it's not last updated by an external user.
- esf_last_updated_timestamp is the date/time the transaction was last updated.
- esf_literal allows you to specify a fixed Literal value that will always appear in the column. This is mostly used for CSV integration with other systems where you need to provide a fixed value.
- esf_package_name is the PathName of the package referenced by the transaction.
- esf_stall_timestamp is the date/time the transaction stalled (was in progress, but had no active party or the active party has no email address or related TO DO group associated with it -- if they are currently working on it, then it may not be truly stalled), indicating a possible programming error.
- esf_start_timestamp is the date/time the transaction was started.
- esf_status is the transaction status: In progress, Canceled, Completed, or Suspended.
- esf_status_text is the transaction status description, which is typically the current document and party in the process flow.
- esf_transaction_id is the unique transaction id.
- esf_transaction_template_name is the PathName of the transaction template.
- In Column header specify the label to show in the column header for this field in the report.
- In Output format specify the format to use for the field.
- For general fields, you can select to show the entire value, or mask the leading or trailing characters and just show up to 4 of the actual characters.
- For date fields, you can select the format for the date.
- For date/time fields, you can select the format for the date/time.
- For user fields, you can select whether to display the name and/or email address of the user.
- For decimal/money fields, you can specify the format for the number.
- For integer fields, you can specify the format for the number.
- Check the Allow search box, when available, to allow for searching transactions based on the values held in this report field.

Click the Ok button to keep your changes, or click Cancel. This applies to changes to the report field specification, but also if you re-order the fields by dragging them to a new position.
Click the Close button to close the list of fields in the report window.
Click the Delete button to remove the selected report field.
Tip: To save your changes, you will want to click the Ok button on the list of fields window as well as click the Save button for the report template.
## Report field templatesClick the Report field templates button on the list of fields for a report template, or from the package's Map report fields page to modify the report field template name that is otherwise created using the same name as the document field when it is mapped to a new report field.
Report fields are shared across all reports and users so that similar data can be combined from any number of documents and produce a common report.
You cannot rename built-in fields that begin with the 'esf_' prefix.
The type of a report field is initially set based on the type of the document field being mapped. You cannot change the type unless it's a General field type, in which case you can tweak it to be 'Numbers only' (numeric) or 'Letter/numbers only' (alphanumeric). If you have existing data already mapped and you change a General type like this, you'll need to reload the transaction data from the package if you want prior report data to also have the new numbers only or letters/numbers content in your reports.

- In Type select the type of the field if it is a string type like General, Numbers only, or Letter/Numbers only.
- In EsfName you can change the name of the report field template if it's not a built-in type.
- In Label you can set the default column label for this report field template when it's added to a report.
- In Toolip you can set the default tooltip for this report field template when it's added to a report.
You are also presented with two lists that show:
- In Referenced in the following reports you can see which reports (that you have permission to list) include the selected field.
- In Package versions that map fields to this report field you can see which package versions populate this report field.
Click the Save button to keep your changes, or click Cancel.
Click the Close button to close the list of report field templates window.
Click the Delete button to remove the selected report field template if it's not listed as being in use.
While a transaction exists, parties can use their unique links (and users can access their work via the To Do queue) to access the package of documents.
If a transaction is canceled or suspended, no access is given to any party.