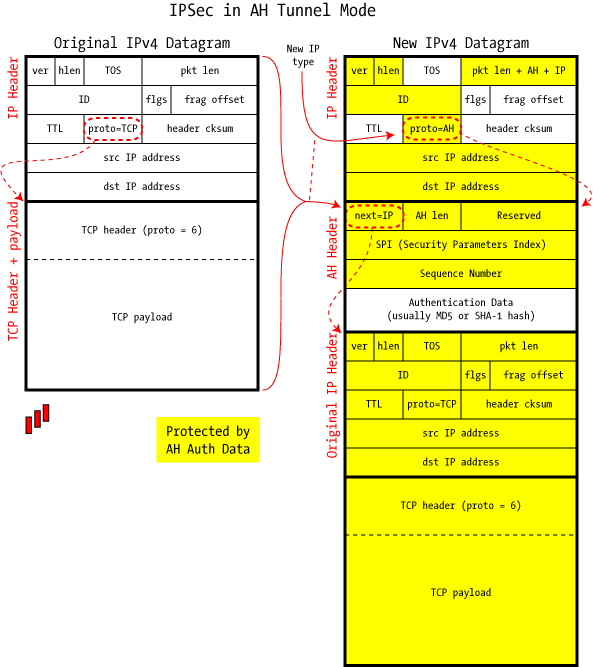
Authentication Header (AH) is used to authenticate — but not encrypt — IP traffic, serving three main purposes: verifying the identity of the communication partners, detecting any data alterations during transit, and optionally protecting against replay attacks where intercepted data is reintroduced into the network.
Authentication involves calculating a cryptographic hash-based message authentication code over most IP packet fields (excluding mutable ones like TTL or the header checksum). This code is then stored in an added AH header and sent to the recipient. The AH header, inserted between the original IP header and the payload, comprises five key fields as depicted in the below figure.
Image source and further reading: An Illustrated Guide to IPsec
This project implements an AH tunnel mode between two hosts to ensure data integrity and source authentication. By using AH, the project provides a mechanism for authentication of the origin, checks the integrity of the transmitted data, and protects against replay attacks without encrypting the data payload. This implementation is crucial for environments where data confidentiality is less critical than the assurance of data origin and integrity.
Extra reading: https://blog.jadhusan.com/ipsec-tunneling/
In the Ubuntu Machine 20.10, run following commands to setup a TUN interface called asa0.
sudo ip tuntap add dev asa0 mode tunsudo ip addr add 10.0.1.1/24 dev asa0sudo ip link set dev asa0 upip addr show
In the CentOs Machine , run following commands to setup a TUN interface called asa0.
sudo ip tuntap add dev asa0 mode tunsudo ip addr add 10.0.1.2/24 dev asa0sudo ip link set dev asa0 upip addr show
You can alternatively run the bash script on the designated machines:
- On VM1 (Ubuntu):
sudo bash setup_tun_vm1.sh - On VM2 (CentOs):
sudo bash setup_tun_vm2.sh
Basically, this Tunnel program runs in ubuntu with two NIC interface, which one is assigned a static IP Address and other one is TUN interface that works as a virtual NIC. We have to excute the same file in both the machines to work. After excuting, we will send ICMP request {ping} from Virtual NIC (asa0) on VM1 to VM2. Use the following command ping -I 10.0.1.1 10.0.1.2. The Ping will send a ICMP request from VM1 to VM2 but the asa0 has no routing therefore AH.py will capture the traffic and calculate the icv value for the packet with current configuration defined in SecurityAssociation. Then, script encapsulates the packet within new IP packet and send it to physical NIC on VM2. When the packet arrives to VM2's physical NIC, the integrity verification is done and the decapsulated packet will be written into it's virtual NIC(asa0). Then VM2's virtual NIC will send a ICMP reply to the request (ping) in the same manner.
Virtual Machines used for testing :
- Ubuntu 20.10 (VM1)
- CentOs Linux (VM2)
- Physical Interface = 192.168.100.6/24 Static Ip
- Logical Interface (asa0) = 10.0.1.1/24 Static Ip
- Physical Interface = 192.168.100.4/24 Static Ip
- Logical Interface (asa0) = 10.0.1.2/24 Static Ip
UBUNTU MACHINE
- Runing the script is simple, you must have root privelages. Run the
AH.pyfile to begin the Tunnel. - For VM1:
sudo python3 AH.py enp0s3 -dst 192.168.100.4 -key 256 -tun asa0 - For VM2:
sudo python3 AH.py enp0s3 -dst 192.168.100.6 -key 256 -tun asa0
- Must run this on both the Machine with the correct parameters.
- Requirements to run this Tunnel.
- Python 3.8.2
- Ubuntu 20.10 Virtual Machine.
- Four Interfaces with IP configured. - Dependencies.
- pip3 install scapy
- pip3 install netifaces
- pip3 install argparse


